You may be familiar with immunofluorescence (IF, often referred to as immunocytochemistry (ICC) when the sample is cultured cells or immunohistochemistry (IHC) with tissues), where an antibody binds a target protein in your sample, then a fluorescently labeled secondary antibody binds that first antibody, then you use a microscope to see where the target protein is (localization) and how much there is (quantification). But what if you’ve got several interesting protein targets and you want to know if they co-localize at the same place in the cell? Or you know that the presence of several biomarkers together in the same tissue sample predicts a certain cancer and want to look for them? Or maybe you just want to make some really beautiful images? Multiplex IF may be just what you need!
How does it work?
There are several ways to achieve multiplex IF. One of the most common approaches is to use sequential cycles of primary and secondary antibody labeling and imaging, repeating for each target. Alternatively, you can perform simultaneous detection with a mixture of primary antibodies and appropriate secondary antibodies. The general process is similar to standard immunofluorescence, but with some extra considerations (Im et al., 2019; McLaughlin, 2019).
 |
|
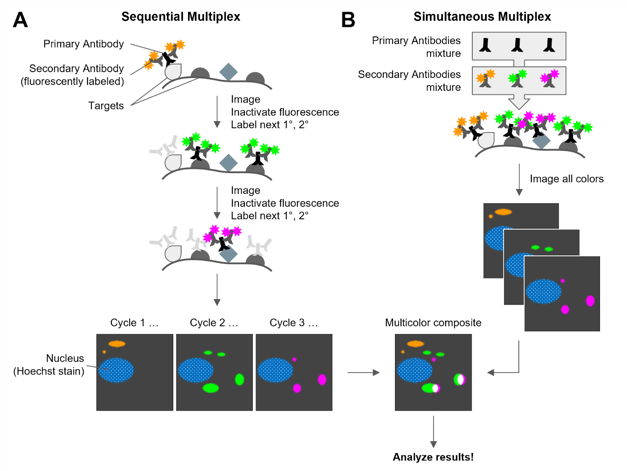
Figure 1: Schematic of multiplex immunofluorescence approaches. A) Sequential Multiplex IF, where one target is labeled and imaged at a time, inactivating the fluorescent secondary antibodies before labeling the next target. B) Simultaneous Multiplex IF, where all the primary antibodies are combined in one step and all the secondary antibodies are combined in one step. |
As with standard IF, you will need to start with a fixed sample. Depending on the sample type, this might be frozen or formalin-fixed, paraffin-embedded tissue sections, methanol- or paraformaldehyde-fixed cell samples, or other preparations.
Sequential IF
For a sequential IF experiment (Figure 1A), you’ll block, add primary antibody to bind the target, wash, add dye-conjugated secondary antibody that recognizes the primary, wash again, then image. But here’s where the “sequential” part comes in. After you image the first target, you inactivate the fluorophores in the sample, either by chemical treatment or photobleaching or by stripping out the antibodies, then start over with the next target: add the new primary, wash, add secondary, image again, inactivate, and repeat these cycles for all your targets. Of course, you’ll need to align all these images once taken. To do so, you will need to include a marker like the Hoechst stain for the nuclei. (See Brewer et al, 2022 for a sample protocol.)
Simultaneous IF
Depending on your needs, your sample, and targets, you might decide to do simultaneous IF instead (Figure 1B). To label all your targets in one step, you simply use a mixture of primary antibodies, wash, add a mixture of secondary antibodies, and image all the different colors in one session – fast and easy! Just make sure your primary antibodies are all of different species/isotypes and that each secondary has a different color fluorophore that you can image separately on your microscope. Abcam's sample protocol is a good place to get started.
One important consideration when deciding whether you can do simultaneous or sequential labeling is what conjugated secondary antibodies you have available. If the only secondary antibodies you have on hand are conjugated with the same dye (say, you have Goat Anti-Rabbit IgG and Donkey Anti-Mouse IgG both with Alexa Fluor® 488) then you can’t use them simultaneously because you won’t know which label the signal is coming from. But by labeling sequentially with one, inactivating the fluorophores, then labeling with the other, you can still record the signal separately for each target.
 |
|
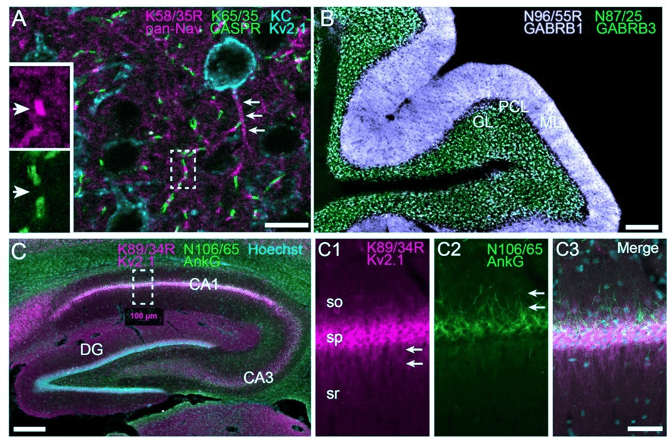
Figure 2: Examples of simultaneous multiplex IF labeling of rat brain samples from the James Trimmer Lab, using recombinant antibodies with different isotypes. (A) Neocortex labeled with anti-pan-Nav (magenta), anti-CASPR (green), and anti-Kv2.1 (cyan). (B) Cerebellum labeled with anti-GABA-AR β1 (white) and anti-GABA-AR β3 (green). (C) Hippocampus labeled with anti-Kv2.1 (magenta), anti-AnkyrinG (green), and Hoechst nuclear stain (cyan). Panels C1-C3 show magnified detail of the box in C. Image adapted from Andrews et al., 2019 under CC-BY 4.0 license. |
Selecting your antibodies
When selecting antibodies for multiplexed IF, many of the same considerations apply as for standard IF. However, there are a few specific considerations to keep in mind. Most importantly, make sure you are using primary antibodies from different species or isotypes, so that the secondary antibodies don’t cross-react. Depending on the abundance of your targets, it’s also possible to avoid secondary antibodies altogether and multiplex with direct IF, using primary antibodies that are conjugated to fluorophores. However, the primary-secondary workflow (a.k.a. indirect IF) is more flexible and efficient, since you only need a few fluorescent secondaries on hand in the lab to mix and match with primaries for whichever targets you like. Plus, indirect IF amplifies the signal since multiple secondary antibodies will bind to each primary antibody.

Look for primary antibodies that have been validated in IF applications (find IHC validated or ICC validated antibodies from Addgene), or be prepared to run some extra controls and validate the antibody yourself. If you can’t find a suitable antibody against your target protein, consider fusing a protein tag to the target and using an epitope-based strategy such as Anti-6xHis. You could also consider strategies using other types of affinity reagents like fluorescently-labeled nanobodies or scFvs.
Many, many options for fluorescently conjugated secondary antibodies are commercially available. Pick whichever combination of host and target species, isotype specificity, and dye meets your needs and budget, or you can make your own. For example, to label the rat brain sample shown in Figure 2A above, Andrews et al. used the following combination of antibodies:
|
Target (Rat) |
Primary antibody |
Secondary antibody |
|
SCN1A sodium channels |
anti-pan-Nav R-mAb K58/35R (Mouse IgG2a) |
Goat anti-mouse IgG2a |
|
CASPR |
anti-CASPR mAb K65/35 (Mouse IgG1) |
Goat anti-mouse IgG1 |
|
Kv2.1 channel |
anti-Kv2.1 KC (Rabbit IgG polyclonal) |
Goat anti-Rabbit IgG |
If you need more signal, another strategy is to use a biotinylated secondary antibody then label that with fluorescently-conjugated streptavidin to get more fluorophores per antibody, or conjugate with an enzymatic label such as horseradish peroxidase (HRP). Experiments using enzymatic labeling can be difficult to quantify accurately, but can be especially helpful to generate more signal from low abundance targets.
Analysis/Presentation
Once you’ve captured your images, various software programs will allow you to align the images of each labeled target as different color channels and analyze the results. Depending on the goal of your experiment, you might need to quantify the intensity of the different signals in a certain region or calculate a colocalization factor to assess the spatial relationship between the targets. Or, it might be sufficient to describe or classify the labeled structures visually; for example, confirming that your target protein is expressed in the hippocampus, or counting the number of puncta in each cell.
When making figures for a paper or presentation, make sure the images are accessible to all viewers. Use a colorblind-friendly color palette for display (like green-magenta-blue or orange-blue rather than red-green). Even better, show each channel in individual panels, then the multicolor overlay; this helps all viewers, especially if you have some complex patterns with several overlapping targets to interpret. Check out (Jambor et al., 2021) for more guidelines for creating clear and informative figures.
Pro-tip! If you find yourself stuck with red-green images generated automatically from the microscope software, you can always recolor them! In Fiji, for example, you’d open the offending red-green image, go to Image>Color>Replace Red with Magenta. Or you can use Color>Split Channels and then Color>Merge Channels into whatever combination of colors you like.
Controls and validation
Can’t forget the controls! The necessary control experiments will vary depending on your specific experimental design. Like selecting an antibody, some of the requirements are similar to standard IF. Here, we’ll walk you through the necessary types of controls for a multiplex experiment.
Check for non-specific interactions of the antibodies
Confirm your secondary antibody only labels sites where you expect the target to be. You can test this by preparing a sample without the primary antibody, or with a primary antibody of a different species/isotype; when you add the secondary antibody, it should get completely washed away and leave no signal. If you see lots of extra signal in these samples where you don’t expect to see it, the secondary antibody may be binding non-specifically – try optimizing your blocking and washing conditions or consider using a different antibody.
Prepare a positive control
Prepare and label a sample that expresses your target(s) at a high level, either naturally or by overexpression, for a positive control. You can also confirm the secondary works as expected by using it to label a different protein known to be abundant in your samples (with a primary antibody that has the same species and isotype as the primary antibody in your experiment).
Confirm each individual target is stained correctly
Image a set of samples where you label only one target in each. Compare these individually-labeled samples with the results of your multiplex-labeled sample to see if the localization and intensity patterns are similar between the two experiments. If not, it might be that the other antibodies are disrupting the binding of later targets, the sample is being damaged by all the handling steps, or there’s some unexpected cross-reactivity.
Keep in mind that you may need to optimize the conditions and concentrations of all the different antibodies, blocking, washing, and sample preparation steps, in order to ensure your antibodies are performing their best and that the sample is not being degraded.

Whether you’re just getting started with two or three targets or you’re pushing the limits like Addgene depositor Ronald Germain (Radtke et al., 2020 multiplexed over 65 targets!) IF is a versatile method with endless possibilities, and there are always new and improved variations you could try. We hope this post helped you start planning for your next multiplex IF experiment! If you have questions or any favorite tips and tricks, leave a comment below. Happy imaging!
References and Resources
References
Andrews, N. P., Boeckman, J. X., Manning, C. F., Nguyen, J. T., Bechtold, H., Dumitras, C., Gong, B., Nguyen, K., Van Der List, D., Murray, K. D., Engebrecht, J., & Trimmer, J. S. (2019). A toolbox of IgG subclass-switched recombinant monoclonal antibodies for enhanced multiplex immunolabeling of brain. eLife, 8, e43322. https://doi.org/10.7554/eLife.43322
Brewer, M., McDonough, L., Zhu, Y., Neumann, E., De Caestecker, M., Gutierrez, D., & Spraggins, J. (2022). Multiplex Immunofluorescence on Fresh Frozen Tissue-V2 v2. protocols.io. https://doi.org/10.17504/protocols.io.bs68nhhw
Im, K., Mareninov, S., Diaz, M. F. P., & Yong, W. H. (2019). An Introduction to Performing Immunofluorescence Staining. In W. H. Yong (Ed.), Biobanking (Vol. 1897, pp. 299–311). Springer New York. https://doi.org/10.1007/978-1-4939-8935-5_26
Jambor, H., Antonietti, A., Alicea, B., Audisio, T. L., Auer, S., Bhardwaj, V., Burgess, S. J., Ferling, I., Gazda, M. A., Hoeppner, L. H., Ilangovan, V., Lo, H., Olson, M., Mohamed, S. Y., Sarabipour, S., Varma, A., Walavalkar, K., Wissink, E. M., & Weissgerber, T. L. (2021). Creating clear and informative image-based figures for scientific publications. PLOS Biology, 19(3), e3001161. https://doi.org/10.1371/journal.pbio.3001161
McLaughlin, K. (2019). Multiplexing Immunohistochemistry. Materials and Methods, 9. https://doi.org/10.13070/mm.en.9.2846
Radtke, A. J., Kandov, E., Lowekamp, B., Speranza, E., Chu, C. J., Gola, A., Thakur, N., Shih, R., Yao, L., Yaniv, Z. R., Beuschel, R. T., Kabat, J., Croteau, J., Davis, J., Hernandez, J. M., & Germain, R. N. (2020). IBEX: A versatile multiplex optical imaging approach for deep phenotyping and spatial analysis of cells in complex tissues. Proceedings of the National Academy of Sciences, 117(52), 33455–33465. https://doi.org/10.1073/pnas.2018488117
Additional Resources on the Addgene blog
Which Fluorescence Microscopy Technique is Best for Me?
Introduction to Immunofluorescence
Resources on Addgene.org
Find recombinant antibodies available at Addgene
Protocols for Immunocytochemistry
Protocols for other antibody applications
Topics: Antibodies


Leave a Comment