Immunofluorescence (IF), is an immunoassay that brings to light the cellular world. The technique allows you to ask questions like: “Where does my protein of interest live within a cell,” “Does this disease change the architecture of my cells,” or “How does this mutation impact the types of cells found in my tissue.” It is based on the same principles as other antibody-based assays, like an ELISA or Western Blotting, but it allows you to visualize a target of interest within an intact cell, tissue, or, in some cases, a whole organism. But, as with any antibody-based technique, validation and proper experimental design are essential. In this article, we’ll go through some of the most important considerations to make when planning and performing an IF experiment.
What is immunofluorescence?
Generally speaking, IF is an application in which antibodies that have been joined to fluorescent molecules are applied to a cell or tissue sample where they bind to their targets, most commonly proteins. You can then use fluorescent microscopy to look for those fluorescent molecules, knowing that where you see fluorescence indicates your target’s location. Some other terms you might see associated with IF are immunocytochemistry (ICC) or immunohistochemistry (IHC). All three of these terms refer to the use of antibodies to visualize a target within an intact sample, a cell in the case of ICC or a tissue in the case of IHC. IF is used specifically when we visualize the antibodies using fluorescence (for some background on fluorescence, try the Introduction to Fluorescence Microscopy video from iBiology). IHC and ICC are essentially just more general terms that can also refer to assays using non-fluorescent visualization methods. Stay tuned for a future blog post to learn more about these techniques!
Direct vs. indirect immunofluorescence
There are a couple different approaches to be familiar with when talking about IF, direct and indirect. For direct IF, researchers use a single antibody to visualize their target. These antibodies are generated against a specific antigen and then conjugated with a fluorescent molecule allowing one to “directly” visualize their target. In contrast, indirect IF requires two antibodies: a primary and secondary. For indirect IF, the primary antibody targets the antigen of interest but is not attached to a fluorescent molecule, instead a secondary antibody that targets the primary is conjugated to a fluorophore (Figure 1).
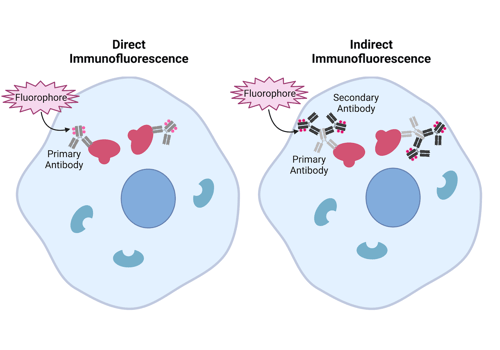 |
| Figure 1: Comparison between how direct immunofluorescence and indirect immunofluorescence work. Image created with BioRender.com |
Indirect IF is a much more common approach than direct IF, so we will focus on this technique here. One of the reasons that indirect IF is more common is that secondary antibodies are generally polyclonal, which means that multiple secondary molecules can bind to a single primary, resulting in signal amplification. Another reason is cost effectiveness. Generating and validating primary antibodies is a time consuming and expensive process. Consider the vast number of possible primary antibodies that exist and you can begin to see why generating fluorophore-conjugated versions for each primary antibody could get out of hand. Instead, it is more efficient to generate a handful of secondary antibodies that target common IgGs and then conjugate them with an array of fluorophores. It is common for labs to keep a few trusted secondary antibodies on hand to mix and match with a larger collection of primary antibodies. This strategy gives you the flexibility to target primaries produced in different species and to label targets with different colors.
Multiplex immunofluorescence
Speaking of different colors, having a palette of secondary antibodies in a few different species and colors makes it easy to perform multiplexed IF. By using multiple primary antibodies made in different species on a single sample, you can then use the corresponding secondary antibodies conjugated to distinct fluorophores to visualize multiple targets at once. An advantage of multiplexing is that you can ask how multiple proteins relate to one another in the same sample. For this strategy to work, it is important to ensure that you are using secondaries with fluorophores whose excitation/emission spectra do not overlap. Multiplexed IF can also require some additional optimization as each antibody performs differently and some antibodies impact the performance of other antibodies. But, once you do find the right protocol, multiplex IF can give you impactful and beautiful results.
Performing an immunofluorescence experiment
The process to perform IF can be broadly divided into the several steps outlined below and in Figure 2. For a deeper dive into the steps and techniques, see Im, et al. 2019.
- Fixation
- Good fixation maintains sample morphology with minimal impact to the target epitope.
- There are multiple methods for fixing samples, each with its own pros and cons.
- The method you use will depend on the target and sample type.
- Sample Preparation
- This step can involve multiple smaller steps that all help to ensure that antibodies can access their target and that you will be able to image them in the end.
- Again, the methods you use will depend on target and sample type.
- Example steps include: permeabilization, antigen retrieval, and sectioning.
- Blocking
- Block is used to reduce non-specific binding of antibodies.
- You may need to optimize the type of block used, the concentration, or the incubation time depending on your target and sample type.
- Primary Antibody
- This is the first antibody applied to your sample, which will bind to your target molecule.
- You may need to optimize the concentration and incubation time.
- Secondary Antibody
- Unsurprisingly, this is the second antibody you apply, which binds to the first antibody and is conjugated to a fluorophore.
- You may need to optimize the concentration and incubation time for this step as well.
- Preservation and Imaging
- Similar to Sample Preparation, this step can involve multiple smaller steps, but the aim is to preserve sample integrity and fluorescence and to capture your results.
- The methods used depend on the sample type, microscopy tools available, and your experimental goals.
- Example steps include: counterstaining, mounting sample on slides, and confocal
-min.png?width=700&name=Figure%202%20-%20IF%20Overview%20(1)-min.png) |
| Figure 2: High-level overview of an indirect immunofluorescence procedure with key considerations about each step. Image created with BioRender.com |
The first couple of steps are preliminary steps that are not exclusive to IF, but they can have a significant impact on the outcome of your IF experiment. Many of the details for each step depend on your antibody, target epitope, and sample type (Im, et al. 2019). To narrow down which specific methods to use, start by reading the methods sections of papers that have successfully used your particular antibodies and refer to the manufacturer’s recommendations.
As you optimize your protocol, always remember to include controls to show that your antibodies are binding specifically. For positive controls, aim to use samples that are known to express your target or have been manipulated to overexpress it. For negative controls, use samples in which the target is known to be absent naturally or in which it has been knocked-out/knocked-down. “No primary”, pre-absorption, and isotype controls are also commonly used in IF experiments. Precisely which controls you perform will depend on your experimental context.
Choosing antibodies for your assay
The antibodies you choose for your experiment will have a significant impact on the protocol you use and the ultimate outcome of your assay. So how do you choose good ones? Choosing a secondary is often much more straightforward than choosing a primary, so we’ll start there. Some of the most important considerations are to make sure your secondary 1) will recognize the species of your primary antibody and 2) is conjugated to a fluorophore that suits your experiment (i.e. the spectral properties match your available imaging instruments and the spectral properties do not overlap with any other fluorescent molecules in your sample).
When choosing a primary antibody, first, remember that antibodies recognize very specific 3-dimensional epitopes. Different sample processing steps can alter epitopes in different ways, so antibodies that work in one context may not work in another. Try to choose primary antibodies that have been validated in either IF, IHC, or ICC. The biggest difference between IF and ICC/IHC relates to the type of secondary antibody you use, so as long as the sample processing steps used in a non-fluorescent IHC/ICC assay are similar to the ones you plan to use, then the primary antibody will likely perform as expected in both.
How do you find validated antibodies? Many companies that produce and distribute antibodies validate them in a variety of applications, including IF (or IHC or ICC), and will share some of their results and corresponding protocols. Other researchers may also have tested an antibody in IF and will share their findings either through their publications or as a review on a company website. It is important to review the data and protocols available for each antibody that you consider in order to determine how reliable the antibody seems and what sort of protocol you will need to use. (To learn more about antibody validation, this commentary by Uhlen, et al. 2016 is a good place to start.)
Reviewing available antibodies can seem overwhelming, especially when there are dozens of products that all claim to target your protein of interest. Thankfully, there are a number of websites compiling antibody data that can help you compare antibodies from different companies, such as Validated Antibody Database and CiteAb. The antibody you choose can make or break your experiment, so take advantage of all the available resources and give yourself time to carefully review your options. If possible, try to select a couple of antibodies that seem promising to compare in your own lab.
Even with all of the resources available, it may still be difficult to find an antibody in which you are confident, especially if you work in an organism that is underrepresented in the biomedical research community. You may have to take some risks on antibodies. Once you have the antibodies in your lab, regardless of how “risky” they may be, it is always important to verify their performance in your hands and in your specific experiment. If you identify an antibody that performs either really well or poorly in a given context, let your community know! Sharing your experience, positive or negative, will help make antibodies more effective and reliable in the future.
We hope that this post has shed some light on immunofluorescence. The technique can provide you not only answers to your most pressing research questions, but also stunning images (am I the only one with IF results as artwork at home?). Take your time to research antibodies, protocols, and appropriate controls and you will be well on your way to performing a successful IF experiment.
References and resources
References
Im K, Mareninov S, Diaz MFP, Yong WH (2018) An Introduction to Performing Immunofluorescence Staining. In: Methods in Molecular Biology. Springer New York, pp 299–311. https://doi.org/10.1007/978-1-4939-8935-5_26
Stuurman N. (2012) Introduction to Fluorescence Microscopy. iBiology. https://www.ibiology.org/talks/fluorescence-microscopy/
Uhlen M, Bandrowski A, Carr S, Edwards A, Ellenberg J, Lundberg E, Rimm DL, Rodriguez H, Hiltke T, Snyder M, Yamamoto T (2016) A proposal for validation of antibodies. Nat Methods 13:823–827. https://doi.org/10.1038/nmeth.3995
Additional Resources on the Addgene blog
- Learn about research applications of antibodies in Introduction to Antibodies
- Learn more about fluorescence microscopy in Which Fluorescence Microscopy Techniques is Best for Me?
- Read about another common antibody application in The Basics of Western Blotting
Resources on Addgene.org
- Find plasmids encoding recombinant antibodies at Addgene
Topics: Antibodies


Leave a Comment