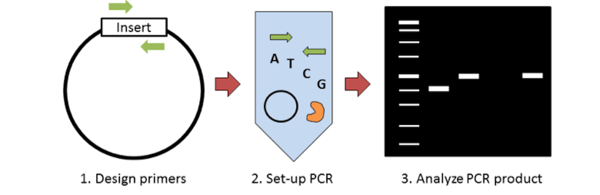
Molecular cloning requires some method of screening colonies for the presence of an insert. Traditionally this has been done with restriction enzyme digest; however colony PCR can accomplish the same thing in less time and for less money. The key steps to colony PCR are: 1) design primers to detect the presence of your insert; 2) set up a standard PCR reaction (primers, dNTPs, polymerase) using the supernatant of lysed bacteria as template; and 3) run your PCR product on a gel to analyze product size. This blog post discusses some of the key things to consider when performing colony PCR.
Designing colony PCR primers
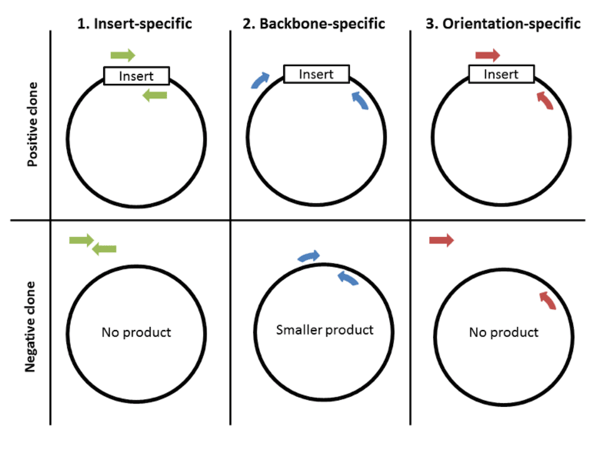
The first and perhaps most important step to colony PCR is designing primers. There are 3 strategies for primer design: 1) insert-specific primers, 2) backbone-specific primers, and 3) orientation-specific primers.
-
Insert-specific primers: Insert-specific primers are designed to anneal to an insert-specific sequence. This is a “yes or no” kind of test, with a positive clone amplifying a product and a negative clone resulting in no product. Additionally, this type of primer only tells you if your specific insert is present but not if it’s in the correct orientation or even if it’s in your plasmid backbone.
-
Backbone-specific primers: A second option is to design backbone-specific primers. These primers are designed to anneal to sites that flank the insert site. A positive clone will produce a larger size product then a negative clone without the insert. This type of primer pair can tell you if the insert is the correct size and whether it’s within your backbone. This type of primer pair is also great for screening clones created with the same backbone but that contain different inserts. When you design primers to anneal outside the cloning site, it doesn’t matter what the sequence of the insert is, allowing you to use the same primer pair to screen for the presence of many different inserts. The downside: this type of primer does not provide information about the orientation of the insert.
-
Orientation-specific primers: If you need information about insert orientation, then you might consider designing orientation-specific primers. Blunt end cloning is an example of when you might want to know the orientation of the insert. One member of this type of primer pair anneals to a sequence flanking the insert and one primer anneals to the insert. A simple way to create this type of primer pair is to mix-and-match insert-specific and back-bone specific primers.
Find Empty Backbones at Addgene
Each approach has advantages and drawbacks, which are summarized in the table below. The type of primers you use depends on your preferences. Either way, make sure to test your colony PCR primers before using them to screen colonies. The best way to do this is by using your vector with and without an insert to verify that the primers amplify the expected size PCR products.
| Primer Design | Pros | Cons |
| Insert-Specific |
|
|
| Backbone-Specific |
|
|
|
Orientation-Specific |
|
|
PCR set-up
Setting up colony PCR reactions is nearly identical to preparing a standard PCR reaction: combine template, primers, polymerase, and dNTPs and then incubate with a standard PCR thermocycling program. One key difference is the plasmid DNA must be released from the bacteria in order to serve as PCR template. Dealing with this and a few other colony PCR tips are highlighted below.
-
Preparing template: Pick a single colony with a sterile flat toothpick or pipette tip and swirl in a small amount of sterile water. Pick 3-10 colonies in total to test, depending on the number of background colonies on your no ligation control plate. The more background, the more colonies you will need to screen.
-
Saving clones for later culture: At this point, you will want to hang onto your clones for later use. There are a few ways you can do this. If you are going to complete your colony PCR analysis in the same day, you can save the leftover bacteria-water suspension and use them to start cultures of your positive clones. If you want to store your clones longer term, just streak the colonies on an LB plate. You can use this plate to start liquid cultures. Lastly, you can start small overnight liquid cultures with the clones you pick and only mini-prep the positive ones. Regardless of which method you choose, make sure to use the appropriate antibiotic for selection.
-
Lysing bacteria and setting up PCR reactions: The remaining bacteria-water suspension will serve as the template for your PCR reaction. You just need to lyse the bacteria to release the plasmid DNA by either briefly boiling the sample before use or by directly adding a small volume of the sample to the PCR reaction. The bacteria will be lysed during the initial heating step of the PCR reaction. A standard Taq polymerase is sufficient.
-
Controls: Controls can make or break an experiment. The best controls for a colony PCR are the same ones used to verify if the colony PCR primers work in the first place: the backbone vector with and without an insert. These controls are quick references you can use when you run your PCR products out on a gel to determine if the colonies contain an insert. They also serve as controls for your PCR reaction. Running a no template control PCR reaction for detecting contamination is also a good idea.
Analyzing PCR product size on a gel
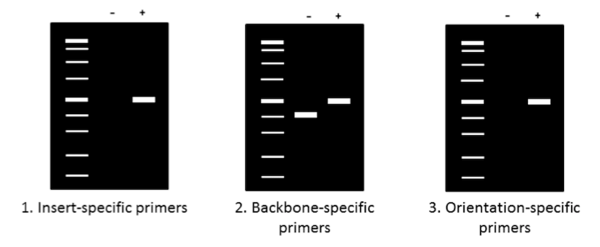
Now that your PCR is complete, it’s time to run the products on an agarose gel to determine their size. Make sure to use an appropriate molecular weight standard for reference and to add a loading dye with glycerol to your samples before pipetting them onto the gel. The figure above summarizes generalized expected results for the three primers previously described. When using insert-specific primers (1), positive clones (+) will give a band, while a negative clone (-) will not. Backbone-specific primers (2) give larger sized products for positive clones (+) compared to negative clones. Finally, orientation-specific primers (3) give the same band (+) or no band (-) result as insert-specific primers but also tell you whether the insert has the correct directionality.
Verifying the insert sequence with Sanger Sequencing
After identifying a few positive clones, the last step is to mini-prep these clones and submit the plasmids for Sanger sequencing. Sequencing allows you to confirm the sequence of the insert, insert orientation, and the sequences of the junctions between the plasmid and insert DNA. Colony PCR will greatly reduce the number of clones you’ll need to send for sequencing, but won’t tell you if your products have any mutations.
There are lots of different cloning strategies, but regardless of which is your favorite, colony PCR is a useful tool to have in your molecular biology tool kit. Consider giving it a try next time you’re screening for positive clones!

Tips and tricks from the bench
-
Don't pick too large of a colony. Too many bacteria can inhibit your PCR reaction or cause non-specific products to show up on your gel.
-
Beware of false positives. Just because you get the expected sized PCR product doesn’t mean there aren’t mutations in your insert. Make sure to submit multiple positive clones for sequencing to verify the insert sequence before proceeding with your experiment.
-
Shorter amplicons tend to be better. Shorter amplicons make for shorter PCR programs and are more likely to work in a PCR reaction that has bacterial debris.
-
Use a positive control. A good positive control is bacteria transformed with the same backbone plasmid. If this control doesn’t amplify a product, then you know there could be something wrong with the PCR setup and/or the primer design.
-
Use a negative control strain. A good negative control strain is an untransformed culture of the same strain of bacteria you used for cloning. This type of control is especially important for insert-specific primers. If your negative control amplifies a product of the expected size, you know the genome of your bacteria already contains your target sequence.

Additional Resources
Additional Resources on the Addgene Blog
- Learn to do Restriction Cloning
- Try SLIC cloning
- Learn about Gibson Assembly
Additional Resources on Addgene.org
Topics: Plasmids 101, Molecular Biology Protocols and Tips, PCR, Plasmids


Leave a Comment