If you’re cloning a plasmid, you’ll need a way to find the needle in the haystack: the one perfect clone that contains the plasmid you’re looking for out of the many cells that don’t. One way to begin the search is by using selection strategies, where only cells that have gained or lost a specific gene survive (ex: antibiotic resistance marker). In a previous blog post, we covered how to use positive and negative selection in plasmid cloning.
But oftentimes, a selection strategy is not enough on its own to help you find your desired plasmid. In many cases, you will need a screening strategy as well. In a screen, you aren’t killing off a portion of the cells like in a selection. Instead, all cells survive and you will need to sort through them to find the desired clone.
Do your selection, then screen
Why add a screen to your cloning strategy? A screen will help you more easily identify successful clones so you have to weed through fewer colonies after your experiments. As a common example, a selection will leave you with the colonies that contain your plasmid backbone, as it often relies on antibiotic resistance. But what about identifying clones that contain your desired insert? This is where a screen comes in.
Let’s take a look at All_in_one_CRISPR/Cas9_LacZ, a CRISPR gRNA plasmid from Lynne Postovit’s lab. It contains an ampicillin resistance marker in the backbone. A selection on agar containing ampicillin will yield bacteria that have taken up this vector, but it won’t tell you whether the vector contains the gRNA insert or not. A blue-white screen, however, can give you this information (more on this below). Plating the transformation on ampicillin plates containing X-gal allows you to identify cells that took up the vector and distinguish between plasmids that contain the gRNA (white) from those that do not (blue).
Let’s take a look at a few screening methods.
Blue-white screen
A widely used method of screening is the blue-white screen, which relies on the lacZ gene. lacZ encodes the enzyme 𝛽-galactosidase which can hydrolyse lactose. Fortunately, for the lab researcher, when the substrate X-gal is broken down by 𝛽-galactosidase, it turns into an insoluble blue pigment.
Find plasmids for blue-white screening at Addgene!
Some bacterial strains contain lacZ in their genome, and scientists have found that when a portion of the gene is deleted, it creates a non-functional 𝛽-galactosidase. Complementing this mutation by expressing this deleted portion, for example on a plasmid, creates a functional 𝛽-galactosidase. Blue-white screens rely on vectors where the gene of interest is inserted into the middle of the lacZ gene, thus disrupting 𝛽-galactosidase activity. These cells, presumably the cell you want, cannot break down X-gal and are white. Cells that don’t contain the insert are blue. Check out our blue-white screening blog post for more information.
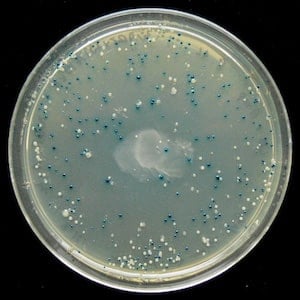 |
| Figure 1: Result of a blue-white screen. Image from Stefan Walkowski. |
Restriction digest
Another way to distinguish between colonies containing plasmids with inserts from those that do not is by using a restriction digest. The key is to be strategic about your enzyme choices. You’ll want to pick enzymes that will give you different sized bands depending on whether the plasmid contains your insert of interest or not. For example, choose enzymes that only cut once on either side of the expected insert. If the plasmid contains your insert, you will see two bands: one representing your vector backbone and the other representing the insert. If the plasmid doesn’t contain the insert, you will just see the vector backbone band. Or, you can choose an enzyme that cuts once in the plasmid backbone and another enzyme that cuts within the insert. If the plasmid contains the insert, you will see two bands but if the plasmid doesn’t, you will just see one band. These are only a few examples of how you can use restriction digest to screen your clones, but there are many other ways to choose restriction enzymes for this approach.
If you’re planning to go this route, check out our protocol video on using restriction digests to analyze plasmids, which can help you visualize this process, or visit our restriction analysis blog post.
Colony PCR
Colony PCR can detect the presence or absence of DNA using lysed bacterial colonies, without the need to prep your plasmid. In this case, you’d be using colony PCR to detect your insert, either by using primers that are specific to your insert or by using primers that are vector specific but amplify a potential insert. If you’re using insert-specific primers, you should expect a PCR product if the plasmid contains the insert and no PCR product if the plasmid does not contain the insert. If you’re using vector-specific primers, look for size differences. You can also use primers where one primer anneals to the insert and the other primer anneals to the backbone. In this case, if there is no insert in the plasmid, you won’t be able to amplify anything. Like any experiment, you’ll want the proper positive and negative controls for your PCR.
Find the details and learn more about colony PCR in this blog post.
 |
| Figure 2: The steps of colony PCR. |
Sanger sequencing
Sanger sequencing determines the precise order of nucleotides within a DNA molecule, in this case a plasmid. Sequencing is one of the surest ways to know that your insert is what you expect it to be. To get started, you will first need a primer that complements your plasmid sequence. Start with a backbone-specific primer that will sequence over the Multiple Cloning Site (MCS) and into your insert. Check out our Vector Database to find plasmid maps of the more commonly used backbones and specific primers you can use to confirm your clones. You can also find a list of popular sequencing primers in our Molecular Biology Reference.
Sometimes common primers can't provide all of the information you need, so you'll want to design a custom primer. Because Sanger sequencing can usually sequence just 1 kb of DNA, custom primers are especially helpful in verifying mutations that wouldn't be reached by sequencing from either terminus. Want to know more? Visit this blog post for tips for analyzing and troubleshooting Sanger sequencing results.
At Addgene, we now use next-generation sequencing during our QC process. This way, we can confirm the sequence of the entire plasmid. Please note that NGS verification is more time-intensive than Sanger sequencing or the other techniques mentioned above.
In molecular biology, cloning a gene into your plasmid is often a numbers game. By using a variety of screening and selection techniques, you can increase the chances of finding the correct clone.

Additional resources on the Addgene blog
- Get all the plasmid basics in our Plasmids 101 series
- Find more molecular biology protocols and tips
Resources on Addgene.org
- Learn more about Sanger sequencing
- Read the Molecular Biology Reference
Topics: Plasmids 101, Plasmid Cloning, Plasmids


Leave a Comment