In a world where so much is out of your hands, it’s helpful to focus on something controllable, like experiments (and their controls!). This blog post will discuss the ins and outs of controls for biological experiments, starting with general controls and then moving on to controls for antibody-related applications. After reading, you will have a better understanding of the different types of controls and be able to use this information to design thoughtfully and thoroughly controlled experiments.
Broadly useful controls
Positive and negative controls
Most biological experiments require positive and negative controls to ensure proper interpretation of results. A positive control is generally a sample or group that will have a desired response. For example, if you are studying the effect of a new tau protein kinase inhibitor on slowing diseases progression in an Alzheimer’s mouse model, then you could treat one group of mice, the experimental group, with the new kinase inhibitor and a second group, the positive control group, with an alternative but well-studied kinase known to prevent tau hyperphosphorylation. You could run brain samples from both groups on a western blot and look for the molecular weight shifts indicative of tau phosphorylation. By including the positive control, you will be able to confirm that the testing protocols elicited the expected response and have a baseline with which to compare the experimental group.
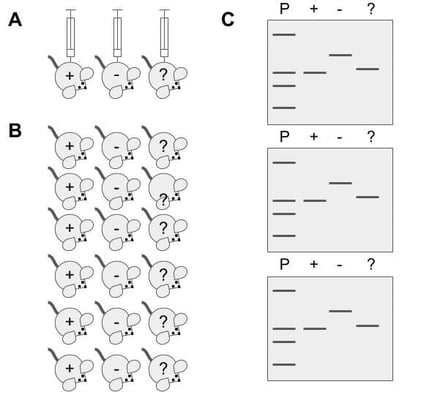
A negative control is a sample or group that is not subjected to the experimental condition. In the example above, a negative control could be a third group of mice that is subjected to the experimental protocol but does not receive either protein kinase inhibitor. Since the negative control group does not receive the drug, any response recorded would be due to natural biological variation. This information is critical for correctly interpreting experimental results.
Replicates
Replicates are another critical control in biological experiments. Replicates can be technical or biological and are included to improve the precision and accuracy and therefore the statistical power of an experiment. Technical replicates are repeated measurements of the same sample and are included to assess variability in the experimental protocol. In the experiment above, you could repeat the tau western blot several times with the same samples and compare the results across runs. If the results vary considerably, then the high degree of variability in the process could make it difficult to obtain meaningful results.
Biological replicates are distinct samples that are treated identically, used to assess naturally occurring random biological variability. If one were studying the effects of tau kinase inhibitors on mice, for example, it would be better to treat and test multiple mice with the drug rather than rely on the results of a single mouse. Biological replicates help you to determine which responses arise from drug treatment versus and which are likely just natural differences between individuals.
Recommended controls for antibody-based experiments
Primary antibody specificity
Antibody-based assays have their own unique controls that must be considered (Burry 2011). Perhaps the most critical are those that confirm primary antibody specificity. The gold standard in demonstrating primary antibody specificity is to test the primary antibody against wild-type and knockout samples. In this test, wild-type and knockout samples are treated with the identical protocols that the experimental samples undergo. If the antibody is specific, then the target signal will be present in the wild-type samples and absent in the knockout.
If knockout samples are unavailable, try substituting with knockdown approaches using siRNA or shRNA. If this alternative is not possible due to a lack of available materials, lethality of knockdown, or other factors, consider using one of the alternative, albeit less ideal, verification approaches discussed in the Antibodies 101: Validation post. The primary antibody control needs only to be run once for each primary antibody that will be used (Burry 2011). It does not need to be repeated for each experimental run as long as the protocol remains the same.
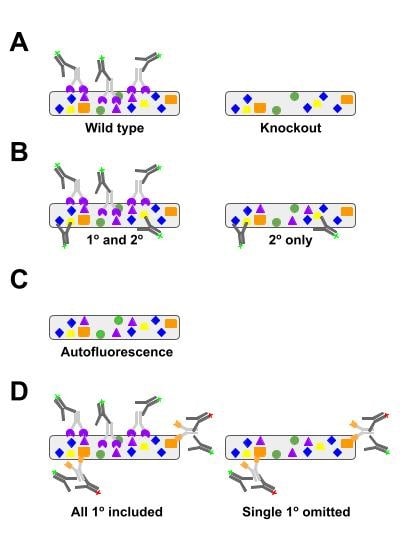 |
| Figure 2: Microscopy-based antibody experiments should include a primary antibody specificity control, secondary antibody specificity control, label control, and cross-reactivity control when multiplexing. A, wild-type and knockout samples are the gold standard to demonstrate primary antibody specificity. B, secondary antibody-only staining will allow you to see nonspecific interactions between the sample and the secondary antibody. C, a label control treats the sample to the full protocol without any antibodies to determine the level of autofluorescence in the sample. D, when using multiple primary antibodies, include controls where each primary is omitted but all secondaries included to uncover secondary antibody cross-reactivity. |
Non-specific binding
Primary antibody specificity is further supported by a pre-immune serum or isotype-specific control (Hewitt 2014, Alexander 2018). In this control, the primary antibody is replaced with pre-immune serum from the animal the antibody was produced in or an isotype-matched control antibody. This control addresses situations where a primary antibody not only binds specifically to its target through the antigen binding site but also binds non-specifically to other molecules through the interactions of other antibody structures, such as the Fc region. Fc-mediated binding interactions will be observable in preimmune serum as well as with an isotype-matched control.
|
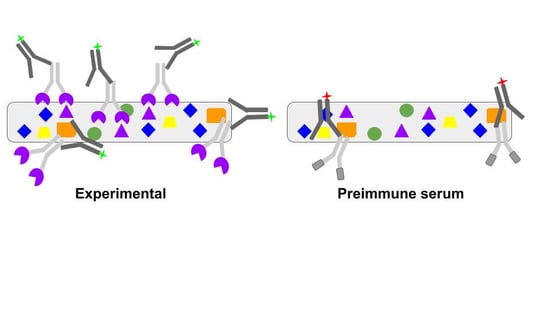
| Figure 3: A preimmune serum control addresses situations where a primary antibody not only binds specifically to its target through the antigen binding site but also binds non-specifically through the interactions of other antibody structures. In the Experimental sample, the antibody binds specifically to its desired target (purple) and nonspecifically through the Fc region (orange). The Preimmune serum control will not bind to the desired target but will bind nonspecifically through the Fc, allowing you to detect this undesirable interaction. |
When non-specific interactions are suspected, use a preadsorption control to confirm. In this method, the primary antibody is incubated with its antigen or a small epitope-containing peptide to block the antigen-binding site. The sample is then stained with the preadsorbed antibody. If a signal is detectable, it is likely due to binding interactions outside of the antigen-binding site.
Secondary antibody specificity
In indirect staining approaches, secondary antibody specificity must also be demonstrated. Secondary antibodies have a tendency to interact nonspecifically with positively charged groups, such as aldehydes in fixed samples. To address this, block positively charged groups with generally sticky proteins such as bovine serum albumin.
Secondary antibodies can also react with endogenous antibodies naturally present in the sample, for example at sites of inflammation. This tends to be most problematic when staining cells or tissues that are the same species as your primary antibody, like if you are using an anti-mouse IgG antibody in mouse tissue. Such species-on-species staining can be partially addressed with stringent staining protocols and the use of isotype-specific secondary antibodies.
Baseline secondary signaling levels
In addition to the above-mentioned safeguards, you’ll need to test the secondary antibody in the absence of the primary antibody to determine the baseline level of nonspecific secondary antibody binding. For this control, samples are prepared following the standard protocol, but the primary antibody is omitted during the incubation step. Samples are incubated with secondary antibody as usual and the signal measured. If a nonspecific signal is detected, the level of noise will determine whether it needs to be addressed. In order to correctly interpret your results, the signal from your target needs to be significantly higher than the background noise (Waters 2009). If the fluorescence from your target is extremely bright, then the noise likely will not interfere. If the fluorescence from your target is weak, then it is best to reassess the protocol and try to find a way to reduce, if not eliminate, the noise. This can be done either by modifying the blocking conditions or by substituting for a more specific secondary antibody. The secondary antibody control should be included with each experimental run (Burry 2011).
Autofluorescence
Endogenous fluorescence of the sample, or autofluorescence, also interferes with data interpretation and can be addressed with a label control. In a label control, the samples are treated with the full experimental protocol with all primary antibodies, secondary antibodies, and labels omitted. Any signal remaining is autofluorescence and should be considered in the interpretation of results. Include the label control for all new samples, protocol changes, or when high background labeling occurs (Burry 2011).
Complex experiments
Finally, additional controls may be required for more complex experiments. A multiplexed experiment, for example, requires staining with multiple primary and secondary antibodies. Ideally, secondary antibodies will be highly specific, but in some cases they may cross-react and bind to more than their target primary antibody. To address this, include a control wherein each primary antibody is individually omitted from the staining but all secondary antibodies are included. If, for instance, you omitted a mouse IgG2a isotype primary antibody but you still observe a signal from your anti-Mouse IgG2a secondary antibody, then that secondary antibody is reacting non-specifically to one of the other primary antibodies in the stain. In situations like this, you may need to find alternative primary or secondary antibodies.
Application-specific controls
Some antibody-based applications have very specific controls, which we will briefly touch on.
Western blotting
When comparing samples in different lanes in a western blot, you’ll need to include a loading control. A loading control measures the protein level of a target that is thought to be equal across all samples, such as a housekeeping protein (GAPDH or tubulin). A loading control confirms equal loading across samples and equal protein transfer from the gel to the membrane.
A loading control is critical for data interpretation, especially when changes in protein expression are the experimental readout. Always probe the loading control on the same membrane that the target protein was measured on.
Flow cytometry
In addition to the controls listed above, viability and compensation controls are recommended for flow cytometry. A viability control allows you to detect dead or dying cells so that you can base your analysis on living cells only (for example, propidium iodide only stains dead cells). Compensation controls address the spectral overlap that occurs during multiplexing. Compensation controls are single stained samples for each fluorophore and are critical to analyze multiplex flow cytometry experiments.
We hope that this blog post will be a useful starting point for you when designing rigorous experiments. While this blog touched upon some of the more critical controls for antibody-based experiments, it is by no means an exhaustive list and we encourage you to review the literature for your specific experimental technique before starting. For more information about antibodies and antibody-based experiments, check out these blog posts.
References and resources
References
- Burry, Richard W. “Controls for Immunocytochemistry.” Journal of Histochemistry & Cytochemistry, vol. 59, no. 1, SAGE Publications, Jan. 2011, pp. 6–12. Crossref, doi:10.1369/jhc.2010.956920. PubMed Central PMCID: PMC3201116.
- Hewitt, Stephen M., et al. “Controls for Immunohistochemistry.” Journal of Histochemistry & Cytochemistry, vol. 62, no. 10, SAGE Publications, July 2014, pp. 693–697. Crossref, doi:10.1369/0022155414545224. PubMed Central PMCID: PMC4212362.
- Alexander, Steve P. H., et al. “Goals and Practicalities of Immunoblotting and Immunohistochemistry: A Guide for Submission to the British Journal of Pharmacology.” British Journal of Pharmacology, vol. 175, no. 3, Wiley, 19 Jan. 2018, pp. 407–411. Crossref, doi:10.1111/bph.14112. PubMed Central PMCID: PMC5773976.
- Waters, Jennifer C. “Accuracy and Precision in Quantitative Fluorescence Microscopy.” Journal of Cell Biology, vol. 185, no. 7, Rockefeller University Press, June 2009, pp. 1135–1148. Crossref, doi:10.1083/jcb.200903097. PubMed Central PMCID: PMC2712964.
More resources on the Addgene blog
Antibodies 101: Choosing the Right Isotype
Antibodies 101: Selecting the Right Antibody
Resources on Addgene.org
Topics: Antibodies, antibodies 101


Leave a Comment