We’ve talked a lot about the quality control process at Addgene by introducing our new sequencing partner seqWell and going into detail about how we use next generation sequencing results to perform quality control on deposited plasmids. We’ve also talked about how our new Snapgene generated maps provide improved feature detection with an easy to use interface. We regularly use Snapgene for our quality control process because of its expansive feature library and useful tools. In this blog, we’ll walk you through how a scientist at Addgene uses Snapgene to confirm the sequence of a plasmid and we’ll highlight some of the new features available on our website through our Snapgene powered maps and sequence analysis tools.

The main ways we use SnapGene for plasmid quality control are:
- To identify important plasmid features
- To align NGS sequencing results with reference sequences
- To design experiments for further plasmid verification
Identifying plasmid features

While our quality control process for incoming plasmids can vary based on the contents of a plasmid, the first step is always to send prepped plasmid DNA for next generation sequencing. We then copy the contents of the resulting FASTA file into the desktop version of Snapgene to visualize the sequence and look for features. The first thing that the Snapgene software will confirm for us is whether it is a linear or circular sequence. Next, we use the “Detect Common Features” function to find and annotate promoters, selectable markers, tags, origins of replication, and fluorescent proteins that are already included in Snapgene’s extensive database.
Snapgene also provides easy visualization of open reading frames, which is often our first clue about where the gene of interest might be located. By easily using BLAST to check the translated amino acid sequence from within Snapgene, we can confirm the identity of the gene and check for any mutations.
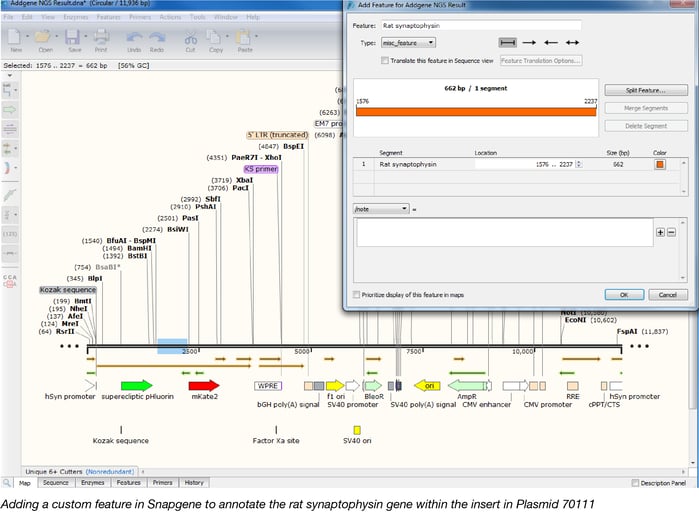
Once we identify the gene, we can easily annotate it by making a custom feature in Snapgene. This saves us time as we are often analyzing deposits with many plasmids that contain similar features and it allows you to more quickly identify the same feature in other plasmids.
Aligning sequences with Snapgene

Once we’ve identified the features within a plasmid, we next verify that our sequencing results match sequence information contributed by the depositor, published backbone sequences, and any known sequences for the insert. The Snapgene desktop software allows us to quickly align multiple sequences at the same time. This means we can easily compare and analyze any differences between our sequence results and the reference sequences.
Using Snapgene for additional verification experiments: Primer and restriction digest design
Some regions of plasmids are difficult to sequence by NGS. These can include GC-rich and repetitive regions. These regions require additional verification experiments that can be partially designed using the Snapgene desktop software.
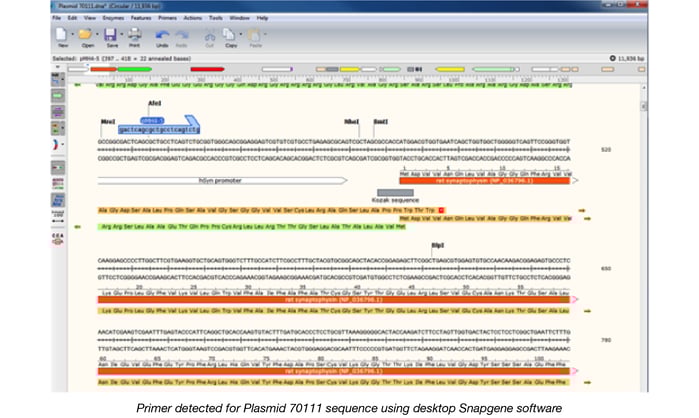
If a plasmid contains a region with a high amount of guanine and cytosine nucleotides, we might need to send it for Sanger sequencing to verify the sequence within that region. We have designed many primers for Sanger sequencing at Addgene. By using Snapgene’s “Import primers from a list” function, we can detect all of the primers we have designed that will anneal to the plasmid sequence. We can then quickly choose which primers we should use to further verify the difficult regions and send the plasmid off for Sanger sequencing.
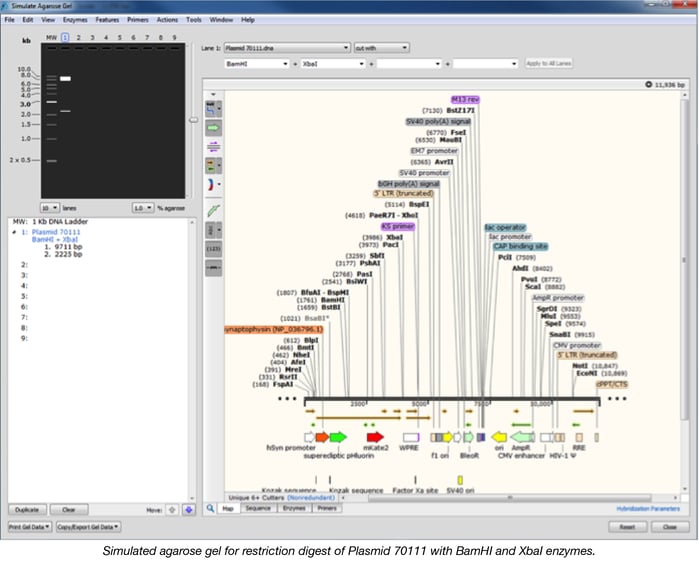
If a repetitive region is present in the plasmid, we might need to perform a restriction digest to confirm the size of the plasmid and the insert. By using the “Simulate agarose gel” option with the desktop version of Snapgene, we can predict the resulting band sizes when digesting the plasmid sequence with one or more enzymes.
Click here to learn how to run an agarose gel
We’ve worked with Snapgene to update our website and enable you to analyze sequencing results for plasmids in the repository at a glance. Our Snapgene-powered plasmid maps and sequences use the same feature detection software as the desktop version of Snapgene. When you download a Snapgene file directly from our website, you can open it with either the Snapgene viewer or Snapgene Desktop programs to analyze the sequence data in depth. You will see the same features annotated in our plasmid maps, including our most popular primers and certain restriction enzymes, but you will also be able to create custom annotations and design additional experiments like restriction digests. We’ll have a tutorial showing all of the features available on our Snapgene powered maps and sequences coming soon!
Additional Resources on the Addgene Blog
- How to verify your plasmid
- Check out our Plasmids 101 featured topic page
Additioinal Resources on Addgene.org
- Molecular Biology Reference Pages
- Basic Molecular Biology Protocols
- Diagnostic Restriction Digest Protocol

Topics: Plasmids 101, Other Plasmid Tools, Plasmids


Leave a Comment