When cloning by restriction digest and ligation, you use restriction enzymes to cut open a plasmid (backbone) and insert a linear fragment of DNA (insert) that has been cut by compatible restriction enzymes. An enzyme, DNA ligase, then covalently binds the plasmid to the new fragment thereby generating a complete, circular plasmid that can be easily maintained in a variety of biological systems. Read on for an in-depth breakdown of how to do perform restriction digests.
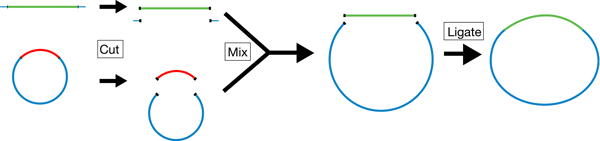 |
| Overview of the restriction cloning process. Both the plasmid (blue, backbone) and the DNA sequence of interest (green, insert) are cut with restriction enzymes to generate compatible overhangs that allow them to bind. Ligase is used to make bonds between the insert and backbone covalent. |

Before beginning the restriction digest and ligation process, you should carefully choose your backbone and insert - these both must have compatible cut sites for restriction enzymes that allow your insert to be placed into the backbone in the proper orientation. For instance, if you were cloning a gene into an expression vector, you would want the start of the gene to end up just downstream of the promoter found in the backbone. Ideally, the backbone will contain a variety of restriction enzyme cut sites (restriction sites) downstream of the promoter as part of a multiple cloning site (MCS). Having multiple sites allows you to easily orient your gene insert with respect to the promoter.
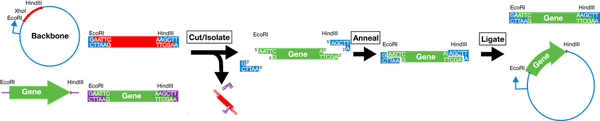
For example, let’s say your plasmid backbone looks like the one found on the left side of the image below. It has a promoter (blue arrow) followed by the restriction sites EcoRI, XhoI, and HindIII. To place your gene in the proper orientation downstream of the promoter, you can add an EcoRI site just 5’ of the start of the gene and a HindIII site just 3’ of the end of the gene. This way you can then cut the plasmid backbone as well as the insert with EcoRI and HindIII and, when you mix the cut products together, the two EcoRI digested ends will anneal and the two HindIII digested ends will anneal leaving the 5’ end of your gene just downstream of the promoter and placing the gene in the proper orientation. You then add ligase to the mixture to covalently link the backbone and insert and, PRESTO, you have a full plasmid ready to be used in your experiments.
Alternatively, this whole process can be completed using a single enzyme if your insert is flanked on both sides by that enzyme’s restriction sites, but the insert can then anneal to the backbone in either a forward or reverse orientation so you’ll need some way to verify that the insert ended up in the direction you want - usually by Sanger sequencing or further restriction digests.
Of course there’s much more detail and verification required for the process to work well, so let’s go over the details step-by-step.

1. Digestion
Set up restriction digests for your insert (or donor plasmid) and plasmid backbone. Because you lose some DNA during the gel purification step, it is important to digest plenty of starting material. We recommend 1.5-2μg of insert and 1μg of plasmid backbone. It is also critical that as much of the backbone plasmid as possible be cut with both enzymes, and therefore it is important that the digest go until completion. The time required for complete digestion varies for different enzymes. Many companies now sell fast digest enzymes that can digest large amounts of DNA in as little as 10 minutes, but check with your enzyme’s manufacturer to ensure that you’re cutting for the proper duration and using the proper conditions.
 Pro Tip!
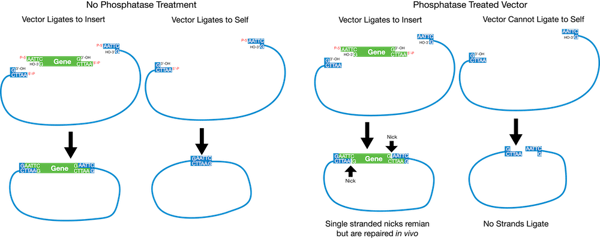
If you are going to use only one restriction enzyme, or enzymes that have compatible overhangs or no overhangs after digestion, you will need to use a phosphatase to prevent re-circularization of the backbone plasmid (see below). You should treat your digested backbone plasmid with a phosphatase prior to the ligation step or prior to the gel purification step, depending on the phosphatase you choose. CIP (calf alkaline phosphatase) or SAP (shrimp alkaline phosphatase) are commonly used. Follow the manufacturer’s instructions.
2. Isolate Your Insert and Vector by Gel Purification
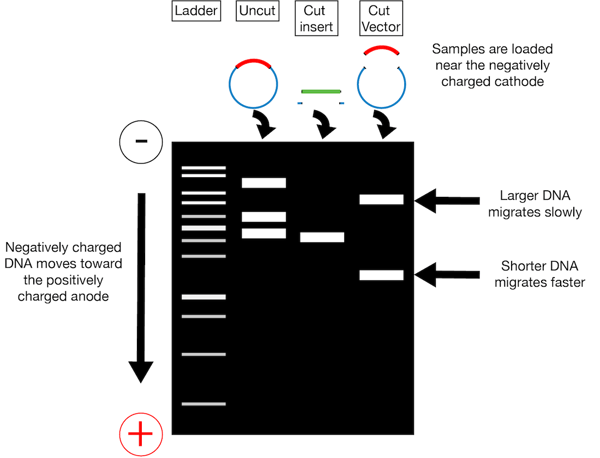
Now that you’ve cut your insert and vector, unfortunately you can’t just throw the digestion mixtures together. You need to isolate your insert and backbone from the enzymes used to digest them as well as any pieces cut out or off of them. An easy way to do this is gel purification. In gel purification, you use a voltage difference across a gel matrix (usually agarose) to pull your negatively charged DNA through the gel. As indicated in the figure on the left, your digested DNA (and undigested controls) are loaded at the top of the gel in wells positioned toward the cathode (- charge). When the voltage is applied across the gel, the DNA migrates toward the anode (+ charge). Larger fragments of linearized DNA migrate slower than smaller linearized fragments. You can separate your backbone away from any inserts cut out of it and your new insert from any overhangs cut off of it via their different migration speeds; after running the gel for some duration of time, these differently sized pieces will be in different locations and can be cut out of the gel individually.
There are a variety of ways to visualize the DNA in your gel (this table is not inclusive of all gel stains):
| Stain | Pre or Post Run? | Visualization | Sensitivity (ng DNA) |
| SYBR Safe | Pre and Post | Blue or UV Light | 0.5 |
| GelRed | Pre and Post (Post recommended) | UV Light | 0.1 |
| GelGreen | Pre and Post (Post recommended) | UV or Green (~500nm) Light | 0.1 |
| Crystal Violet | Pre and Post | Visible Light | 100 |
| Methylene Blue | Post | Visible Light | 100 |
| Ethidium Bromide | Pre and Post | UV Light | 0.5 |
For more information on these stains see the Bitesize Bio Blog and their associated manufacturers websites.
These stains require you to either stain your gel after you run your samples or add the stain as the gel is being made (post or pre run in the table above, respectively). Some of the above stains require you to visualize your DNA using UV light – please note that UV light can damage DNA and that proper personal protective equipment should be worn when visualizing using UV as it can cause damage to the eyes and skin.
When running a gel for purification purposes it is important to have nice crisp bands and to have space to cut out the bands. Because of this we recommend that you use a wide gel comb, run the gel on the slower side, and skip lanes between samples. In addition to a DNA ladder standard, it is also a good idea to run an uncut sample of each plasmid to help with troubleshooting if your digests don’t look as expected.
Once you have cut out and purified your insert and recipient plasmid backbone bands away from the gel via your favorite gel purification method, it is important to determine the concentration of recovered DNA as this will be useful for the ligation step.
3. Ligate Your Insert into Your Vector
In the ligation step, you mix your purified, cut backbone and insert in a single tube allowing the compatible overhangs generated by restriction digestion to anneal to one another and form a complete, circular plasmid. You then add DNA ligase to covalently link the fragments together at the expense of ATP (see below, covalent bonds are indicated in red).

We recommend around 100ng of total DNA in a standard ligation reaction. You ideally want a “recipient plasmid : insert ratio” of approximately 1:3. Since the number of base pairs for each varies, it is difficult to calculate this based on DNA concentration alone. One method is to conduct 2 ligations for each plasmid you are trying to create, with varying ratios of recipient plasmid to insert.
It is critical to set up a negative control ligation reaction with no insert DNA added. This will allow you to determine how many colonies you should expect in the transformation due to background re-circularization and contamination from uncut plasmid.
4. Transformation
Transform your ligation reaction into your bacterial strain of choice. Follow the manufacturer’s instructions for your competent cells.
For most standard cloning, you can transform 1-2μl of your ligation reaction into competent cells such as DH5alpha or TOP10. If using much less total DNA (<1ng) or if you are having trouble getting colonies, you might want to use higher competency cells. Additionally, if your final product is going to be very large (>10kb) you might want to use electro-competent cells instead of the more common chemically-competent cells.
You should perform, at minimum, two transformations after a ligation:
1. Control Transformation containing the ligation mixture with backbone alone;
2. Transformation containing ligation mixture with insert and backbone.
Sample results indicative of successful and unsuccessful ligations are indicated below. A successful ligation will have few colonies on the backbone alone plate and many colonies on the backbone + insert plate (or at least more colonies than the backbone alone plate). Unsuccessful ligations will usually result in few colonies on both plates (unsuccessful 1), in a vector alone plate with many more colonies than the vector + insert plate (unsuccessful 2), or roughly equivalent numbers of colonies on each plate (unsuccessful 3).

If you have a high number of colonies on your backbone plate (greater than or equivalent to backbone + insert, unsuccessful 2 and 3 above), you can try ligating the recipient plasmid alone in the presence and absence of ligase. If the colonies are a result of uncut empty plasmid, you will still have colonies when you do not add ligase. If the colonies are a result of recipient plasmid self-ligation, you will see significantly more colonies when you add ligase.
If you do not see any colonies, you should conduct a positive control to ensure that your transformation worked. You should also verify that you are plating on the appropriate antibiotic and try varying the “recipient plasmid : insert ratio” in the ligation reaction.
5. Purify the finished plasmid
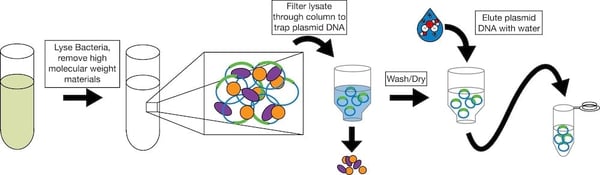
Once it looks like your ligation has worked, you will need to pick individual bacterial colonies and check them for successful ligation. Pick 3-10 colonies depending on the number of background colonies on your control plate (the more background, the more colonies you will need to pick) and grow overnight cultures for DNA purification. The simplest purification you can do is a miniprep, but if you need larger quantities of DNA, you’ll need to do a midiprep or a maxiprep. In these purifications, you generally lyse the bacteria; add chemicals to precipitate out the high molecular weight genomic DNA; filter the remaining plasmid DNA through a column that binds the plasmid DNA and lets other materials pass through; and, finally, selectively elute the plasmid DNA from the column using a particular buffer or water. See column manufacturers for more detail. Find columnless purification protocols on our website.
6. Verify the plasmid
 After purifying the DNA, conduct a diagnostic restriction digest of 100-300ng of your purified DNA with the enzymes you used for cloning. Run your digest on an agarose gel. You should see two bands, one the size of your backbone and one the size of your new insert (see right). If you used only one enzyme or used enzymes with compatible overhangs for your ligation, then you will need to verify the orientation of your insert. You may want to design a diagnostic digest for this purpose.
Ideally, once you know that your plasmid has an appropriately sized insert, you should send it for sanger sequencing using primers that will allow you to read over the insert. See our post on how to verify your plasmid for more details.
Once your complete plasmid has been verified, you’re ready to get experimenting!
Additional Resources:
- Read about Gel Stains on the BitesizeBio Blog
Additional Resources on the Addgene Blog:
- Learn How to Verify Your Plasmid
- Try Out Golden Gate or SLIC Cloning
- Read Other Plasmids 101 Posts
Resources on Addgene.org
- Find the Perfect Empty Vector for Your Cloning Experiments
- Browse Our Molecular Biology Resources

Topics: Plasmids 101, Plasmid Cloning, Plasmids


Leave a Comment