This post was contributed by Oskar Laur, head of the custom cloning core at Emory University, and Paolo Colombi, a product development scientist at Addgene.
Cloning can be quite an arduous process. The PCR could fail to produce a product, the transformation may not result in any cells, or all the colonies screened might not contain the correct plasmid. There’s a lot that can go wrong! With all the steps in the cloning process, there are also many ways to troubleshoot the cloning experiment. Here are some tips that will help you with your cloning project, and hopefully obtain your coveted plasmid with no substantial delays.
Design, design, design
Before diving into the experimental work, spend some time outlining the construction of the plasmid and all the steps you will have to take. Decide which technique you are going to adopt (i.e. restriction cloning, Gibson Assembly, Golden Gate etc.), and try to find the simplest way to do it (i.e. avoid assembling too many fragments at once, if it is possible). There are many softwares out there than can help you at this stage and that can be used to simulate in silico cloning. This will definitely help in understanding if your strategy will be successful, and to avoid easy mistakes that could affect or delay your experimental work.
Fragments generation
After you’ve designed your cloning scheme, you’re now ready to generate fragments. You can generate the parts of DNA that you want to assemble together in a combination of different ways according to your cloning strategy:
Restriction enzyme digestion
Be mindful of the restriction enzymes you chose. Make sure that enzymes that you are using are not blocked by methylation like XbaI, ClaI, etc. If you are doing multiple digestion be sure that the buffers and temperature are compatible between the different enzymes. Always check the fragments size of your digestion on an agarose gel. If the digestion does not provide the fragments of the size you expect, check the restriction pattern of the enzymes you chose, and verify that the sequence of the plasmid you are working with is correct. It's also best to use 1-2 ug of the vector for digestion.
PCR
Design primers that overlap at least 24 bp with the template and if the sequence has high GC or AT content, increase the overlapping region of the primer to 40-60 bp. It is always a good idea to perform primer optimization, especially if you are having difficulty amplifying your target sequence, or if you want to amplify sequences from a large genome organisms like mouse or human. There are several online tools that can help you with that, they can be open source (i.e. primer3) or provided by the major companies selling PCR reagents.
Nowadays commercial polymerases are very efficient, but if you are having difficulties in amplifying a template, particularly from a large genome, you can recheck your primer design or optimize your primers or PCR conditions.

Purifying DNA fragments
Once you’ve generated your DNA fragments, it is always a good habit to purify your digested fragments or PCR products from a gel. You will avoid contamination from other DNA fragments and you will remove the buffers used in the previous reactions. This will increase your chances to have a successful and ultimately faster cloning. Remember to quantify the DNA concentration of all the samples by gel or by nanodrop to assemble the fragments based on their molar ratio.
Assembly of the fragments
There are multiple ways you can assemble the different parts of a plasmid based on the cloning strategy you followed. While most of the troubleshooting regarding this step has to be strategy specific, there are few general parameters that you can adjust: temperature and time of incubation, and amount of DNA. As a general rule, try to use an excess of insert compared to the backbone plasmid; a starting point could be a molar ratio of 1:2 (plasmid:insert), but this parameter has to be optimized according to the strategy adopted, and to the specific reaction you are running.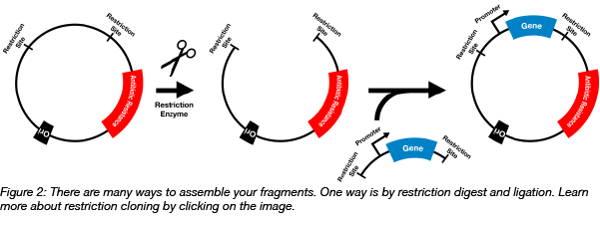
Transformation
Transform a few microliters of your ligation reaction. Here are the possible outcomes:
- No colonies. If you have no colonies, check that the antibiotic in the plate correspond to the antibiotic resistance marker present in your plasmid. You should also verify the strain and the efficacy of your competent cells (when they get old, they lose competency). If all the above is correct, you should probably have a second and more detailed look at your experimental design.
- Full lawn of cells. The antibiotic in your plate might not work. Check the plates! Streak on them an E. coli strain known to be sensitive to that antibiotic, and if the strain is growing fine, it is probably time to prepare new plates with a fresh stock of antibiotic.
- Many small colonies surrounding big colonies. You probably left your plate for too long in the incubator. The small colonies are called satellite colonies and they form when all the antibiotic has been used. Don’t worry too much, just pick the big colony and you are safe!
Colony screening
Pick a few colonies (5-10) and grow them in a small culture volume (2 or 3 ml) containing the corresponding antibiotic, extract the plasmid, and analyze it using the following steps:
- Do a single or double digest to be sure that the plasmid is the correct expected size and contains the correct insert
- Sequence the regions that have been amplified by PCR, putting special attention in the areas of ligation between the different fragments
If you don’t get any positive clone, try transforming the ligation mix in different bacterial strains (stbl2, NEB stable, etc.), and/or use a different temperature (30°C) for the growth on plates and in liquid culture. If you don’t get any positive clone after these steps, you might want to reconsider your approach, and try a different cloning strategy.
Once you've identified potential clones after the screening, sequence the plasmid. Many vectors contain sequences that are complementary to standard sequencing primers. If not, design primers to sequence your insert. When you get your sequencing results back, you can use the chromatogram to spot whether any discrepancies between your sequencing result and the expected result is due to a PCR mistake or a mistake by the DNA analysis software.
Now that you've read our plasmid troubleshooting guide, you hopefully have some new strategies to tackle that tricky cloning project. Good luck with your experiment!
Many thanks to our guest blogger Oskar Laur from Emory University.
 Oskar Laur, PhD runs Emory University DNA Custom Cloning Service since 2009. He has developed a proprietary, low cost cloning protocol that he has used for cloning of more than 10,000 DNA custom constructs. His work was acknowledged in hundreds of publications including Cell, Nature, and other journals.
 Paolo Colombi is currently the product development scientist at Addgene. In the lab he develops new assays and processes. Outside the lab, he enjoy the outdoor in all the possible aspects.
Additional Resources on the Addgene Blog
- Browse our Plasmids 101 blog posts
- Read blog posts on plasmid cloning
- Read about different plasmid elements
Resources on Addgene.org
Topics: Plasmid Cloning, Plasmids


Leave a Comment