This post was contributed by Doug Richardson, Director of the Harvard Center for Biological Imaging and a Lecturer on Molecular and Cellular Biology at Harvard University.
No matter whether you are a sports photographer at the Super Bowl, a medical technologist taking an x-ray, or a biologist imaging the smallest structures of life; the key to a great image is contrast. The human visual system relies primarily on contrast to identify individual objects and perceive the world around us. Without contrast, objects simply vanish into noise.
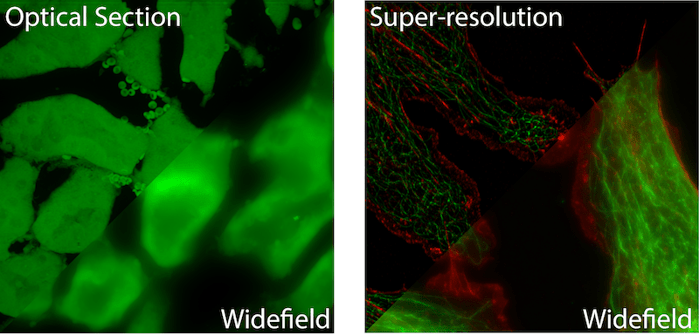
Due to its unrivaled contrast, fluorescence imaging has emerged as the dominant light microscopy contrast technique in modern biology (1). When performed correctly, fluorescence microscopy provides a high contrast image in which a bright signal overlays a perfectly black background. In addition to this, the use of multiple fluorophores can add a second layer of contrast, color contrast, to an image and thereby provide molecular or structural specificity to the viewer. Finally, modern microscope designs may further exploit the unique characteristics of fluorophores to block out of focus fluorescence from reaching a detector or restricting fluorescence to specific excitation volumes to enhance spatial contrast (i.e. optical sectioning (2) or super-resolution (3).

Fluorescence microscopy techniques
Fluorescent Widefield Microscopy
Fluorescent Widefield Microscopy is the most common and simplest form of fluorescent microscopy. Collimated (non-converging or diverging) excitation light exits the microscope objective evenly illuminating the entire (wide) field of view. Fluorescent light traveling back towards the objective is collected and focused onto a camera for visualization. Illuminating a sample in the opposite direction to fluorescence collection is referred to as “Epi” illumination. Therefore these are sometimes call Epi-fluorescence microscopes. (See left image above for an example image).
Point Scanning Confocal Microscopy
Point Scanning Confocal Microscopy was the first fluorescence microscopy technique to incorporate optical sectioning. Optical sectioning refers to the ability to extract light from a single, thin plane within a relatively thicker three dimensional sample (see Figure 1); similar to an MRI or CT scanner. This is accomplished by focusing excitation light to a point in the sample and raster scanning the point to build up a final image pixel by pixel. The collected fluorescent light passes through a pinhole before reaching the detector. The pinhole is specifically placed to only allow light from the focal plane to reach the detector and all light from above or below is excluded.
Parallelized Confocal Microscopy (Spinning Disk)
Parallelized Confocal Microscopy (Spinning Disk) increases the speed at which a confocal image can be acquired. Assembling an image pixel by pixel is slow; therefore, certain confocal microscopes use parallelization to enhance performance. In spinning disk microscopy, a metal disk containing a number of holes rotates through the excitation light path. Each hole corresponds to a different location in the sample. As more than one hole is illuminated at a time, the image can be acquired more quickly.
2-Photon Microscopy
2-Photon Microscopy attempts to solve two drawbacks of widefield and confocal microscopy. First, widefield and confocal microscopy project excitation light through the entire axial volume of a sample. Therefore, when a large number of optical slices are acquired all fluorophores throughout the sample are constantly exposed to light, not just those in the focal volume. This leads to more rapid photobleaching and a reduction in signal intensity. 2-Photon microscopes restrict excitation (and bleaching) to a single focal point. This is accomplished by using, for example, red light instead of blue to excite a molecule of GFP. Because red light has approximately half the energy of blue light, two photons of red light are needed to excite GFP compared to only one of blue. Only at the focal point of the objective can a a high enough density of red-photons be establish for this to happen.
Using red light has a second advantage: red light penetrates deeper into biological tissue. To prove this, simply hold a flash light to the palm of your hand. Although white light is entering your hand, only orange/red light can be seen exiting through the tissue. Therefore, 2-photon allows for deeper imaging into thick tissues.
Light Sheet Microscopy
Light Sheet Microscopy typically utilizes a configuration of two or more objectives to create a thin sheet of excitation light that propagates perpendicular to an imaging objective that collects fluorescence. Like 2-photon microscopy, only a single focal plane of the sample is excited at one time, limiting photobleaching. Similar to widefield, the entire field of view is excited at one time and captured in a single camera exposure. This is much faster than relying on raster scanning as is done in confocal or 2-photon microscopes.
Total Internal Reflection Microscopy (TIRF)
Total Internal Reflection Microscopy (TIRF) is a technique used to only excite a very thin layer of fluorescent molecules sitting right next to the coverslip. Light is projected through the coverslip at an angle such that when it reaches the interface between the glass coverslip and a sample in aqueous buffer it is completely reflected. This reflection occurs due to the refractive index mismatch between the glass and the water-like buffer the sample is immersed in. Although the excitation light is completely reflected, energy is propagated into the sample via an evanescent wave that only excites fluorophores within a few hundred nanometers of the glass/water interface.
Super resolution microscopy
Super Resolution Microscopy allows for imaging below the diffraction (resolution) limit of a light microscope. Due to the wave nature of light, an infinitely small point of light will blur to a 200-300nm sized spot while passing through the optics of a microscope before it reaches the detector. This means that two or more objects lying within the diffraction limit will appear as one object in the final image. Over the past two decades a number of techniques have been developed that allow for sub-diffraction limit imaging. Most often, these techniques provide a 2-10x improvement in the resolution of a light microscope (see Figure 1).
 What microscopy technique should I use for my experiment?
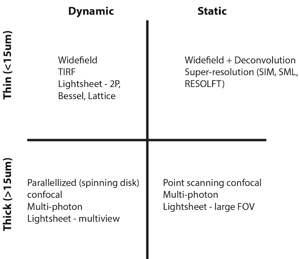
When I am contemplating which microscope to use for a new sample I always start by asking two questions:
1) Is the sample dynamic or static?
2) Is the sample thin (< 15 μm) or thick?
These questions will place each sample into one of four categories that are each suited to different types of modern day fluorescence microscopes (see Table 1).
Thin dynamic samples
Ex: monolayers of live cells with fluorescently labelled, motile structures
These samples are thin enough to sit within the depth of field of the objective (the distance in the axial dimension that will appear in focus). This means that the images will appear sharp without interference from blurry out-of-focus light. The most difficult characteristic to capture in these types of samples is their fast movements. Depending on the sample, a temporal resolution on the millisecond scale may be needed. Most commonly these experiments are performed on a fluorescent widefield microscope. Here, excitation light is projected from the objective so that the entire field of view is bathed with an even illumination. The emitted fluorescence from all dye molecules in the sample is then collected and projected back to a fast, sensitive detector such as a scientific CMOS camera.
If plasma membrane dynamics are the main focus of the experiment, a Total Internal Reflection Fluorescence (TIRF) microscope can be used. TIRF only excites fluorophores within a few hundred nanometers of the coverslip (4). Essentially, an optical section is achieved that boosts contrast by filtering out emission light from fluorophores higher in the sample. TIRF is also very gentle on the sample as the majority of the laser light is reflected away from the sample and excitation occurs through the fluorophore’s interaction with an evanescent energy field.
Lightsheet microscopes that project ultra-thin sheets of excitation light through multiple focal planes of a sample may also be useful for providing fast imaging along with optical sectioning (5). One such example is the lattice lightsheet that projects a number of thin cone-shaped beams into the sample. These beams interfere to form a single plane of excitation light that is thinner than the portion of the sample that is in focus. This technique can be used to provide high 3D spatial resolution while also avoiding the toxic effects of high light doses to the cells.
Thin static samples
Ex: Fixed monolayers of cells or thin (<15 μm) tissue sections and 3D cultures
These samples do not necessarily require optical sectioning, but open the door to a number of other techniques that can improve contrast and resolution due to the lack of a requirement for high temporal imaging speeds. Standard fluorescence widefield microscopy can be combined with deconvolution, a mathematical software post-processing step that reassigns out of focus light to its respective focal plane. In sufficiently thin samples, deconvolution can outperform optical sectioning techniques due to a higher photon flux via the more efficient camera detector and lack of a light-reducing pinhole. By collecting more photons, a higher signal to noise ratio can be achieved (6).
Super-resolution techniques such as Structured Illumination (SIM), Single Molecule Localization (PALM/STORM), or Reversible Saturable Optical Linear Fluorescence Transitions (RESOLFT/STED) also excel on these types of samples. Prior to the advent of super-resolution imaging, the light microscope was limited in its capacity to resolve closely lying structures. This is because light that passes through the optics of a light microscope is diffracted. Even an infinitely small point of light – think of a single GFP molecule – will appear as a fuzzy 200-300 nm spot when imaged. Super-resolution microscopy uses a number of optical and chemical ‘tricks’ to turn subsets of fluorescent molecules on and off. This can provide a 2-10 fold increase in resolution, down to 10s of nanometers.
Thick dynamic samples
Ex: 3D cell cultures, small model embryos >15 μm
Thsee are some of the most challenging samples to image as they require both optical sectioning, imaging over large distances and high temporal resolution. Traditionally, this type of sample is imaged with a parallelized confocal technique such as spinning disk confocal. However, due to the scattering nature of biological tissue, imaging more than 80-100 um in depth may not be possible. Therefore, 2-photon microscopy which relies on deeply penetrating infra-red excitation light can push imaging depths closer to 1 mm. Traditionally, 2-photon has been a very slow imaging technique but recent advances in scanner technology and parallelization (7) have allowed for real-time monitoring of neuronal activity across substantial 3D volumes.
In addition to 2-photon microscopy, lightsheet microscopy is rapidly becoming the preferred technique for many of these samples due to its fast temporal resolution and decreased phototoxicity. Lightsheet designs that allow for multi-view imaging can image thick scattering samples in their entirety, something that is not possible via traditional confocal due to limitations in light penetration mentioned above (5).
Thick static samples
Ex: Fixed tissue sections (> 15 um), 3D cultures, and cleared tissues
These samples always require some form of optical sectioning. Point scanning confocal microscopes (see above) often provide the highest quality images for this type of sample as they are most efficient at excluding out of focus light. However, they also continually dose the sample from top to bottom with excitation light which can lead to photobleaching when acquiring multiple images over a large axial range. 2-photon imaging, which restricts excitation and photobleaching to the focal plane can be used to overcome this (8).
The recent development of tissue clearing techniques (9) now allows researchers to image tissues that are over a cm3 in size. Point scanning confocal and 2-photon microscopes which rely on building an entire image pixel by pixel are unable to provide the frame-rates necessary for imaging tissues of this size. For example, it could take nearly two months to image an entire mouse brain with a 20x/1.0NA objective with proper sampling. Therefore, large, cleared tissues need to be imaged via Lightsheet microscopy. Although not all lightsheet microscopes can cover samples of this size, those that can will completely image large tissues in a few hours.
Although the modern explosion in light microscopy techniques has provided biologists with a host of tools and opened doors to many great insights, it can be overwhelming to a novice microscopist. Hopefully this brief synopsis can help point you in the right direction. You certainly shouldn’t be afraid to seek out expertise from a well-established microscopist at your institution when heading into a new set of experiments.
Many thanks to our guest blogger, Doug Richardson!
 Doug Richardson is the Director of the Harvard Center for Biological Imaging and a Lecturer on Molecular and Cellular Biology at Harvard University.
Additional Resources Online
- Microscopy Primer on the Molecular Expressions Website
- Other major microscopy manufacturers have similar information
References
1. Lichtman JW, Conchello JA. Fluorescence microscopy. Nature methods 2, 910-919 (2005). PubMed PMID: 16299476.
2. Conchello JA, Lichtman JW. Optical sectioning microscopy. Nature methods 2, 920-931 (2005). PubMed PMID: 16299477.
3. Eggeling C, Willig KI, Sahl SJ, Hell SW. Lens-based fluorescence nanoscopy. Quarterly reviews of biophysics 48, 178-243 (2015). PubMed PMID: 25998828.
4. Axelrod D. Total internal reflection fluorescence microscopy in cell biology. Methods Enzymol 361, 1-33 (2003). PubMed PMID: 12624904.
5. Power RM, Huisken J. A guide to light-sheet fluorescence microscopy for multiscale imaging. Nature methods 14, 360-373 (2017). PubMed PMID: 28362435.
6. Pawley JB. Handbook of biological confocal microscopy, 3rd edn. Springer (2006).
7. Yang, Weijian, and Rafael Yuste. In vivo imaging of neural activity. Nature Methods 14.4 (2017): 349-359. PubMed PMID: 28362436.
8. Helmchen F, Denk W. Deep tissue two-photon microscopy. Nature methods 2, 932-940 (2005). PubMed PMID: 16299478.
9. Richardson DS, Lichtman JW. Clarifying Tissue Clearing. Cell 162, 246-257 (2015). PubMed PMID: 26186186.
Additional Resouces on the Addgene Blog
- Lightsheet Microscopy
- Choosing Your Fluorescent Proteins for Multi-Color Imaging
- Choose the Brightest Fluorescent Protein for Your Experiments
Resources on Addgene.org
- Browse Our Fluorescent Protein Resources
- Find Empty Fluorescent Protein Backbones
- Find Plasmids for Optogenetics
Topics: Fluorescent Proteins, Fluorescent Imaging


Leave a Comment