Antibodies are used in many different experiments that require scientists to detect proteins in their samples. One technique that relies heavily on antibodies is ELISA, which stands for Enzyme-linked Immunosorbent Assay. ELISA are used to detect proteins within a 96- or 384-well, flat-bottomed plate. The basic principle of an ELISA is that any antigen within a sample adheres to the well (either directly or by binding to an antibody that is coating the bottom of the well), and then its concentration is detected through visualization of an enzymatic reaction.
Types of ELISA
There are four different types of ELISAs, which differ in the way the antigen is detected. These are sandwich, competitive, direct, and indirect. Sandwich and competitive ELISA use antibodies coating the wells to capture antigen from a sample, whereas antigen is bound directly to the wells in a direct and indirect ELISA.
Sandwich ELISA
Most commercially available ELISA kits are for a sandwich ELISA. This technique works by first coating the wells of a flat bottomed plate with a capture antibody that is specific to the protein you are interested in detecting in your sample. When an ELISA kit is ordered, the wells are typically already coated with the antibody. Then, you add your sample to the wells, and the antibodies bind to your protein of interest.
The next step is to detect the protein-antibody pair. In a sandwich ELISA, the first step of this process is the addition of a detection antibody (typically a monoclonal antibody) that also recognizes the same target protein. The capture antibody and the detection antibody recognize different epitopes on the target protein, so they do not compete with each other. This antibody is also conjugated to another molecule, such as biotin. Next, a conjugated substrate is added to the wells. In the case where the detection antibody is biotin-conjugated, streptavidin (which has a high affinity for binding biotin), is conjugated to the enzyme horseradish peroxidase (HRP). Finally, the substrate of HRP is added to the wells. This reaction produces a colorimetric reaction that reflects the concentration of your target protein in each well. The reaction is stopped by the addition of hydrochloric acid (for more details on this, see below).
The sandwich ELISA is best used to detect proteins for which multiple antibodies that recognize different epitopes are available; this type of ELISA is extremely specific and sensitive to the target protein due to the use of multiple antibodies.
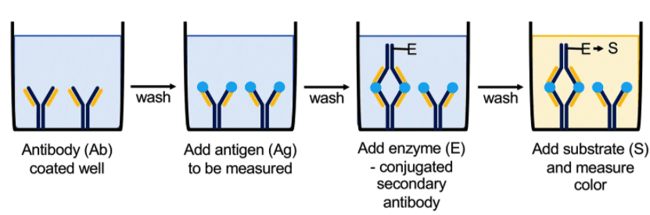 |
| Figure 1: Overview of using Sandwich ELISA to quantitatively measure protein concentration or antibody specificity via a colorimetric reaction. Image from Boguszewska et al., 2019. |
Competitive ELISA
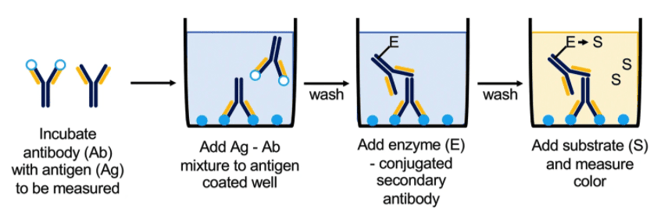
Similar to a sandwich ELISA, the competitive ELISA is also used to detect a single protein within a mixed sample. However, in this case your protein of interest is pre-incubated with a known amount of an antibody that recognizes it, while the bottom of the wells are coated with another protein — known as a reference antigen — that can also bind to that antibody. Then, the protein-antigen mixture is added to the wells. Any free antibody (meaning it hasn’t bound to your protein of interest) will bind to the competing antigen in the wells while the protein-antigen complexes will be washed away during the protocol. The amount of antibody that binds in the well is an inverse measure of the amount of your protein of interest in the original sample.
The competitive ELISA is best used for detecting antigens that are too small to be captured between two antibodies in a sandwich ELISA.
While the most common type of competitive ELISA is a modification of the sandwich ELISA as described here, the direct and indirect ELISA (more details below) can also be adapted to a competitive format.
|
|
| Figure 2: Overview of using Competitive ELISA to quantitatively measure protein concentration or antibody specificity via a colorimetric reaction. Image from Boguszewska et al., 2019. |
Direct ELISA
In a direct ELISA, purified proteins or the experimental sample are bound to the wells of a plate instead of an antibody. Coating the wells with a purified protein allows you to characterize properties of an antibody that recognizes that protein, while coating the wells with an experimental sample allows for detecting one protein from the sample. A direct ELISA has many fewer steps than a sandwich or competitive ELISA because the protein of interest is then detected by an enzyme-conjugated antibody. Next, its substrate is added and the reaction can be visualized via a colorimetric reaction.
The direct ELISA is often used when there is only one antibody available for your antigen as the other types of ELISAs require two different antibodies. As mentioned above, it can also be used to characterize antibodies against the antigen bound to the plate.
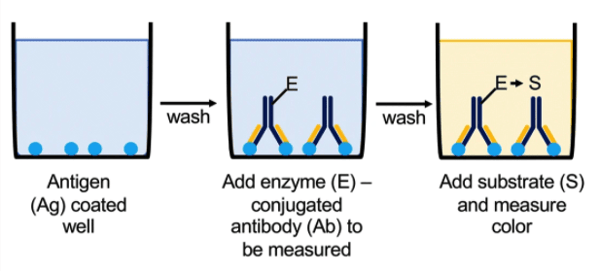 |
| Figure 3: Overview of using Direct ELISA to quantitatively measure protein concentration or antibody specificity via a colorimetric reaction. Image from Boguszewska et al., 2019. |
Indirect ELISA
The indirect ELISA is very similar to a direct ELISA, aside from the detection step. Similarly, the protein antigen is coated onto the wells of the plate. However, instead of detecting your protein using an enzyme-conjugated antibody, a primary-secondary pair is used. This amplifies the signal as multiple secondary antibodies can bind to a single primary antibody. The secondary antibody is conjugated to an enzyme for visualization.
The indirect ELISA is used for similar experiments as the direct ELISA, the only difference being the additional amplification step, which helps to visualize low-abundance proteins.
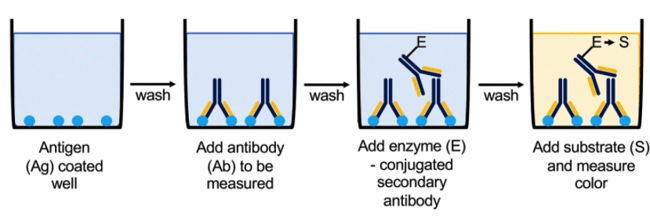 |
| Figure 4: Overview of using Indirect ELISA to quantitatively measure protein concentration or antibody specificity via a colorimetric reaction. Image from Boguszewska et al., 2019. |
Detecting the concentration of proteins in an ELISA well
As mentioned above, the measurement of the concentration of proteins in an ELISA well is based on a colorimetric reaction. Most commonly, this is a blue reaction that results from the reaction of HRP with its substrate, 3,3′,5,5′-Tetramethylbenzidine (TMB). The addition of hydrochloric acid, which stops the reaction, turns the solution yellow. The absorbance of each well, which is measured using a microplate reader, is directly proportional to the amount of enzyme present in the well and is used to calculate the amount of your protein of interest that is present.
Using a Standard Curve
To do that calculation, you’ll need to include a standard curve in your experiment. These are wells on the same ELISA plate that include known concentrations of your protein of interest. The optical density (OD) - the measure of light absorbed by a solution - of these wells is plotted against the known protein concentration. Importantly, you’ll want a portion of your standard curve to plot to a linear equation (remember y = mx+b?).
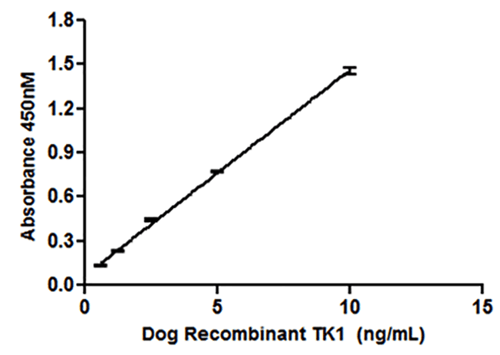 |
| Figure 5: A standard curve is generated by plotting OD against known concentrations of your target protein. The OD of experimental samples can then be plotted along this line to calculate the protein concentration. Image from Jagarlamudi et al., 2015. |
The maximum OD that most microplate readers can detect is 4.0, so if you max out your standard curve and it reaches an asymptote, you won’t be able to accurately calculate the protein concentration of any experimental wells in that range of optical densities. If your standard curve does not have a linear portion or the OD of your experimental samples has reached 4.0, you can resolve this issue when you repeat the experiment by diluting your standard curve, performing a serial dilution of your experimental sample, and/or stopping the HRP-TMB reaction more quickly. Just make sure to incorporate the dilution factor in your calculation from OD to protein concentration if that’s the option you choose. Once you’ve identified the linear portion of your standard curve, you can calculate the concentration of protein in the experimental wells based on the equation of the line.
With these tips in mind, you’ll be prepared to run an ELISA in your lab!
References and resources
References
Boguszewska, K., Szewczuk, M., Urbaniak, S. et al. Review: immunoassays in DNA damage and instability detection. Cell. Mol. Life Sci. 76, 4689–4704 (2019). https://doi.org/10.1007/s00018-019-03239-6
Additional resources on the Addgene blog
- Learn about the advantages and disadvantages of using monoclonal antibodies.
- Read about other techniques that you can use antibodies for in our Intro to Antibodies post
Resources on Addgene.org
- Browse Addgene’s Antibodies plasmid collection
Topics: Antibodies


Leave a Comment