You’ve gotten the plasmid encoding your protein of interest from Addgene, transfected it into your target cells, now what? How can you tell if the protein you are so keen to study is expressing in your cells? Immunoblotting or simply the western blot, or western, is one of the simplest methods to detect the presence or absence of a protein (Renart et al., 1979, Towbin et al., 1979, Burnett et al., 1981).
Introduction to western blotting
In a western, proteins are:
(1) separated by size,
(2) transferred to a membrane, and
(3) detected using antibodies.
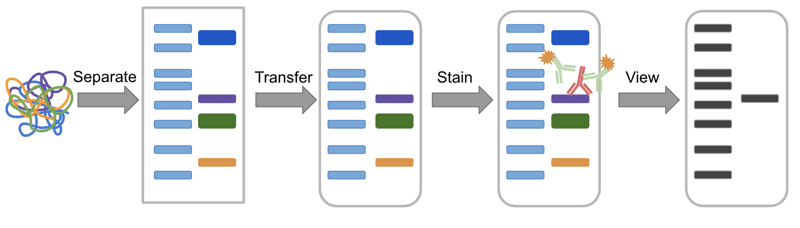 |
| Figure 1: Overview of the Western blot process. The sample, a mixture of protein is separated in a gel, transferred to a membrane, stained with antibodies, and finally visualized. |
This process allows you to detect a single, specific protein within the complex mix derived from cells or tissues. Westerns are useful not only to detect the presence or absence of a protein, but can also determine if proteins are being up- or downregulated in a system, detect post-translational modifications, quantify protein levels relative to standards, detect the cellular location of proteins, and can be a readout for protein interaction studies such as immunoprecipitation and pull-down assays.
Westerns are divided into two categories, native and denaturing. In a native western, the protein’s secondary and tertiary structures remain intact and the protein is separated through a matrix by charge. In a denaturing western, the protein is denatured to its primary structure and separated by size with smaller molecules moving more quickly through the matrix. For the purpose of this blog, we will be focusing on denaturing westerns.
Separating a protein mix by size
Sodium dodecyl sulfate-polyacrylamide gel electrophoresis (SDS-PAGE) is the first step of a western. To prepare the samples for SDS-PAGE, measure the protein content and normalize to ensure equivalent loading. Denature the samples to their primary amino acid sequence by boiling in the presence of a reducing agent, typically containing thiols, to cleave disulfide bonds. Load the samples, one sample per lane, onto the top of a resolving gel composed of the crosslinked polymer acrylamide. In addition to the samples, a protein standard of known molecular weight in a separate lane can help confirm the size of the protein of interest. An electric current applied to the gel causes the negatively charged proteins to migrate toward the positive charge at the bottom of the gel and separate by size.
Smaller proteins encounter less resistance in the acrylamide matrix and migrate faster through the gel. For better protein separation, vary the acrylamide content of the gel. For small proteins, use a higher percentage of acrylamide to increase migration resistance and improve separation. For large proteins, reduce the percentage of acrylamide.
To further improve resolution, use a stacking gel on top of the resolving gel. A stacking gel typically has a different ionic strength and lower pH and acrylamide content than the resolving gel. Under these conditions, all of the proteins in a sample migrate through the stacking gel at the same pace and enter the resolving gel at the same time where they are then separated by size. Gradient gels are another great option to enhance resolution. In this setup, gels have an increasing range of acrylamide content from top to bottom allowing a mix of proteins with a broad size range to be separated on a single gel.
Immobilizing proteins on a membrane
Once separated, the proteins are immobilized onto a membrane, usually composed of a nitrocellulose or polyvinylidene difluoride (PVDF) in a step called protein transfer. While both nitrocellulose and PVDF are commonly used, PVDF tends to be slightly more popular due to its durability and high binding capacity. In addition, PVDF membranes can be repeatedly stripped of an antibody and reprobed with different antibodies allowing multiple targets to be assessed from a single western.
There are several variations of the protein transfer step including wet, semi-dry, and dry but all follow the same general principle where the gel and membrane are “sandwiched” together with blotting paper and an electric current is applied causing proteins to migrate out of the gel and attach to the membrane.
In a wet transfer system the sandwich is completely submerged in a tank filled with a transfer buffer formulated to conduct the electric current. The wet transfer process is very effective in transferring a broad range of protein sizes but takes hours to overnight.
In contrast, a semi-dry transfer only requires enough buffer to saturate the sandwich and typically takes less than an hour. However large proteins typically do not transfer as well using this method.
Finally, commercially available dry blotting systems efficiently transfer a range of protein sizes in minutes without any transfer buffer. These systems, however, require you to purchase expensive system-specific sandwiches.
 |
| Figure 2: The western blot dry apparatus includes a stack of filter paper, a copper anode/iblot gel matrix, the blotting membrane, the gel, a copper cathode/iblot gel matrix, and filter paper. Pretty much like an actual sandwich! S'mores image from Evan Amos. |
After the transfer, some areas of the membrane remain unbound by protein. These unbound regions are “sticky” and have the potential to bind nonspecifically to the antibodies used for staining. To address this, the membranes are incubated before staining in a buffer containing nonfat milk, bovine serum albumin or other proteins. The sticky areas on the membrane will bind to the proteins in the buffer, blocking the membrane from binding to the antibodies during the stain. The ideal blocking buffer depends on the antibodies and labels being used and may require some trial and error (Yang et al., 2012).
Choosing your primary antibody
Once the membrane has been blocked, it is stained with a primary antibody against your protein of interest. But which antibody should you use? You will likely find several different antibody options targeting your protein of interest from a variety of vendors and you may even find plasmids encoding antibodies from Addgene that you can make on your own.
To narrow your search, first pay attention to the validated applications listed on the vendor’s website and choose an antibody that has been validated for immunoblotting. Different immunoassays detect proteins in different states. For example, in immunoprecipitation (IP) the antibody interacts with a protein in its native state while a western blot detects denatured polypeptide chains. The protein regions available for antibody binding, or epitopes, differ between a protein in its native state versus the polypeptide chain. Consequently, antibodies validated for IP might not work for a western and vice versa.
In addition to validated applications, pay close attention to the controls listed on the vendor’s website. Typically, the vendor will demonstrate that their antibody binds to protein of the correct size. Many vendors will show that the antibody binds to transiently overexpressed protein, however, they should also demonstrate that the antibody efficiently binds to endogenously expressed protein at physiologically relevant levels. Some vendors will also test their antibody in a variety of tissues to demonstrate that the protein staining matches the expected expression patterns across tissues. Recently, knockdown or knockout lines have become the gold standard in antibody validation. This level of validation ensures that the antibody is staining the intended target.
Once you have chosen an antibody read the data sheet thoroughly. Vendors will frequently include suggestions for working concentrations, blocking buffers, and incubation times. If the vendor includes publications that cited the antibody, consider reviewing the materials and methods sections of those publications.
Finally, always verify that the chosen antibody works in your specific experimental context (Pillai-Kastoori et al., 2019). Tissues or cell lines other than those used by the vendor for validation could contain unintended cross-reactive proteins. Similarly, if you vary the experimental conditions from those used by the vendor then it may lead to nonspecific binding.
Whenever possible, include positive and negative controls. Positive controls typically include cell lines or tissues that are known to express the protein at physiologically relevant levels (not overexpression systems) while negative controls are those that do not naturally express the protein or have had gene expression knocked down or knocked out. If you are interested in making your own knockout line for validation, please view this tutorial from Stuart Orkin's and Daniel Bauer's labs.

Visualizing your protein of interest with the help of secondary antibodies
In order to visualize proteins on the membrane the antibodies are typically conjugated to an enzyme, such as horseradish peroxidase (HRP), that emits light upon reacting with a specific substrate. The emitted light, or chemiluminescence, is detected on x-ray film or with specific imaging devices. In most cases, the primary antibody, which binds the protein of interest, is not labeled. Instead, a conjugated species-specific secondary antibody is used to visualize the proteins. In this set-up, multiple secondary antibody molecules bind the primary antibody and amplify the detection signal.
Analyzing the western blot
Once visible, it’s time to analyze your protein of interest. Analysis typically begins by confirming that the protein is the expected size as compared to the protein standards.
Protein abundance
In addition, the thickness of the band provides information about the relative abundance of the protein in the sample. More protein causes a thicker band, while less protein leads to a thinner band. It is important to note, however, that you must include a loading control when assessing protein abundance or comparing samples across lanes.
For a typical loading control the membrane is probed with an antibody that detects a ubiquitously expressed protein, such as actin. Actin levels should be consistent across all samples on the gel and should be observed as a band of consistent size and density present in all samples. Uneven sample loading or incomplete protein transfer causes inconsistent levels of the loading control. In these cases, the western should be repeated.
Finally, while westerns are a useful way to gauge protein abundance they provide qualitative measurements. If you require precise quantification of a protein, consider using an alternative method such as an enzyme-linked immunosorbent assay (ELISA) (Aydin et al., 2015).
Post-translational modifications
In addition to protein abundance, westerns detect changes to a protein’s post-translational modifications such as phosphorylation, acetylation, methylation and ubiquitination. For example, to test if a protein is phosphorylated following a specific experimental condition you could look for a slight size shift in the protein band before and after treatment.
Westerns are also a useful readout for a number of cellular assays. They can determine protein interactions following immunoprecipitation and are a common readout for subcellular fractionations, a procedure that isolates proteins from different cellular compartments such as the mitochondria, cytoplasm and nucleus.
We hope that this blog has provided you with a good overview of the western blot. When planning a western, take care to include the proper positive and negative controls, choose antibodies that are validated for your application and test the antibody in your specific system. If you found this blog helpful be sure to check out Addgene’s blog for overviews of other antibody topics.

Resources and references
References
Aydin S (2015) A short history, principles, and types of ELISA, and our laboratory experience with peptide/protein analyses using ELISA. Peptides 72:4–15 . https://doi.org/10.1016/j.peptides.2015.04.012
Burnette WN (1981) “Western Blotting”: Electrophoretic transfer of proteins from sodium dodecyl sulfate-polyacrylamide gels to unmodified nitrocellulose and radiographic detection with antibody and radioiodinated protein A. Analytical Biochemistry 112:195–203 . https://doi.org/10.1016/0003-2697(81)90281-5
Pillai-Kastoori L, Heaton S, Shiflett SD, Roberts AC, Solache A, Schutz-Geschwender AR (2019) Antibody validation for Western blot: By the user, for the user. J Biol Chem 295:926–939 . https://doi.org/10.1074/jbc.ra119.010472
Renart J, Reiser J, Stark GR (1979) Transfer of proteins from gels to diazobenzyloxymethyl-paper and detection with antisera: a method for studying antibody specificity and antigen structure. Proceedings of the National Academy of Sciences 76:3116–3120 . https://doi.org/10.1073/pnas.76.7.3116
Towbin H, Staehelin T, Gordon J (1979) Electrophoretic transfer of proteins from polyacrylamide gels to nitrocellulose sheets: procedure and some applications. Proceedings of the National Academy of Sciences 76:4350–4354 . https://doi.org/10.1073/pnas.76.9.4350
Yang P-C, Mahmood T (2012) Western blot: Technique, theory, and trouble shooting. North Am J Med Sci 4:429 . https://doi.org/10.4103/1947-2714.100998
Additional resources on the Addgene blog
- Find other tips and tricks for molecular biology protocols
- Browse other articles related to antibodies


Leave a Comment