If you’ve ordered a pooled library from Addgene, you may have been a little surprised at how this powerful tool is in such a small package. But don’t let the simple presentation deceive you; pooled libraries can be quite challenging to use! In this post, I’ll walk you through how to prep and transduce your pooled library.
Pooled libraries
Scientists have deposited many types of pooled libraries here at Addgene, including cDNA, barcoding, screening, and gRNA libraries. Most of the pooled libraries at Addgene are lentiviral pooled libraries, though other types exist.
When you buy a pooled library from Addgene, you can either order a DNA pooled library, which contains a collection of plasmids in a single tube, or a pre-made viral prep library. Addgene’s pooled libraries are typically DNA preps, but we do distribute several of our most popular CRISPR pooled libraries and one of our most popular barcoding libraries as pre-made viral preps. If you can’t (or don’t want to) make viral preps in your lab, there are custom viral prep services that can prepare the libraries for you.
Starting from plasmids requires amplification, verification, and lentiviral production steps before you can start transducing your virus. Let’s start there!
 |
|
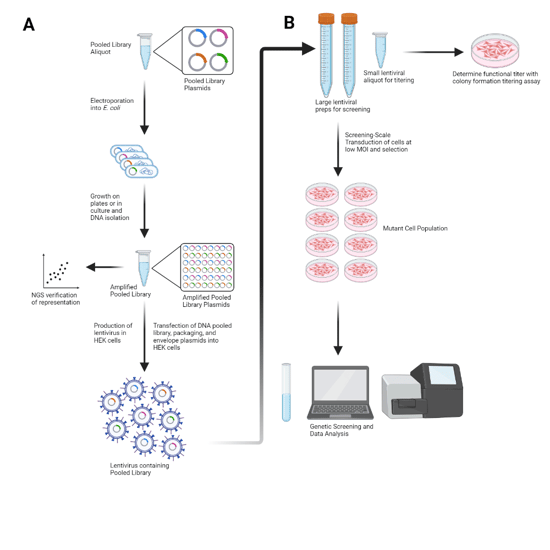
Figure 1: Flowchart showing the process for using pooled lentiviral libraries. A) Amplification, validation, and lentiviral generation of a pooled library. An aliquot of the pooled library is transformed into E. coli for amplification. Transformed E. coli are allowed to grow on plates or in liquid culture to amplify the library, followed by DNA isolation. The amplified library is verified through NGS sequencing to confirm library representation. Transfection of the DNA pooled library and appropriate packaging and envelope plasmids into HEK cells allows production of lentivirus. Purification of this lentivirus results in the pooled library lentiviral prep. B) Usage of a pooled library lentiviral prep for experiments. Pooled library lentiviral preps are generally aliquoted to reduce the number of freeze-thaw cycles needed when using the virus. A small aliquot is used to determine functional titer with a colony formation titering assay or similar protocol. After functional titer is determined, larger lentiviral preps can be used for screening-scale transduction of cells, resulting in cell population mutated by the viral pooled library. These cells can then be used for genetic screening, followed by sequencing and further data analysis. Based on Figure 31.5.2 from McDade et al., 2016. |
Amplification
When you request a DNA pooled library from Addgene, you’ll usually receive an aliquot from the original library constructed by the depositing lab. (For our more popular libraries, you might receive a similarly-sized aliquot from an amplification done by Addgene.) This small aliquot is not enough to transfect producer cells, so your first step will be to amplify the library. This is similar to amplifying a plasmid: transform E. coli with the pooled library DNA, allow the bacteria to grow and replicate, then purify the DNA.
.png?width=550&height=430&name=unnamed-min%20(1).png) |
|
Figure 2: A pooled library page with protocol links boxed in red. |
Unlike a standard single plasmid transformation, though, a pooled library has hundreds to millions of distinct plasmids, all of which need to be represented in the same proportion after amplification as they were prior to amplification. And as anyone who has worked with individual plasmids knows, some plasmids amplify well and others don’t. The size and composition of your library can drastically impact what conditions it needs to properly amplify.
Amplification protocols therefore differ from library to library. We strongly recommend following the protocols provided by the depositing lab whenever available. Addgene also shares the protocols we’ve developed for the libraries we amplify in house, but these are not general amplification protocols. Rather, each protocol is optimized for a single, specific library.
If you have a library without an amplification protocol, or have constructed your own library, you’ll need to develop your own protocol that amplifies without disrupting plasmid representation. A good place to start is with a protocol for a library of similar size and backbone.
Verification
Once your library has been amplified, you'll need to verify your library by next-generation sequencing (NGS). The representation of your amplified library should be very similar to that of the original library. Like amplification, this step also depends on the individual library. So, on each library’s page, you can find protocols for sequencing, representative NGS results (read counts or another visualization) that confirm diversity of the library sample, and any other information or scripts provided by the depositing lab for data analysis.
I'm often asked whether this step can be skipped or whether selecting colonies and performing Sanger sequencing will suffice…and the answer is no. Due to the size and complexity of pooled libraries, NGS is the best way to validate your amplified library and verify that you have not skewed the representation of your pooled library during the amplification process. It’s far better to verify via NGS now than to learn some of your plasmids didn’t amplify after your screen is completed!
Producing Your Lentiviral Library
Once you've amplified–and verified!–your pooled library DNA, the next step is to make your virus. If the library happens to have a specific protocol for producing virus, I recommend that you follow that protocol. If not, our protocol on Lentivirus Production provides a general approach for producing lentivirus in Lenti-X 293T cells using a polyethyenimine transfection protocol. I also recommend searching PubMed for any publications associated with the library and reading their methods sections to see what worked.
Ready, optimize, transduce!
If you’re ordering a pre-made library, you don’t need to worry about amplifying and producing lentivirus. But pre-made libraries aren’t quite plug-and-play: you’ll still need to titer and optimize before you can transduce your cells.
Titering
After generating your lentivirus, you’ll want to infect your cells with the virus–the right amount of virus, that is. Ideally, each cell will be transduced by no more than one viral particle, giving a low multiplicity of infection (MOI). MOI is controlled by viral titer, so you’ll need to measure your viral titer before you can transduce your cells.
While Addgene uses a physical titer (via ddPCR) to quality control our viral preps, we recommend determining the functional (infectious) titer once you've received your pre-made library/produced your lentivirus. Since viruses are sensitive to freeze/thaw cycles, we include a 1.3 mL aliquot with mostlibrary requests specifically to allow scientists to perform functional titering and optimize transduction efficiency. Transduction efficiency can vary with titer, cell type, and other factors, so make sure to put that aliquot to full use! Common conditions to optimize include incubation time, antibiotic conditions, and amount of polybrene. (psst…didn’t get your library pre-made from Addgene? Take a page from our book and put aside an aliquot for titering and optimizing before you freeze down your viral preps!)
Once you’ve optimized your transduction conditions, you’re ready to transduce! Addgene has a transduction protocol you can follow and a troubleshooting blog should you run into any issues. Keep in mind that a low MOI will increase the chances of a cell being infected by only one viral particle, but it also increases the chances that a cell doesn’t get infected at all. To make sure that every plasmid’s payload is adequately represented in the cell population, you’ll need to infect many more cells than the number of plasmids in the library.
Spinfection
If you have a large number of cells to transduce, you may want to consider spinfection. Spinfection is the process of transducing cells at a concentrated seeding density while centrifuging. Spinfection transduction efficiency can vary across cell types and generally requires optimization of many variables, such as seeding density and reagent concentration.
Screening time
Phew! You are now (finally!) ready to use your transduced cells to perform your pooled library screen… but that’s a blog post for another day.
Using pooled libraries can be intimidating and require a large amount of experimental work, but with this guide, we hope you feel more confident incorporating them into your research. And, of course, if you have any questions, don’t hesitate to email us at help@addgene.org. Happy screening!
This blog was written by Addgenie Hannah Dotson.
Resources and references
References
- Joung, J., Konermann, S., Gootenberg, J. S., Abudayyeh, O. O., Platt, R. J., Brigham, M. D., Sanjana, N. E., & Zhang, F. (2017). Genome-scale CRISPR-Cas9 knockout and transcriptional activation screening. Nat Protoc, 12(4), 828–863. https://doi.org/10.1038/nprot.2017.016. PMID 28333914.
- An excellent protocol paper by the Feng Zhang lab describing construction, lentiviral production, transduction, screening, and validation of CRISPR libraries.
- The Genome Engineering using CRISPR/Cas Systems Forum: Moderated by the Feng Zhang lab, this is a useful place to ask experimental questions.
- McDade, J. R., Waxmonsky, N. C., Swanson, L. E., & Fan, M. (2016). Practical Considerations for Using Pooled Lentiviral CRISPR Libraries. Curr Protoc Mol Biol., 115, 31.5.1–31.5.13. https://doi.org/10.1002/cpmb.8. PMID 27366891.
- A nice overview of what to consider when using pooled lentiviral CRISPR libraries.
- Protocols from the Broad Institute: A variety of protocols and guides regarding pooled libraries, from cloning a pooled library to viral production to screening. Many of Addgene's pooled libraries use these protocols.
Topics: CRISPR Pooled Libraries, Retroviral and Lentiviral Vectors


Leave a Comment