My lab's vector of choice is AAV, with nearly every experiment requiring AAV. Before joining my lab, I had never worked with AAV, so naturally I had to package some virus for my first experiment. It was a bit intimidating, but I had my lab’s protocols and some great co-workers to help me out. Even with these tools, I found myself writing AAV production tricks into the margins of my protocol. While these tips weren’t critical to the experiment, they definitely made my life easier! In this post, I’ll share some AAV production, purification, and titration tips, while also summarizing the basic steps and analyses needed for packaging AAV.
.png?width=600&height=420&name=Overview%20of%20key%20steps%20of%20AAV%20production%2c%20iodixanol%20gradient%20purification%2c%20and%20titration%20(1).png)
AAV production
Overview: The first step in packaging AAV is transfecting HEK293 cells with AAV packaging plasmids. The cells need three different plasmids to produce AAV: 1) the RepCap plasmid which provides the AAV replication (rep) and capsid (cap) genes. AAV replication uses the host’s polymerase, but requires Rep proteins to process a double-stranded intermediate into the single-stranded genome that's then packaged into AAV’s protein shell, or capsid; 2) the pHelper plasmid which expresses adenovirus genes which help mediate AAV viral replication; and 3) the transfer plasmid which encodes a transgene of interest that’s packaged into the virus. Two to five days after transfection, the AAV-containing cells and media are harvested and purified. In total, this process takes 4-7 days, not counting the time needed to expand the HEK293 cells. Check out the Addgene AAV Production protocol for more details.
Pro tips
- I’m not going to lie, AAV transfer plasmids are kind of a pain to work with. These plasmids contain ITRs which are required for proper packaging of AAV, but also form secondary structures that are prone to deletion from the transfer plasmid. The good news is there’s a few simple ways to deal with this issue. One way is to grow multiple bacterial cultures of your AAV transfer plasmid at 30 °C instead of 37 °C and then screen for ITR recombination with a SmaI or XmaI restriction enzyme digest (the ITRs contain SmaI and XmaI restriction sites). Another way is to transform AAV transfer plasmids into bacterial strains, like NEB Stable. NEB Stable competent cells lack RecA, a protein that aids in the homologous recombination of duplicated regions like the ITRs. Restriction digest screening for ITR deletion is still necessary.
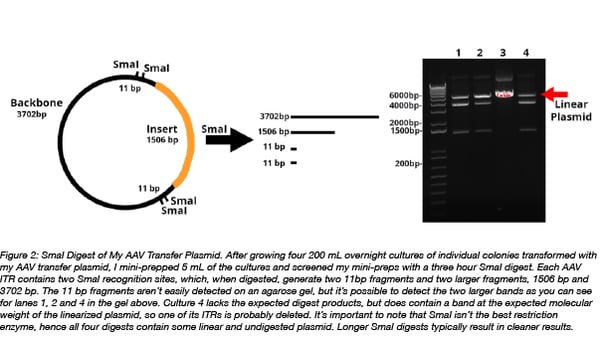
- To save time and money, I like to miniprep 5 mL of my AAV transfer plasmid cultures and then screen with SmaI digests. I freeze the bacterial pellet for the remainder of the cultures and later maxiprep only the cultures with intact ITRs.
- I use a spreadsheet similar to this one to plan my AAV packaging PEI transfections. It saves me time and helps me figure out if I have enough plasmid to complete my experiment.
- AAV is usually the limiting reagent for my experiments, so I always make more AAV than I think I need. Unlike lentivirus, AAV requires a higher number of viral particles for efficient gene transfer. I figure it’s better to have a bit extra AAV than to have to produce more virus because I don’t have enough AAV.
- Compared to the Addgene AAV Production protocol, I take a lazier approach for harvesting my AAV. I skip the PEG precipitation of the HEK293 cell culture supernatant because it’s time consuming to prepare the 40% PEG solution. PEG takes several hours on a heated stir plate to dissolve and requires monitoring so that the solution doesn’t get too hot because then the PEG will separate into two phases. If this happens, the solution can be cooled and the two phases mixed together. Lastly, the PEG solution needs to be sterilized, either by filtration, which takes time because the solution is viscous, or by autoclaving, which also takes time. Rather than investing all of this effort in preparing reagents, I choose to only harvest the cell pellet. My yield would be higher if I used PEG precipitation, but for my experiments, I get enough virus from the cell pellet alone. If yield is important, or if the viral particles of the AAV serotype you’re working with are primarily found in the culture media, you should consider performing PEG precipitation.
- Instead of sonicating the cell pellet, I lyse the cells with this AAV lysis buffer and freeze/thaw the lystate four times in a 95% ethanol and dry ice bath to release the virus particles from the cells. Cell lysates are then treated with benzonase immediately before iodixanol purification. This approach gives me a bit of flexibility since I can store the cell lysates at -80 °C for up to 6 months before purifying the AAV (Choi et al).

AAV purification with iodixanol gradient ultrafugation
Overview: Iodixanol gradient ultracentrifugation uses a gradient of different concentrations of iodixanol to separate out contaminants from an impure AAV preparation. 15%, 25%, 40%, and 60% iodixanol solutions are carefully layered and then the viral suspension generated during AAV production is overlaid. Following ultracentrifugation, the AAV-containing 40% fraction is collected and buffer exchanged to remove the iodixanol and concentrate the purified virus. This process can be completed in one long day, or the virus can be stored at 4 °C and buffer exchanged the next day. Refer to the AAV Iodixanol Gradient Ultracentrifugation Protocol for more details.
Pro tips
- Watch this AAV purification video! It didn’t exist when I did my first iodixanol gradient purification, but I wish it had. The video gives a brief overview of how iodixanol purifications works, shows how to create the iodixanol gradient layers, and has some great pointers that while help you master iodixanol AAV purification.
- If you’re new to creating gradients, practice making the iodixanol layers before doing your first purification. This helped me get a feel for layering the iodixanol solutions and let me double-check that the iodixanol gradient solutions were prepared correctly.
- When aliquoting purified and buffer exchanged virus, remember to make one or two small aliquots to use for qPCR titering. This helps avoid multiple freeze/thaws of your larger aliquots of virus.

AAV titration by qPCR
Overview: AAV titering by qPCR quantifies the number of genome-containing viral particles that are present in an AAV prep. AAV samples are first DNaseI digested to remove any residual AAV plasmid that was carried over from the AAV production process. Either SYBR green technology or a TaqMan primer/probe set can be used and samples are quantified by comparing to an AAV standard curve, which is generated from an ITR-containing plasmid. This whole process takes ~3 hours to complete: 1 hours hands-on time and 2 hours for the qPCR run and data analysis. Refer to this Addgene AAV Titration by qPCR Protocol for more details.
Pro Tips
- When calculating the titer for your AAV, remember to account for the dilution of the sample for the DNAseI digest.
- Use good sterile technique when handling your AAV plasmid standard and AAV transfer plasmids. It’s easy to contaminate a workspace with plasmid, not that I would know about this… A no template control (NTC) should always be included.
- While the physical titer generated by qPCR is useful, I test a few different concentrations of virus, or multiplicity of infections (MOIs), to determine the optimal dose of AAV for my cells of interest. Every batch of AAV requires its own MOI optimization to account for batch-to-batch variability. Check out this post to learn more about different ways to titer AAV.
Do you have any AAV production tips or tricks? Please share them in the comments below!
Special thanks for Dr. Dan Stone and Harshana de Silva Feelixge at Fred Hutchinson Cancer Center for teaching me about AAV production and purification!
References
1. Aurnhammer, C., Haase, M., Muether, N., Hausl, M.A., Rauschhuber, C.T., Huber, I., Nitschko, H.M., Busch, U., Sing, A.S., Ehrhardt, A., & Baiker, A. (2012). Universal real-time PCR for the detection and quantification of adeno-associated virus serotype 2-derived inverted terminal repeat sequences. Human gene therapy methods, 23 1, 18-28. PubMed PMID: 22428977.
2. Choi, V.W., Asokan, A., Haberman, R.A., & Samulski, R.J. (2007). Production of recombinant adeno-associated viral vectors for in vitro and in vivo use. Current protocols in molecular biology, Chapter 16, Unit 16.25. PubMed PMID: 18265393.
Additional resources on the Addgene blog
- Find out what makes AAV a versatile tool for gene expression in mammals
- Use the PEI calculator for planning AAV packaging transfections
- Find tips for a first time CRISPR user
Resources on Addgene.org
- Learn how Addgene produces AAV and lentivirus
- Check out Addgene's virus protocols
- Find AAV for your research
Topics: Viral Vectors, Viral Vectors 101, Viral Vector Protocols and Tips, AAV


Leave a Comment