Congratulations, you have a plasmid expressing your gene of interest (YGOI) and are ready to dive into your functional experiments! Whether you’ve cloned the plasmid yourself or obtained it from a colleague down the hall, it is always a good idea to take some time to confirm that you are working with the correct construct, and verify that the plasmid you received matches the expected sequence. Here at Addgene, we use NGS-based quality control to confirm the sequence of all the plasmids we distribute. This method is time-intensive, so we recommend a variety of ways to screen and verify your plasmids. Here, we'll cover restriction digest analysis.
Diagnostic restriction digest
Diagnostic digests can be used to confirm the rough structure of the plasmid based on the predicted sizes and organization of different features within the plasmid. Restriction analysis can also be used successfully even if you don't have the full plasmid sequence. Once you have purified plasmid DNA, this method can be done right in your lab in less than a day. Diagnostic restriction digests are comprised of 2 separate steps: 1) incubating your DNA with restriction enzymes which cleave the DNA molecules at specific sites and 2) running the reaction on an agarose gel to determine the relative sizes of the resulting DNA fragments.
Restriction digests are commonly used to confirm the presence of an insert in a particular vector by excising the insert from the backbone. To do this, you'll use enzymes with restriction sites that flank the insert. You will need to know both the approximate size of the vector backbone as well as the predicted size of the insert. You can search NCBI for YGOI to find the particular reference sequence if necessary.
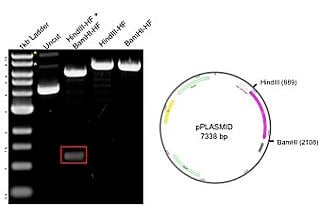 The example plasmid on the right has a total size of 7.3kb, including a 1.2 kb insert. The plasmid was digested with 2 unique enzymes (HindIII and BamHI) and run on an agarose gel. The resulting gel image includes a 1kb ladder (lane 1) that has bands ranging from about 500bp to 10kb, with the 3.0kb fragment having increased intensity to serve as a reference band. The uncut DNA (lane 2) shows 3 possible plasmid conformations, with relaxed and nicked marked with asterisks (*). When the plasmid is digested with either HindIII and BamHI alone (lanes 4-5), there is a single band of 7.3 kb representing the full size of the plasmid. The double digest with both HindIII and BamHI (lane 3) produces bands at 6kb and 1.2kb (red box), matching the backbone and insert, respectively. The results on the gel correspond to the predicted sizes.
Watch this video for a quick overview of how to analyze a restriction digest:
Restriction digest tips and tricks:
The following tips will make it easier for you to obtain a useful and informative diagnostic restriction digest.
For your digest:
- Try choosing unique enzymes. Enzymes that only cut once allow you to more easily and accurately visualize the full size of your construct.
- Consider buffer and temperature compatibility when digesting with more than one enzyme. Consult the manufacturer’s manual for the optimal working conditions for each enzyme.
- Watch out for methylation issues. Enzymes like XbaI and ClaI are sensitive to methylation and their activity may be blocked. If you have to use these enzymes for your digest, you will need to purify your DNA from a dcm or dam methylation-deficient bacterial strain such as JM110 or INV110.
- Avoid star activity. Some endonucleases (for example BamHI) are capable of cleaving sequences which are similar, but not identical, to their defined recognition sequence. Most enzyme manufacturers make High Fidelity versions of the endonucleases and/or supply custom buffers as means to avoid this issue.
For your gel:
- Add ethidium bromide (EtBr) to your gel before pouring it. EtBr binds to the DNA and allows you to visualize the DNA under ultraviolet (UV) light.
- Don’t forget to add loading buffer to your digest reactions before loading them. The glycerol in the buffer will make sure your sample settles in the gel well and the dyes provide a visual reference point so you can easily assess how far the gel has run. Bonus: The dyes also run at predicted sizes so you can estimate how far down the gel your bands have traveled based on the dye!
- Always run a ladder. Ladders allow you to interpret the bands that you get in your sample lanes. Choose your ladder based on the expected band sizes.
- Always run control uncut DNA to ensure your enzymes are working. When uncut plasmid DNA is isolated and run on an agarose gel, you are likely to see 3 bands. This is due to the fact that the circular DNA takes on several conformations the most abundant being: supercoiled, relaxed and nicked. If your digest lanes look like your uncut lane then there is something wrong!
- Quantify your DNA. Loading too much DNA will make it difficult to obtain crisp bands and analyze the results. Bonus: knowing how much DNA you have loaded in each well will allow you to approximate the DNA mass of comparably intense samples of similar size.
- Run the gel at 80-150V until you have good separation between your bands. Stopping the gel when the bromophenol blue dye line is approximately 75-80% of the way down the gel will ensure you keep smaller bands from running off; however, you may need to run the gel for longer to achieve good separation of larger DNA fragments.
I hope these tips demonstrate that plasmid verification is not just necessary but also an easy process. Please vist Addgene's resource for plasmid verification to find additional tips and detailed protocols on topics such as how to set up your digests and pouring/running a DNA gel.
More Plasmid Eductional Resources:
- Addgene's Molecular Biology Reference
- Find More Protocols and Videos

Topics: Plasmids 101, Molecular Biology Protocols and Tips, Plasmids


Leave a Comment