Chromatin immunoprecipitation (ChIP) is an extremely useful technique that provides insight into protein:DNA interactions. ChIP works by using antibodies to capture protein:DNA complexes with antibodies specific to your protein(s) of interest. Once the complex is captured, it is treated so that the protein and DNA are no longer bound, and the DNA can then be isolated and studied through a variety of downstream methods, such as qPCR or next-gen sequencing. ChIP is an incredibly useful application for exploring these interactions, and can give valuable insight into DNA expression and protein interactions, including epigenetic modifications. But it's not an approach for the faint of heart!
The Process
ChIP can be done for either tissues or cells. The process is very similar for both, though tissue samples do require an extra homogenization step. For this blog, we're going to focus on the ChIP process and not the upsteam sample collection process or the downstream analysis process. And ChIP itself begins at...
Crosslinking
Once you have your sample, the first step is to ensure your protein:DNA complexes will remain bound to each other until you are ready to separate them. Most proteins are not likely to remain attached to the DNA throughout the sample processing and therefore will require crosslinking, which uses formaldehyde or UV light to create strong but reversible bonds. This will keep the protein:DNA complexes together until you want to break them. Crosslinking is necessary for most ChIP experiences, but the increased binding can mask the epitopes antibodies recognize. It is therefore best to either select antibodies validated for ChIP or to validate your antibody on crosslinked proteins. In the case of histone modifying proteins, which bind quite strongly to DNA, crosslinking may not be necessary. This is known as Native ChIP.
If you’re working with a tissue sample, you’ll need to homogenize your sample before moving on to the next step. Typically, this can be done by cutting the tissue sample up and then processing with a homogenizer, but bone or especially fibrous tissues may need extra steps.
Fragmenting
The next step is break the DNA into random, small pieces of roughly equal size, typically between 200-1000 bp. This is to ensure that your downstream analysis focuses on the DNA your protein is actively interacting with, reducing background information. Your options for this step are sonication, which uses high-frequency sound waves to break up the DNA, or enzymatic digestion. Sonication provides a truly random digestion, but is harsher and requires more optimization. Enzymatic digestion, while gentler on the sample, introduces bias due to the selective nature of the cutting. While sonication is usually the preferred method, enzymatic digestion can be appropriate when your protein of interest is a low abundance transcription factor or cofactor. In such cases, the gentler enzymatic digestion can preserve more of the protein:DNA complexes. Once you’ve finished fragmenting the DNA, spin down the samples to remove cell debris, which will collect in a pellet. The supernatant will contain your fragmented, crosslinked chromatin.
Whichever method you choose, you’ll need to reserve a small aliquot, split into two parts to (1) run a DNA gel to confirm fragment size and (2) incubate with RNAse and Proteinase K to purify the DNA and then determine concentration.
Protein Capture
After crosslinking and sonication or enzymatic digestion, you’re ready to incubate the sample with your antibody. Both polyclonal and monoclonal antibodies can work well in ChIP. If you’re using an antibody for the first time, look for one that has been validated in multiple assay types. Remember that ChIP uses native proteins (so antibodies validated only for denatured proteins may not be a good choice) and the amount of cross-linking can affect epitope availability.
Collect the DNA
Incubate your antibody, or antibodies, with your samples, and then use an antibody capture method such as Protein A/G beads to collect your antibody-bound samples. With a bead method, you’ll need to ensure you have a bead-only control alongside your input control. Elute the DNA after washing and then incubate with Proteinase K to reverse the crosslinking. Finally, purify your DNA with a PCR purification kit or with a phenol-chloroform extraction.
|
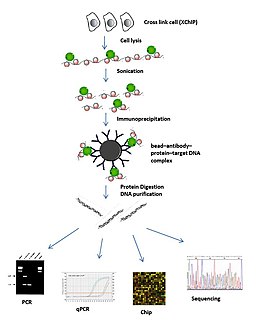
| Fig. 1: Schematic overview of ChIP. Image courtesy of Shengliu via Wikicommons. |
Okay, let’s do a quick review. At this point you have (1) crosslinked your proteins of interest to any DNA they were bound to (2) fragmented the DNA (3) used antibodies to specifically select for proteins of interest (4) isolated your antibody:protein:DNA complexes and finally (5) isolated the DNA from your antibody:protein:DNA complexes. Your DNA is now ready for downstream analysis via any methods suitable for isolated and purified DNA, such as sequencing or qPCR. Yay!
Where’s the challenge in that?
So while this method is certainly long and complex, you may be thinking, well, these are mostly fairly standard molecular and cell biology techniques. What’s all the fuss? Well, ChIP’s complexities come not from the techniques used, but from the difficulty of developing an optimized protocol - it’s a bit like Goldilocks and the Three Steps (Crosslinking, Fragmenting, Capturing), if you ask me.
Each of the three steps need to be optimized for each specific sample type. And, if that weren’t bad enough, optimization of one step can affect the optimization of another. For instance, a sample may need more or less cross-linking to firmly attach the proteins to the DNA, depending on how tightly the proteins bind natively. But the amount of cross-linking can affect epitope availability, which could affect antibody selection. Sonication (or enzymatic digest) will also have to be optimized for both tissue or cell type, amount of protein, and desired fragment length for your output assay. A longer sonication time could mean needing to increase crosslinking to counteract the effects of increased sample agitation; a shorter sonication time could be an opportunity to decrease crosslinking. (Homogenization for a tissue sample can also need significant optimization for the sample type and size.) It can be quite the challenge, and take a few rounds of adjustments, to get everything just right!
 |
| Fig. 2: Goldilocks is actually celebrating a successful ChIP experiment! Image courtesy of https://www.wannapik.com/ |
Even though ChIP requires a larger upfront investment than many other antibody applications, this investment can well be worth it once you generate your data. However, it may be a good idea to add "patience and an extra-methodical approach" to the top of your protocols when embarking on your ChIP journey!
References and Resources
More resources on Addgene’s blog
- Antibodies 101: Immunoprecipitation
- Antibodies 101: Polyclonal Antibodies
- Antibodies 101: Introduction to Antibodies
Resources on Addgene.org
- Find plasmids encoding recombinant antibodies at Addgene


Leave a Comment