Western blots can be tricky to get right. If you’ve thoughtfully done the technical design of your blot, but are still finding yourself having issues, you’re in the right place! In this post, we’ll talk about western blot optimization and troubleshooting.
Before you can optimize or troubleshoot a western, you’ll need to be familiar with running a gradient, which will allow you to optimize the concentrations of your various blot reagents. There are two types of gradients. Protein gradients use dilutions of your sample or protein of interest to understand the dynamic or working range of a given reagent (usually an antibody).

|
| Figure 1: A protein gradient. The density of the bands, which increase as protein concentration increases, show the protein concentrations are within the antibody’s dynamic range. Created with biorender.com |
Alternatively, you can run a reagent gradient. In this approach, you’ll run the same protein concentration in multiple lanes and cut up the membrane to treat each lane with a different concentration of your reagent. Be aware that this approach requires excellent attention to detail, since you’ll end up with a lot of moving parts that all look exactly alike.

|
| Figure 2: Reagent gradient. Here, the lanes are lightly marked on the membrane (1) using the gel as a guide. The gel is then removed from the membrane (2) and the membrane is cut so each lane is its own piece (3). After incubation, blocking, and washing, the membrane is reassembled and imaged. In this example, a 1:1,000 dilution gives a high signal with low background. Created with biorender.com |
Both gradients can be informative, so spend some time thinking about which type of gradient can help answer your particular question before running one.
Good on gradients? Excellent! Now, let’s head west, intrepid reader!
Protein Prep
The first step in any western blot is to lyse your samples. There are a few issues that can arise in this step: protein degradation, incomplete lysing/insoluble proteins, and protein aggregation.
Protein degradation, which would result in low protein yield, can be reduced by adding a protease inhibitor cocktail and phosphatase inhibitors to your lysis buffer. Additionally, protein lysis should be done at 4 °C or on ice, whichever is more practical.
If your lysing method is not resulting in your protein being available, check its subcellular location and solubility. If it’s membrane-bound or located in a subcellular compartment, you may want to try an SDS-containing detergent like RIPA. You can try a few different lysing buffers and strengths. If that’s not working, consider using a subcellular fractionation kit or a lysing protocol developed for isolating proteins from a specific compartment. If your proteins are nuclear- or DNA-binding proteins, you may need to sonicate your lysates in order to release the proteins from their binding.
If you’re seeing protein aggregation, you may want to consider changing your incubation temperature. Some proteins aggregate at 95 °C, a common lysis temperature, so consider a longer incubation (10–20 minutes) at 70 °C, or a truly lengthy incubation (30–60 minutes) at 37 °C, if you suspect aggregation in your prep.
If your proteins are the wrong size on your gel or blot, Table 1 (at the end of the post) has a number of helpful suggestions.
Gels
Gel issues usually come down to voltage and time. Make sure to load an appropriate protein ladder on your gel and keep an eye on it and the leading line (dye front) visible in the sample buffer. You’ll want to run long enough to get good separation in your ladder, particularly in the sizes around your protein of interest, but you don’t want to run so long your dye front or ladder runs off the gel. Luckily, this is easily monitored in real time, as the dye front (and many ladders!) are visible to the naked eye.
If you see a smiley face in your gel, or if you see smeared bands, your voltage is likely too high. If you’re seeing a smiley face at an appropriate voltage (usually 10–15 V/cm of gel), your gel may be overheating. Try running it in a cold room or putting ice packs in and/or around the gel box. If overheating remains an issue, which can happen with large proteins, try lowering the voltage and using a longer run time.
Samples can run into empty neighboring lanes, so load your gel to ensure your samples and reference ladders are not next to empty wells. Most people will simply load an extra ladder or technical replicate (ie, leftover sample) to fill the relevant wells. Similarly, if you load a gel and then forget to start it, the samples can actually migrate into the buffer — so it’s better to start over if that happens.
Finally, if you’re seeing a weird issue and can’t figure out what’s causing it, try making fresh running buffer. Old or improperly made running buffers can cause all kinds of odd issues.
If your gel is running properly but you’re not seeing sufficient resolution in the bands, you may want to consult Tables 1 and 2 in our Technical Design of a Western Blot post to make sure you have the optimal gel for your experiment.
Ladders
If you need very accurate protein measurements, consider using an unstained protein ladder, which will run a bit more true to size than a stained ladder. Unstained ladders contain either a protein tag or an IgG binding site, allowing you to visualize them with a conjugated antibody. If you do not need such precise measurements, you can use a colorimetric ladder, visible to the naked eye; a fluorescent ladder compatible with your imaging system; or a combination of the two. There are many commercially available options to choose from.
Transfer
Transfers are a little trickier than gels and may require multiple runs to optimize or troubleshoot.
Before you start…
Mark your membrane! Membranes look the same from both sides, so it’s quite easy to think lane 1 is lane 8. Common ways to keep membrane orientation straight are to mark the upper left-hand corner with a pencil (not a pen — they bleed!), cut off the upper left-hand corner, or place a double ladder on the lefthand side. Whatever you do, be consistent and document it.
Did it work?
Save yourself time and trouble by confirming your transfer worked with Ponceau S staining or other reversible protein staining immediately after your transfer. If you are expecting low amounts of protein, make sure your reversible staining method of choice is appropriately sensitive. If using a PVDF membrane, you can dry the membrane, wet it with 20% methanol, and place over a light box to visualize proteins after transfer.

Troubleshooting
The two most common (non-technical) issues with transferring are smaller proteins going completely through the membrane or larger proteins not transferring completely onto the membrane. If you’re not sure if your protein of interest is over-transferring (going completely through your membrane to the other side), you can check by using two membranes during your transfer instead of one. If you see signal on both membranes, you know your protein is over-transferring! If you see very little signal, but you know you loaded a good amount of sample of a large protein, you may be under-transferring.
Membrane pore size
Membranes come in different pore sizes for different proteins: try using a 0.2 µm (psi) membrane for small proteins (< 15 kDa) and a 0.45 µm (p) membrane for larger ones. Changing your membrane size is probably the easiest troubleshooting step to take.
If you’re not sure if you need a smaller pore on your membrane, run a double-membrane transfer with a psi membrane stacked behind the p membrane. If your protein runs through the p membrane into the psi membrane, that’s a good indication that the p membrane pores are too large.
Transfer method
Wet transfers are more efficient, so if you’re struggling to transfer a large protein, consider using a wet transfer with a long transfer time. Be aware that the transfer works by electricity, so long transfer times increase the heat of the system…and gels can overheat. Running your transfer in the cold room or packing the box with ice packs can help keep the system cool, as can lower voltages.
If your small protein is over-transferring, try using the faster semi-dry transfer, which works better for small and medium proteins.
If your proteins are compatible with electroblots/dry transfer systems, and you have one available, they are a good, if expensive, option for transferring proteins of mixed sizes. If electroblots are not a good option for your experiment, and wet and semi-dry are not working, you’ll want to try optimizing your transfer buffer.
Adjusting the buffer
For wet and semi-dry transfers, you can adjust the amounts of alcohol and SDS in your transfer buffers. To slow down smaller proteins and prevent them from over-transferring, increase the amount of alcohol and decrease the amount of SDS, with a decreased transfer time. Alcohol will slow down the migration of smaller proteins through the membrane while increasing the ability of proteins to stick to the membrane by stripping away the SDS.
To speed up larger proteins and prevent them from under-transferring, try increasing the amount of SDS while decreasing the amount of alcohol. The increased SDS will increase the negative charge on the protein, allowing it to move more readily with the current.
Pro tip! You need both alcohol and SDS for your proteins to migrate…so don’t try eliminating one component entirely.
If you are trying to transfer proteins of vastly different sizes, you may need to optimize quite a bit to find a membrane, transfer, and buffer combination that works.
Background
If you’re seeing odd background patterns, rather than just high background, your issue is likely technical. White circles, for example, could indicate that you had air trapped between the membrane and gel during the transfer, while dark splotches could indicate dirty equipment, degraded or improperly mixed blocking buffer, or insufficient rocking during incubation steps.
Many errors can arise from technical issues. The good news is that such errors are both commonly made and commonly discussed. If you’re seeing a weird pattern in your background, try asking more experienced labmates or looking it up online. You’ll find many resources with examples, like BioRad’s Western Blot Doctor page, or robust discussions, like ResearchGate’s western blot forum.
Blocking
Don’t skimp on the blocking time! Fill the time with smaller tasks, or simply enjoy some well-deserved down time while waiting for your timer to ding. If you’re shaving off a few minutes here and there, and seeing high background in your blots, that could be why.
Troubleshooting
Blocking reduces the amount of background in your blot, so blocking issues can either result in high background (insufficient blocking) or reduced signal (too much blocking.) If you’re having issues with your blocking, first check your antibody spec sheet. Some antibodies work better with specific blockers, and the manufacturer will usually include recommended blocking conditions on the spec sheet.
If you’re still seeing high background after following manufacturer’s recommendations, you can try either longer blocking times or higher concentrations of blocking buffer.
If you see a low signal, you can optimize blocking conditions by running a gradient with different concentrations of your protein-based buffer (FBS, milk, etc.) against the same amount of sample.
If you’re using chemical blockers, you can run a comparison of different formulations instead of concentrations. Most labs use protein-based buffers, so here’s a quick tip: Keep a bottle of chemical buffer around, which works well and consistently, to help troubleshoot background issues. It’s a quick way to identify (or rule out) blocking issues.
If your antibody information doesn’t contain blocker recommendations, you may want to try different protein blockers to see if one works better than another. For nitrocellose membranes, you can even give gelatin a shot.
Remember that protein-based blockers degrade fairly quickly, even at 4 °C, so when in doubt, make up a fresh batch.
Antibodies
We always recommend either using an antibody validated for your protein and application of interest or validating an antibody yourself. But even with a validated antibody, it can still take time for you to get it to work well.
Dilutions
Most antibodies come with a recommended dilution and/or range (typically between 1:500 and 1:10,000 for primary antibodies). You’ll want to run a protein gradient to test the antibody at the recommended dilution. If the antibody dilution’s dynamic range encompasses your protein’s expected concentrations, you’ll see the signal increase as the concentration of the protein increases (Figure 3A).
This step is especially important for highly expressed proteins, including “housekeeping” or ubiquitously expressed proteins used for normalization. Many times the expression levels of these proteins are out of the measurable range of the dilution used in an assay, meaning that your normalization calculations will not be correct, and you’ll need to adjust your antibody dilution to accurately measure these proteins. That being said, normalizing to total protein expression is preferable, and more accurate, than normalizing to ubiquitously expressed proteins.
Once you’ve run your protein gradient, compare your diluted samples. If multiple dilutions are showing the same signal (Figure 3B), that means the amount of protein loaded is outside the detectable range of that antibody dilution. Adjust the antibody dilution until your protein dilutions are in the dynamic linear range (i.e., expression decreases as protein concentration decreases).
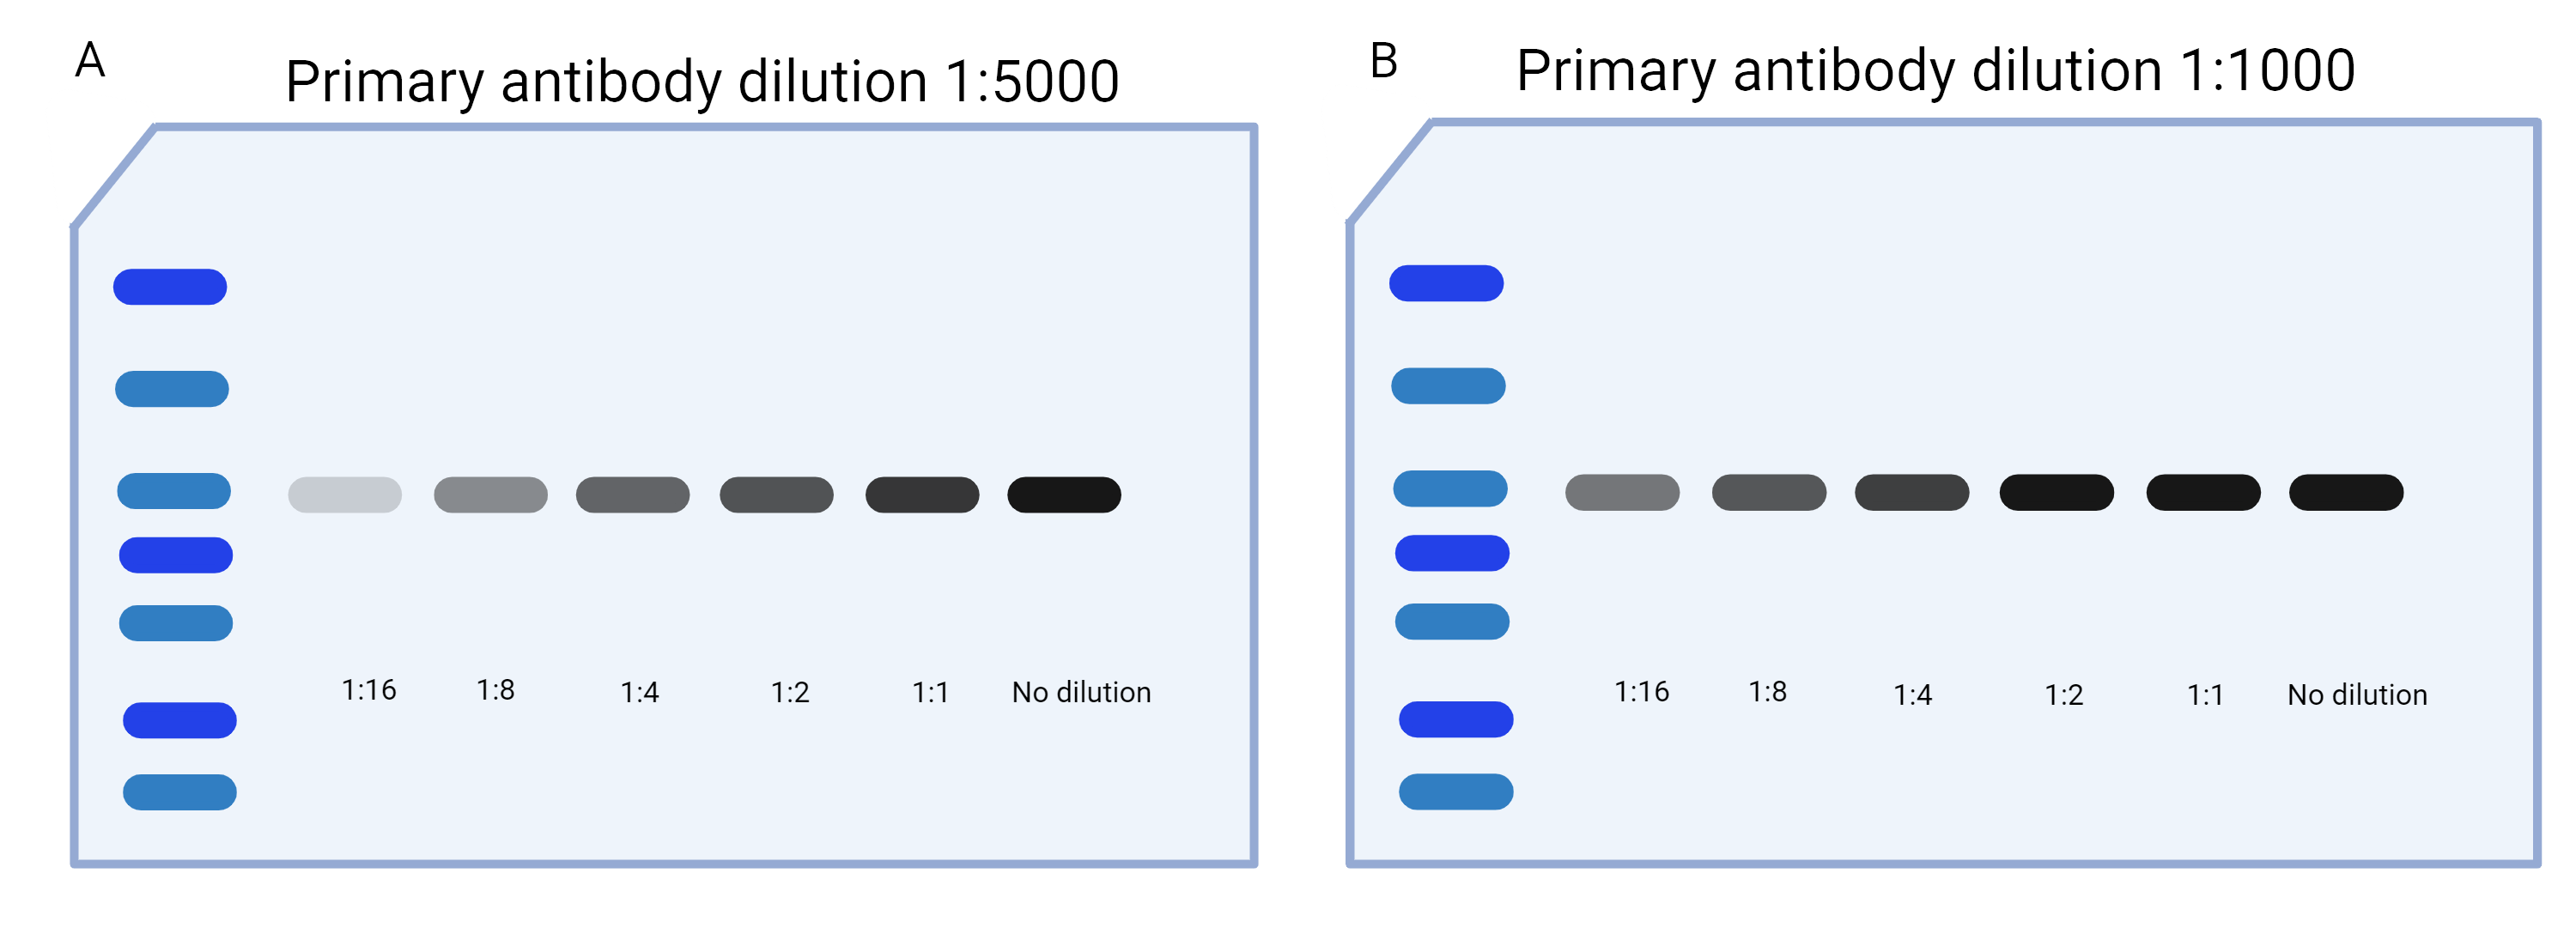
|
| Figure 3: Testing the antibody’s dynamic range. A) The protein dilutions, representing expected concentrations, are all within the antibody’s dynamic range. B) The protein dilutions, representing expected concentrations, are outside of the antibody’s dynamic range. Specifically, the 1:2, 1:1, and No dilution samples all have approximately equally dense bands. Created with biorender.com. |
Since antibodies, especially polyclonal antibodies, can vary lot-to-lot, this range needs to be empirically determined every time you order a new lot of antibodies. If you’re planning to use a large amount of a specific antibody, plan ahead and request as much antibody from the same lot as you need or can get from the manufacturer. You can also consider using monoclonal or recombinant antibodies, which have much lower lot-to-lot variability.
If you’re running an already-developed assay, and you have faint or no bands, it could be that you need a higher antibody concentration to detect low levels of proteins. In this case, it might be faster to run the same amount of protein in every lane and cut up the membrane to run with different concentrations of antibodies. This will let you know what the minimum antibody dilution is to detect your level of protein. If you’re seeing a wide range of protein amounts in your sample, you may need to optimize your antibody dilution further from this starting point. You can also consider using polyclonal or recombinant multiclonal antibodies to increase overall signal from the primary antibody.
Pro tip! If your antibodies are coming directly from tissue or supernatant, and you’re doing the purification and cross-adsorption in lab, consider a dilution range from 1:100–1:1,000. If your antibodies come from ascites fluid, try a dilution range from 1:1,000–1:100,000.
Secondary antibodies
For secondary antibodies, the recommended dilution range is usually between 1:5,000 and 1:200,000. Check the manufacturer’s recommendations, and if needed, optimize your secondary antibody concentration by running a protein gradient.
If your background is high, and you’ve ruled out blocking issues, try running a reagent gradient with your secondary antibody to see if lower concentrations reduce background noise.
Temperature and time
You may need to optimize your antibody incubation temperature and time. Though the most common conditions are 4 °C overnight or room temperature for 1–2 hours, there is some evidence that antibodies may need longer to reach their maximum binding, so feel free to trial even longer incubation times if you’d like (Luo et al., 2011). This does come at the risk of higher backgrounds.
Once you’ve optimized antibody concentration, you can optimize incubation conditions to improve binding and/or reduce background, including trying longer incubations at both temperatures if needed.
Washes
Check your antibody manufacturer for wash recommendations. Tris-buffered saline (TBS) or phosphate-buffered saline (PBS) are the most commonly used solutions for washing. If your background noise is high, you can consider adding a detergent like Tween-20 to your washes — although this can be harsh and inhibit some detection reactions.
Like blocking, you don’t want to skimp on your washing steps! It’s important to let them wash for the full amount of time, every time.
Imaging
The last step in a western blot tends to be the most straightforward. While there are some things you’ll want to consider (see our “technical design of a western blot”) post, most imaging issues can be fixed real-time by exposing for either a shorter (for less exposure) or longer (for more exposure) time. If you’re seeing high background or low signal during the imaging process, try adjusting your exposure time first, since you can do that without having to re-run the western.
Remember that chemilumescent methods, like horseradish peroxidase protein (HRP), have a limited dynamic range based on the solution used to expose them. You’ll need to make sure the sensitivity of your exposure solution matches the expected amount of protein in your samples. If you have a wide variety of protein amounts on the same blot, you may want to consider using a different reporter or, if you don’t need to compare the protein amounts directly, stripping and reprobing. Just make sure to go from least to most abundant protein if you’re stripping, since you’ll lose protein with every strip cycle.
Troubleshooting the troubleshooting
There’s many different troubleshooting and optimization steps available for western blots, but it’s very unlikely you’ll be able to do them all for every western blot assay you run. How do you know which steps to take?
As a rule of thumb, the more strictly you want to interpret your blot’s data, the more time you’ll want to spend optimizing it. Blots for quantification generally require more optimization than blots used to confirm overexpression. Before starting a western blot, think about how you’ll interpret the data and what level of accuracy you’ll need to do that confidently.
Once you’ve run your western, check out our handy Table 1 for help in deciding which troubleshooting steps to take. It’s long but easy to use!
And remember, a western blot is only as good as its antibodies. Whenever possible, use validated antibodies or validate them yourself, so you don’t spend time troubleshooting an assay that’s fine with antibodies that are not.
Table 1: Troubleshooting a western blot
*indicates a diagnostic-only step
| Issue | Potential Cause | Troubleshooting Suggestion |
|
Proteins are the wrong size |
Proteins may be aggregating |
Lyse at lower temperature for a longer time |
|
Protein degradation |
Add protease inhibitors to lysate |
|
|
Insufficient denaturing conditions |
Adjust lysis conditions: time, temperature, and/or buffer to increase lysis |
|
|
Add sonication step to protein lysis |
||
|
Splice variants |
Check literature |
|
|
Posttranslational modifications |
Check literature |
|
|
Highly charged amino acids |
Run control protein (if available) and note in analysis |
|
|
Plasmid-based proteins: plasmid sequence not accurate |
Check plasmid sequence for frameshifts and stop codons |
|
|
Weird background patterns (dots, lines, smudges, etc...) |
Technical errors |
Search online/ask an expert |
|
Review protocol videos for a visual guide to good technique |
||
|
High background |
Antibody concentration too high |
Run a reagent gradient with the primary antibody* |
|
Run a reagent gradient with the secondary antibody* |
||
|
Inefficient blocking |
Check antibody spec sheet for buffer recommendations |
|
|
Use a chemical blocking buffer |
||
|
Increase blocking time and/or concentration |
||
|
Try a different protein-based buffer (eg, milk instead of BSA) |
||
|
Nonspecific antibody binding |
Run a reagent gradient with primary antibody* |
|
|
Decrease incubation time |
||
|
Increase amount of protein/sample loaded |
||
|
Incubate primary antibody at 4 °C overnight |
||
|
Incomplete washing |
Ensuring wash is happening under sufficient agitation (rocking) |
|
|
Add Tween-20 to wash buffer (can strip some protein from membrane) |
||
|
Increase time of wash step |
||
|
Increase volume of wash buffer |
||
|
Incomplete stripping (If stripping/reprobing) |
Check for antibody signaling after each round of stripping* |
|
|
Use a harsher stripping buffer |
||
|
Too little signal |
Large proteins: Incomplete transfer |
Check transfer with Ponceau red stain or other reversible stain* |
|
Roll out all of the bubbles in the membrane sandwich |
||
|
Ensure methanol concentration in transfer buffer is < 20% |
||
|
Wet transfer |
||
|
Increase transfer time |
||
|
Increase voltage |
||
|
Increase SDS/decrease alcohol in transfer buffer |
||
|
Small proteins: Over-transferring |
Transfer with two membranes* |
|
|
Psi membrane |
||
|
Semi-dry transfer |
||
|
Decrease voltage |
||
|
Decrease transfer time |
||
|
Decrease SDS/increase alcohol in transfer buffer |
||
|
Mixed proteins: Transferring issues |
Transfer with two membranes* |
|
|
Electroblot/dry transfer system |
||
|
Different membrane pore size |
||
|
Adjust SDS:alcohol ratio in transfer buffer |
||
|
Antibody dilutions too low |
Run a reagent gradient for primary antibody* |
|
|
Run a reagent gradient for secondary antibody* |
||
|
Antibody not completely binding |
Increase incubation time |
|
|
Not enough antibody binding sites |
Polyclonal or recombinant multiclonal antibodies |
|
|
Protein not properly lysed |
Different lysing buffer/adjust lysing buffer strength |
|
|
Sonication based lysing protocol |
||
|
Subcellular fractional kit or lysing protocol |
||
|
Not enough target |
Run protein control or load more lysate/sample* |
|
|
Underexposed |
Increase exposure time |
|
|
Chemilumenescence: use a more sensitive exposure kit |
||
|
Too much signal |
Antibody dilutions too high |
Run a protein gradient* |
|
Too much protein |
Load less sample |
|
|
Overexposed blot |
Shorter exposure time |
|
|
Chemilumenescence: use a less sensitive exposure kit |
||
|
No signal variation in highly expressed proteins |
Antibody dilutions too high |
Run a protein gradient* |
|
Load less sample/lysate |
We hope this helps you on your western blot journey. Best of luck and happy gradients!
References and resources
References
Luo, H., Rankin, G., Straley, S., & Chen, Y. (2011). Prolonged Incubation and Stacked Film Exposure Improve Sensitivity in Western Blotting. Journal of Pharmacological and Toxicological Methods, 64, 233–237. https://doi.org/10.1016/j.vascn.2011.06.001
More resources on the Addgene blog
Technical Design of a Western Blot
More resources on addgene.org
Topics: Antibodies, antibodies 101


Leave a Comment