This post was contributed by guest blogger Derek Simon.
![]() Optogenetics is spreading through the neuroscience community like wildfire and for good reason. For the first time in the history of neuroscience research we have a technology that allows us to show causality in neural circuits with incredible temporal and spatial precision (I’m not going to discuss the basic biology of optogenetics so if you are not familiar with it, check out the video below). That’s not to say that the technique doesn’t have its limitations or that other technologies need to be discarded but clearly we are in an era of neuroscience research where optogenetics will be a standard tool used in nearly any neuroscience project or topic of interest. Despite its power and versatility, the technique is remarkably straightforward to learn and relatively cheap (compared to many other technologies and techniques in the sciences). But how exactly does an optogenetics experiment work? What are the various tools and components necessary to run it? And, most importantly, what are the methodological and experimental limitations and considerations?
Optogenetics is spreading through the neuroscience community like wildfire and for good reason. For the first time in the history of neuroscience research we have a technology that allows us to show causality in neural circuits with incredible temporal and spatial precision (I’m not going to discuss the basic biology of optogenetics so if you are not familiar with it, check out the video below). That’s not to say that the technique doesn’t have its limitations or that other technologies need to be discarded but clearly we are in an era of neuroscience research where optogenetics will be a standard tool used in nearly any neuroscience project or topic of interest. Despite its power and versatility, the technique is remarkably straightforward to learn and relatively cheap (compared to many other technologies and techniques in the sciences). But how exactly does an optogenetics experiment work? What are the various tools and components necessary to run it? And, most importantly, what are the methodological and experimental limitations and considerations?
I recently spent two months in the lab of Antonello Bonci, Director of the National Institutes of Drug Abuse Intramural Research Program (NIH-NIDA IRP), with the stated goal of learning behavioral optogenetics in order to implement the technique in my lab at The Rockefeller University. In this and upcoming posts in this optogenetics primer series, I’m happy to share some of the tips and tricks and I’ve learned from numerous scientists at NIDA and some of the practicalities and considerations you may not find in the materials and methods sections of optogenetics papers.
Optogenetics step one: Deciding how you want to use optogenetics
The most important question to consider is what exactly do you want to use optogenetics for? The technique is non-trivial; you don’t want to spend months doing surgeries and making fiber optic cables only to hook up your lasers and not have the proper controls or a proper behavioral readout that allows you to interpret the results of your experiment. Like many things in science, optogenetics is best used to address a specific question. Optogenetics is a tool and, just like any other tool in a scientist’s vast toolbox, its effectiveness depends on how and why it’s used.
There are two main experimental avenues (that are not mutually exclusive) commonly used in optogenetics: 1) electrophysiology and 2) behavioral experiments. I’m not an electrophysiologist so I cannot speak directly on this topic but, in numerous studies, optogenetics is used in slice physiology in order to directly show that, for example, the firing of a specific type of neuron in a specific brain region can result in a particular neurotransmitter release or post-synaptic current. Fortunately, if your lab focuses primarily on behavior, you don’t necessarily need to use electrophysiology to prove that your optogenetic manipulations are generating action potentials (or lack there of, depending on the opsin you use); the efficacy of optogenetics has already been proven. Therefore, a concrete, well defined, and robust behavioral output is sufficient to assess the effectiveness of your optogenetic manipulations (though a reviewer will probably ask for electrophysiology data too but that’s what collaborators are for). For example, if you study neural pathways involved in addiction (such as the lab I work in), an obvious behavioral experiment to test for sufficiency of your circuit of interest in promoting reward is a self-stimulation experiment wherein mouse initiated optogenetic activation of a neuronal circuit either does or does not result in a reward sensation and subsequent repeated stimulation. A spatial memory task, on the other hand, would not be an appropriate test. Of course, proper controls are required and include, for example, confirmation of opsin expression in the intended brain region and/or cell type (I’ll talk more about this in detail later).
But what are the different steps in an optogenetics experiment and what are the tools required for each one? Behavioral Optogenetics can be broken down broadly into three main steps:
1) Selection and expression of your opsin of choice in the brain region you wish to stimulate
2) Fabrication and implantation of the optical fiber into the region of interest
3) Behavioral experimentation
I’ll discuss some of the key features of each of these steps. Today we’ll discuss selection and expression of your opsin, but keep you eyes open for posts about the next steps in the coming weeks.
Expression of the optogenetic constructs
Expression of your desired optogenetic construct in the brain region and cell type of interest is obviously of critical importance to any optogenetic experiment. There are numerous variants for the different types of opsins available and their differences and uses have been discussed thoroughly elsewhere (here and here for instance) [2], [3]. Karl Deisseroth of Stanford University , one of the key scientists who pioneered the development of optogenetics, has genetically manipulated a number of the opsin genes to alter the light spectrum for activation and the kinetics of opsin activity/inactivity. Dr. Deisseroth has also generously made many of his optogenetic constructs available through the vector cores of various universities as well as Addgene. See the Deisseroth lab homepage for details about types of constructs available, instructions for obtaining a material transfer agreement, and list of vendors (such as the vector core at the University of North Carolina) that offer his constructs. Importantly, control viruses (not expressing the opsin) are also available.
Picking your opsin
You must consider whether you wish to stimulate or inhibit neuronal firing, the cell-type specificity, the kinetics of the opsin variant, and other particularities that best suit your specific experiment. Consult these reviews for a discussion of the different variants [1, 2, 4]. And, of course, the best way to learn about the many different opsin variants and how they can be used is to consult the many primary research papers that have been published at this point.

In brief, some standard opsins (see table above) include Channelrhodopsin2 (Chr2), a blue-light sensitive non-specific cation channel, activation of which results in depolarization and subsequent firing of an action potential. Halorhodopsins (HR) are green/yellow-light sensitive chloride ion pumps, activation of which results in efflux of chloride ions, subsequent hyperpolarization, and inhibition of action potential generation. Archaerhodopsin (Arch) is activated at a similar spectrum as HR and also results in membrane hyperpolarization but unlike HR, this is achieved through hydrogen ion efflux; evidence suggests that Arch may more effectively silence neurons than HR.
Delivering your opsin
The standard opsin delivery method is local injection of an adeno-associated viral (AAV) construct using stereotaxic surgery (see videos below). The Deisseroth lab has developed many of these AAV constructs with various promoters and other genetic manipulations to help restrict expression to a specific neuronal subtype. However, the length of promoter that can be used in an AAV construct is limited to only a few kb so attaining neuronal specificity through promoter-directed expression alone is extremely limited. Therefore, highly expressing, generic neuronal promoters such as synapsin or camKIIα drive most of the constructs. As an alternative, some constructs have been engineered with a double-floxed inverse open-reading frame (DIO). Upon coexpression with cre recombinase (either from a mouse line or viral co-injection), the opsin is inverted into the correct direction and expressed (under control of a generic promoter). A DIO opsin allows cell type specificity dependent on the promoter of the cre recombinase while still taking advantage of the robust expression via the promoter in the AAV construct.
Stereotaxic surgery
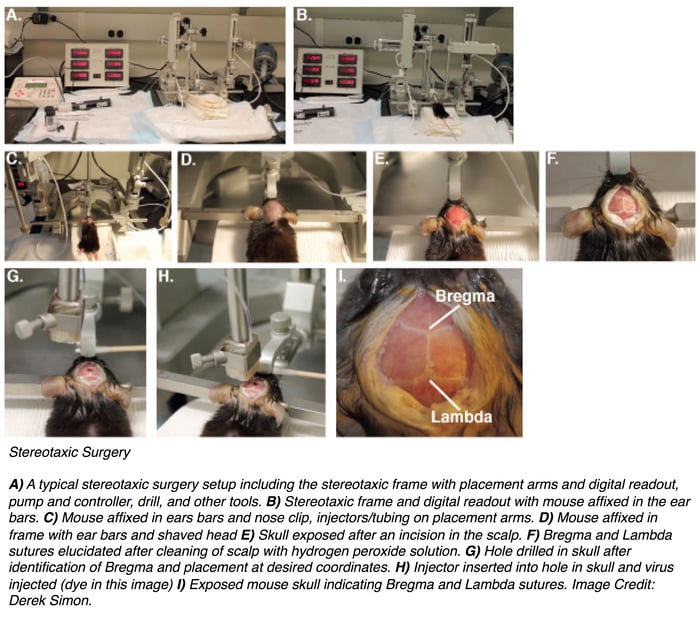
As mentioned above, AAV opsin constructs are injected directly into the region of interest using stereotaxic surgery (stereotaxic surgery videos can be found on youtube [above] and jove). Delivery of an AAV construct using stereotaxic surgery is a neuroscience research technique often used beyond just optogenetics. Successful stereotaxic surgery relies on identification of the bregma and lambda sutures and subsequent determination of the proper coordinates of your brain region of interest (as shown in the figure below). Since most of the precision of optogenetics is dependent on successful delivery of the AAV opsin construct, proficiency in stereotaxic surgeries is required. In any given optogenetics experiment you may need to inject virus into 20 or more mice and the injections must be near identical for all of these surgeries. Identify coordinates through a rodent brain atlas or research papers and practice with die injection prior to using the virus. You may need to adjust coordinates based on your own method of identifying bregma but it is best to spend the time practicing your injections until they are accurate and reproducible. I also highly recommend spending the money on a high quality stereotaxic frame with a digital readout. The advantage is you can “zero” your coordinates at bregma which allows you to quickly and reliably locate your injection site. We recently purchased this model ( no longer available through Kopf). Additional general protocols on stereotaxic surgeries for viral injections can be found here [5, 6].
Opsin transgenic mice
Transgenic mouse lines have also been engineered to express various opsin genes [7-9]. The advantage of using these lines is, if one is crossed with an appropriate mouse line expressing a particular cre, viral expression of your opsin is no longer required to achieve cell-type specific opsin expression. However, the types of opsins you are able to use are obviously limited by the mouse line itself. Generation, breeding, and maintenance of a mouse line is also an expensive and time-consuming endeavor. Finally, expression of the opsin in a mouse line will likely be less than that of viral expression but may still be sufficient for successful stimulation.
Testing opsin expression
Regardless of the method of expression of your opsin gene, it is essential to test the expression of your opsin. Thankfully the Deisseroth constructs coexpress a fluorescent protein, which allows for easy identification of opsin expression, extent of viral spread, and with co-localization immunofluorescence, cell-type specificity. Viruses that only express the fluorescent proteins are used as a critical control.
Depending on the AAV serotype, promoter of choice, and size of the target brain region, the optimal viral titer must be determined empirically (this is the case for any viral injection into the brain). As a general rule of thumb, if you can detect a strong fluorescent signal (without antibody manipulation), then expression is likely sufficient for successful optical stimulation. It is also important to note that some promoters are so robust they may actually cause neuronal death if allowed to express for too long (synapsin was privately communicated to me as one of these extremely high expressing promoters). Conduct a time course experiment in which you monitor expression at various time points (e.g. every 1-2 weeks over 8 weeks) in order to determine the optimal time period between viral injection and commencement of behavioral experimentation.
Whether you attempt to stimulate the cell body or an axon terminal also affects the length of time you may need to allow the virus to express. For example, if you inject into the ventral tegmental area (VTA) but wish to stimulate VTA terminals in the Nucleus Accumbens (NAc; a primary target of VTA projections), you must wait for the opsin to express and passively diffuse down the length of the fiber before stimulation of the terminals can be attempted [10]. Unfortunately, opsins are not actively transported and must passively diffuse so, depending on the length of your projection, it may take as long as 6-8 weeks for sufficient opsin to reach the axon terminal. Again, this must be empirically determined in your own system.
Once you are confident you have optimized your stereotaxic surgeries and viral expression, you are ready to proceed to the material science part of optogenetics. In next week’s post we’ll delve into some of the important materials science considerations for your optogenetics experiments. Stay tuned!
Many thanks to our guest blogger Derek Simon!

Derek P. Simon received his PhD in Cellular and Molecular Biology from the University of Michigan and he is currently a Postdoctoral Fellow in the lab of Mary Jeanne Kreek at the Rockefeller University. His interests include the role of learning and memory in opioid addiction and science communication/science writing. Derek is also a pianist and an aspiring composer. View his blog drsimonsaysscience.org or follow him on Twitter @derekpsimonphd.
References
1. Tye KM, Deisseroth K. Optogenetic investigation of neural circuits underlying brain disease in animal models. Nature reviews Neuroscience. 2012;13(4):251-66. doi: 10.1038/nrn3171. PMID: 22430017.
2. Fenno L, et al. The development and application of optogenetics. Annual review of neuroscience. 2011;34:389-412. doi: 10.1146/annurev-neuro-061010-113817. PMID: 21692661.
3. Bernstein JG, Boyden ES. Optogenetic tools for analyzing the neural circuits of behavior. Trends in cognitive sciences. 2011;15(12):592-600. doi: 10.1016/j.tics.2011.10.003. PMID: 22055387; PMCID: PMC3225502.
4. Mattis J, et al. Principles for applying optogenetic tools derived from direct comparative analysis of microbial opsins. Nature methods. 2012;9(2):159-72. doi: 10.1038/nmeth.1808. PMID: 22179551; PMCID: PMC4165888.
5. Harris JA, et al. Adeno-associated viral vectors for anterograde axonal tracing with fluorescent proteins in nontransgenic and cre driver mice. Current protocols in neuroscience / editorial board, Jacqueline N Crawley [et al]. 2012;Chapter 1:Unit 1 20 1-18. doi: 10.1002/0471142301.ns0120s59. PMID: 22470147.
6. Gore BB, et al. Manipulating gene expression in projection-specific neuronal populations using combinatorial viral approaches. Current protocols in neuroscience / editorial board, Jacqueline N Crawley [et al]. 2013;4(435):4 35 1-4 20. doi: 10.1002/0471142301.ns0435s65. PMID: 25429312; PMCID: PMC4242517.
7. Madisen L, et al. A toolbox of Cre-dependent optogenetic transgenic mice for light-induced activation and silencing. Nature neuroscience. 2012;15(5):793-802. doi: 10.1038/nn.3078. PMID: 22446880; PMCID: PMC3337962.
8. Zhao S, et al. Cell type-specific channelrhodopsin-2 transgenic mice for optogenetic dissection of neural circuitry function. Nature methods. 2011;8(9):745-52. PMID: 21985008; PMCID: PMC3191888.
9. Zeng H, Madisen L. Mouse transgenic approaches in optogenetics. Progress in brain research. 2012;196:193-213. doi: 10.1016/B978-0-444-59426-6.00010-0. PMID: 22341327; PMCID: PMC3433654.
10. van Zessen R, et al. Activation of VTA GABA neurons disrupts reward consumption. Neuron. 2012;73(6):1184-94. doi: 10.1016/j.neuron.2012.02.016. PMID: 22445345; PMCID: PMC3314244.
- Find optogenetics plasmids!
- Find AAV resources!
- Find fluorescent protein resources!

Topics: Optogenetics, Viral Vectors, AAV


Leave a Comment