
This blog was originally published on BitesizeBio here.
As part of my job ensuring plasmid quality at Addgene, I analyze 50-100 sequencing reactions a week. So I have developed some good habits that I wanted to pass on to you to make sure you are getting the most out of the data you get back from your sequencing runs.
When you run a restriction digest on a gel you always include proper controls like uncut DNA and the proper ladder. These controls help you properly visualize your results.The most important of those is to always look closely at the trace file (or chromatogram) of the sequencing results you get back from your favorite sequencing facility.
When it comes to DNA sequencing the chromatogram is your visual control. And, like all controls, missing out is a big mistake.
Chromatograms come to the rescue for analyzing and troubleshooting your DNA sequencing results
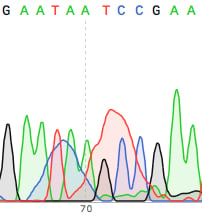
Above (top right corner of this post) is an example of a seemingly clean DNA sequence (no Ns in sight). If you never looked at the trace you would be happy.
But look closer, the overlapping peaks in the chromatogram suggest the results are not as certain as the sequence may suggest. In fact this is so ambiguous that the DNA sequencing reaction should be repeated.
Guidelines to help with DNA sequencing troubleshooting and analysis
1. You can use any of the following programs to view your .ab1 chromatogram file
- 4Peaks (Mac)
- SnapGene Viewer (Mac/PC)
- FinchTV(Mac/PC)
- Chromas (PC)
2. You should see individual, sharp and evenly spaced peaks
…like these….

3. Expect to get 500-700 bases of clean reliable DNA sequence
Anything less and you might suspect contamination in your sample or consider asking your sequencing facility to apply a special protocol for a difficult template. Anything more and you’re venturing into the uncertain terrain.
4. Never trust the first 20-30 bases of a DNA sequencing read
The peaks here are usually unresolved and small, so I suggest designing your primer at least 50bp upstream of the sequence of interest.
5. Use a silica spin column for purification of the samples you send for DNA sequencing
If your sequencing facility requires you to perform your own Big Dye PCR amplification reaction (as opposed to using the all inclusive service some companies offer), you can purify the product either via the Sodium Acetate/isopropanol precipitation method or using a silica spin column available from several vendors. The precipitation method has an unfortunate side effect of messing up the reaction around base 70-75 of the read (see image below), so I would strongly recommend using a silica spin column. They can be pricey, but well worth it.
6. Edit your DNA sequence
Finally, when you do see a miscalled peak, don’t be shy. Feel free to edit it. Most chromatogram viewing programs (even the free ones) allow you to edit the sequence.

I hope these tips will help you get the most out of your DNA sequencing results and to troubleshoot any problems that come up. Good luck analyzing your sequences!
More DNA Sequencing Resources:
![]() Acknowledgements:
Acknowledgements:
- Thank you BitesizeBio for originally publishing this and allowing us to share it with our readers!
- The chromatograms in this article were created with SnapGene.


Leave a Comment