This post was contributed by guest bloggers Joachim Goedhart and Marieke Mastop from the Section of Molecular Cytology and Van Leeuwenhoek Centre for Advanced Microscopy, University of Amsterdam.
Before you decide which car you want to buy, it is worthwhile to test-drive a couple of candidates. Before you buy a new microscope, it is smart to look at (and through) a couple of models. Before you start a new project with fluorescent proteins, the best advice is to try a couple of promising variants to check how they perform under your experimental conditions. This is time well spent and, if you do it right, can be (part of) figure 1 of your next paper or thesis. This series of posts explains how to critically assess the reported properties of fluorescent proteins, how to do a head-to-head comparison of fluorescent proteins and how to make a well-informed decision on the best fluorescent protein for your application.
Selecting the best fluorescent protein for a specific application can seem like a daunting task. Many fluorescent proteins are available and the number of fluorescent proteins is steadily increasing. Often, the choice for a fluorescent protein is based on the properties found in the literature or tabulated data that summarizes properties of fluorescent proteins on websites. To make the best choice, the fluorescent protein properties need to be scrutinized under relevant conditions.
The properties of fluorescent proteins are usually only examined under a few conditions since it is impossible to check all possible combinations of biology and equipment. Because the performance of a fluorescent protein strongly depends on both the biological system as well as the imaging method, we recommend basing your selection on a small-scale head-to-head comparative study under conditions that best mimic the intended application. The three key properties for live cell imaging that will be treated in this series of posts are (i) brightness, (ii) photostability and (iii) aggregation tendency.
Brightness
Brightness refers to the fluorescence intensity of a fluorescent molecule. A higher brightness increases the detected signal and therefore high brightness is an important feature of a fluorophore. The key question is how the brightness is best defined or determined. Here, we will explain how practical brightness is determined and why practical brightness is a better criterion than theoretical brightness for selecting the brightest fluorescent protein.
Theoretical brightness
Two key properties of fluorophores that determine brightness are the extent to which the excitation light is absorbed and the efficiency by which absorbed photons are converted into emitted photons. These are indicated by the extinction coefficient (EC) and quantum yield (QY) respectively. The theoretical brightness is calculated by multiplying EC by QY (EC*QY, sometimes normalized to the value of EGFP). The higher the number, the higher the theoretical brightness. The theoretical brightness often appears in tables with fluorescent protein properties and provides a quick way to compare fluorescent proteins, e.g. see Chudakov et al (2010), Cranfill et al (2016) or Thorn (2017). However, the theoretical brightness ignores several important experimental conditions that are related to the imaging strategy and the sample.
Practical brightness
A protein with a high intrinsic brightness that does not fold well or cannot be detected in a microscopy setup has zero practical brightness and is of no use. Therefore, it is more sensible to compare fluorescent proteins based on their practical brightness in your experimental set up. The practical brightness takes all application specific parameters into account, including the specs of your microscope (excitation wavelength, available emission filters, and detector sensitivity) and the biological system (temperature, prokaryote versus eukaryote, background fluorescence).
Determining practical brightness
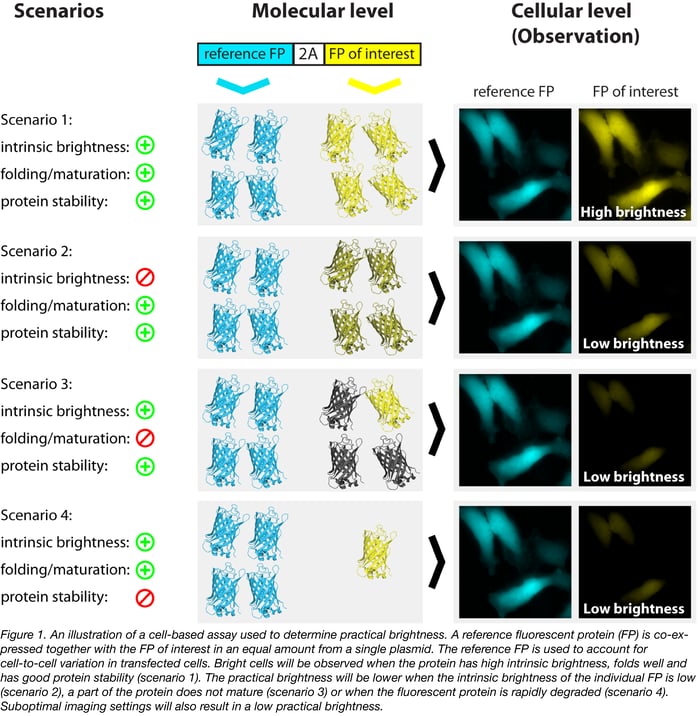
When a dish of mammalian cells is transiently transfected with a plasmid containing a fluorescent protein (fusion) there is huge variation in the fluorescence intensities of individual mammalian cells within the dish. This is caused by the stochastic nature of plasmid uptake by cells. To correct for this variation, a reference fluorescent protein that is expressed at an equal level (Goedhart et al, 2011) can be used.
An assay developed in our lab uses a reference protein that is translated from the same open-reading frame and separated from the protein of interest by a 2A self-cleaving peptide (Goedhart et al, 2010). An explanation of the assay is depicted in figure 1. The strict correlation between the fluorescent protein of interest and the reference protein (Goedhart et al, 2011) allows for a precise determination of brightness in cells, under realistic experimental conditions. By determining the brightness for a set of fluorescent proteins (with the same reference protein) under identical conditions, a ranking of the practical brightness can be made (Goedhart et al, 2012, Bindels et al, 2017). The plasmid for co-expressing mTurquoise2 with mVenus as a reference protein is available from Addgene.

Another way to dodge cellular variation observed in mammalian cells is to tag an endogenous gene. By imaging cells (or tissues) that produce an endogenous protein tagged with a fluorescent protein and repeating this with another fluorescent protein, a ranking of practical brightness can be made. This strategy has been used in yeast by Lee et al (2013) and in nematodes by El Mouridi et al (2017) and Heppert et al (2016). In mammalian cells this would be possible with CRISPR/Cas-based genome editing.
Selecting a bright fluorescent protein
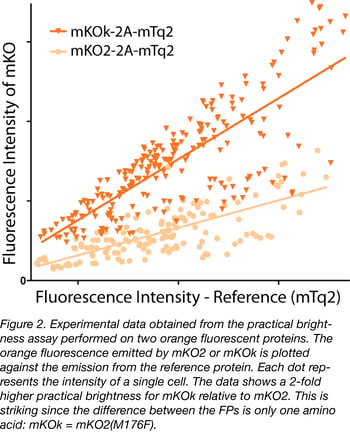
 Practical brightness takes all experimental conditions into account. In particular, the folding and maturation efficiency of the fluorescent protein in the host cell, which is a key determinant of the practical brightness. Therefore, practical brightness provides a better picture of what can be expected in a 'real' application than the theoretical brightness. Consequently, it makes sense to identify a couple of promising fluorescent proteins and to determine and compare their practical brightness in a system closely mimicking the future application. In figure 2 we provide an example of the comparison of the practical brightness of two orange fluorescent proteins, differing by only a single amino acid. Without further information about properties like photostability or aggregation tendency, our choice would be mKOk-2A-mTq2; it is much brighter than mKO2-2A-mTq2 according to this data. The practical brightness assay (employing co-expressing fluorescent proteins or using endogenous tagged genes) can be used to verify performance under different imaging conditions (e.g. different emission filters) or different set-ups.

Many thanks to our guest bloggers Joachim Goedhard and Marieke Mastop!
 Joachim Goedhart is an assistant professor at the Section of Molecular Cytology and Van Leeuwenhoek Centre for Advanced microscopy (University of Amsterdam). He develops, characterizes and uses genetically encoded fluorescent probes. You can follow him on twitter: @joachimgoedhart.
 Marieke Mastop is a PhD candidate at the Section of Molecular Cytology (University of Amsterdam) where she develops genetically encoded FRET based biosensors.
Additional Resources on the Addgene Blog
- Which Fluorescent Protein Should I Use?
- Choosing Your Fluorescent Proteins for Multicolor Imaging
- Learn about Fluorescent Protein Biosensors
Additional Resources on Addgene.org
- Find Empty Backbones with Fluorescent Tags
- Find Plasmids for Subcellular Localization
- Browse the entire Fluorescent Protein Collection


Leave a Comment