This post was contributed by guest blogger Derek Simon.
 The surgeries and standard molecular neuroscience validation experiments we discussed last week are only half of the battle when using optogentics to answer a research question. The flip side of the optogenetics coin is materials science-based. Light is delivered to your opsin through a small piece of fiber optic cable implanted into the animal’s skull (right). The fiber optic cable is threaded through—and fixed to—an optical insulator called a ferrule (below). The fiber optic cable/ferrule is inserted into the target brain region using stereotaxic surgery and cemented to the animal’s skull using dental cement (a similar procedure as implanting a guide cannula). A fiber optic patch cable is then connected from laser to ferrule to deliver light pulses to the target brain region.
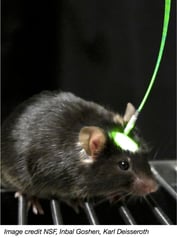
Thankfully, due to their prominence, the preparation of the fiber optics is probably the least difficult portion of optogenetics (though it does require a significant amount of equipment, most of which is relatively cheap). Several protocols have been written outlining the different steps and materials required for each [1, 2]. This protocol [3] provides, in exquisite detail, the various steps required to produce your fiber optic implant. Companies such as Thor Labs and Precision Fiber Products that specialize in fiber optics have become go-to providers of materials needed for optogenetics.
 for size comparison") There are several important considerations with fabrication of the fiber optics needed for optogenetics. First, the length of the fiber optic for the implant depends on the dorsal/ventral location of your region of stimulation (the z-axis bregma coordinate). Because the light that is emitted from the end of the fiber optic implant scatters a great deal once it enters tissue, placement above the site of stimulation guarantees that the majority of the opsins will receive sufficient quantities of photons to become activated. Light is able to penetrate brain tissue a short distance so ideal implant placement should be about 0.4-0.5mm above the site of your stimulation.
There are several important considerations with fabrication of the fiber optics needed for optogenetics. First, the length of the fiber optic for the implant depends on the dorsal/ventral location of your region of stimulation (the z-axis bregma coordinate). Because the light that is emitted from the end of the fiber optic implant scatters a great deal once it enters tissue, placement above the site of stimulation guarantees that the majority of the opsins will receive sufficient quantities of photons to become activated. Light is able to penetrate brain tissue a short distance so ideal implant placement should be about 0.4-0.5mm above the site of your stimulation.
The scatter effect is also an important consideration when preparing the implant itself, which brings me to the second key point; the fiber optics need to be polished to significant smoothness to prevent drastic loss of efficiency between patch cable and implant. A steady stream of photons from the laser to the patch cable to the ferrule implant must be maintained during the entire protocol, otherwise optical stimulation will be erratic, opsin activation/inactivation inconsistent, and behavioral results impossible to interpret. Polishing the fiber optics with diamond polishing paper of sequentially increasing fineness helps to maintain a consistent stream of light. Test your implant by connecting it to a patch cable connected to the laser and measuring its output with a light meter before and after polishing. Efficiency of the implant should be at least 85% of the initial laser output. The same considerations apply to the polishing and preparation of the patch cable (although you may be able to purchase one pre-made instead).
Laser stimulation
In the video above, Channelrhodopsin 2 (Chr2) has been expressed in the motor cortex of a mouse. Upon connection of the ferrule implant to the laser with the patch cable (difficult to see the cable) and subsequent stimulation, the rate of movement of the animal significantly increases.
Before you get your experiment started, you will need a laser of the appropriate wavelength to stimulate your opsin. Each opsin has an excitation spectrum (use the resources discussed in post one of this series already provided or check the materials and methods of a paper that uses the variant you wish to use to determine the ideal excitation). Lasers can be purchased through Laserglow, which caters to optogenetics users and adjusts the lasers appropriately (tuned for optogenetics). These lasers are relatively cheap and will run you about $2-3,000/laser. However, an important caveat is that one laser can stimulate only a single animal during the course of an experiment. There are a number of reasons for this but the primary one is that some behavioral experiments require stimulation only under certain contexts/locations in the test apparatus and thus individual laser stimulation is essential.
In terms of the laser stimulation itself, the output of the laser must be controlled. As discussed above, each opsin variant has slightly different activation/inactivation kinetics. For example, the light-gated cation channel, Channelrhodopsin 2 (ChR2), exists in several states: closed/light receptive, open, closed/light insensitive. If you deliver a continuous stream of photons, Chr2 will open but will not be given an opportunity to “reset” and become receptive to light once again. Therefore, light must be delivered in pulses. An example of a standard stimulation parameter is 20Hz (laser output), 5ms “on”, 50ms “off”. A pulse generator such as the A.M.P.I Master-9 Pulse Stimulator, which can control output of several lasers simultaneously, can be used to set the laser output without manual manipulation of the laser power source itself. Pulse generation (TTL pulse) is a standard electronics protocol not specific to lasers or optogenetics so cheaper, less powerful alternatives to the Master-9 that only control one or two lasers are also available. Optimal stimulation parameters must also be determined empirically but it’s best to try those that have already been published first.
Because behavioral optogenetics is performed in freely moving animals, the fiber optic patch cable must be the appropriate length for your specific behavioral apparatus or test but not so excessively long that it becomes tangled. Furthermore, to give the animal the full range of motion, a commutator allows the patch cable to connect to the laser and rotate 360° without a loss of laser power. More recently, wirelessly-controlled optogenetic implants have been reported by several groups [4, 5, 6]. These have the obvious advantage of not requiring patch cable connection to the laser, which affords the animal much greater movement flexibility in behavioral experiments. However, the technical demands of using these wireless devices are significantly higher than standard “wired” optogenetics but may become the standard in the future.
Now that your animals are all wired up and expressing your opsin of interest, it’s time to get to the fun stuff: the experiments! In our final post in this primer on optogenetics we’ll delve into some of the important considerations when performing optogenetics behavioral experiments.
Thank you to our guest blogger Derek Simon!

Derek P. Simon received his PhD in Cellular and Molecular Biology from the University of Michigan and he is currently a Postdoctoral Fellow in the lab of Mary Jeanne Kreek at the Rockefeller University. His interests include the role of learning and memory in opioid addiction and science communication/science writing. Derek is also a pianist and an aspiring composer. View his blog drsimonsaysscience.org or follow him on Twitter @derekpsimonphd.
References
1. Gutierrez DV, et al. Optogenetic control of motor coordination by Gi/o protein-coupled vertebrate rhodopsin in cerebellar Purkinje cells. The Journal of biological chemistry. 2011;286(29):25848-58. doi: 10.1074/jbc.M111.253674. PubMed PMID: 21628464; PubMed Central PMCID: PMC3138296.
2. Sparta DR, et al. Construction of implantable optical fibers for long-term optogenetic manipulation of neural circuits. Nature protocols. 2012;7(1):12-23. doi: 10.1038/nprot.2011.413. PubMed PMID: 22157972.
3. Britt JP, et al. Use of channelrhodopsin for activation of CNS neurons. Current protocols in neuroscience / editorial board, Jacqueline N Crawley [et al]. 2012;Chapter 2:Unit2 16. doi: 10.1002/0471142301.ns0216s58. PubMed PMID: 23042500; PubMed Central PMCID: PMC3466483.
4. Kim TI, et al. Injectable, cellular-scale optoelectronics with applications for wireless optogenetics. Science. 2013;340(6129):211-6. doi: 10.1126/science.1232437. PubMed PMID: 23580530; PubMed Central PMCID: PMC3769938.
5. Iwai Y, et al. A simple head-mountable LED device for chronic stimulation of optogenetic molecules in freely moving mice. Neuroscience research. 2011;70(1):124-7. doi: 10.1016/j.neures.2011.01.007. PubMed PMID: 21238511.
6. Jeong, Jae-Woong, et al. Wireless Optofluidic Systems for Programmable In Vivo Pharmacology and Optogenetics. Cell 162.3 (2015): 662-674. doi: 10.1016/j.cell.2015.06.058. Pubmed PMID: 26189679.

Topics: Optogenetics, Other, Neuroscience


Leave a Comment