Scientists use deep mutational scanning to simultaneously test how multiple amino acid changes affect a protein of interest’s function. This technique relies on the generation of a plasmid library that expresses all desired variants of a protein. Applying a selective pressure winnows the pool down to plasmids expressing variants with optimal function. High-throughput DNA sequencing is then used to measure the frequency of each variant during the selection process. Each variant is assigned a functional score based on its library frequency before selection compared to its library frequency after selection. Key to this process is the ability to generate full libraries of mutant proteins. Researchers from the Whitehead lab developed One pot saturation mutagenesis as a quick and easy technique that can be used to generate complex libraries of mutant plasmids ready for deep mutational scanning.

3 reasons to be interested in deep mutational scanning
- Hundreds of thousands of protein variants can be tested in one experiment.
- There are many functional assays that link genotype to phenotype that can be used with mutational scanning: ligand binding assays, phage display assays, ubiquitination activity assays, toxin activity, small molecule binding, growth rate, and many more. See Fowler et al for advice on choosing and validating a selection system.
- You can test the effect of multiple mutations in combination and possibly discover unexpected epistatic changes in protein activity. See Natarajan et al for an example of this.
Plasmid library generation prior to one pot saturation mutagenesis
Several methods can be used to create mutational scanning libraries. While each of these methods works well to generate libraries, they all have inherent shortcomings compared to one pot saturation mutagenesis.

- Error-prone PCR: This method amplifies the wild-type template with a “sloppy” version of PCR that results in a polymerase error rate of up to 2% per nucleotide position. The “sloppy” PCR reaction is created by making some or all of the following modifications: 1) increased concentration of Taq polymerase, 2) increased PCR extension time, 3) increased concentration of MgCl2, 4) increased concentration of dNTP, and/or 5) the addition of MnCl2. Disadvantages of this method include favoring of certain types of mutations, difficulty controlling the rate of mutagenesis, and low throughput.
 Gibson Assembly: An easy-to-use technique that joins homologous DNA fragments in a single-tube reaction. For mutational scanning experiments, libraries of DNA fragments that contain variable bases (NNN) at any given codon site of interest can be cloned into an expression vector with Gibson assembly. While this is a comprehensive mutagenesis method, a drawback to using Gibson assembly is that the longer the oligo insert used, the more likely it will contain random synthesis errors, especially single basepair deletions. Therefore, Gibson assembly is better suited for creating small, focused scanning libraries.


- PFunkel: Of prior existing comprehensive mutagenesis methods, PFunkel offers the best combination of library coverage, mutational efficiency, control over where mutations are introduced, and scalability (see Supplementary Table 1 of Wrenbeck et al). It uses a uracil labeled wild-type ssDNA as template for a site-directed mutagenesis PCR that uses mutagenic primers to introduce all desired codon changes (step 1 in the image above). A second universal primer is used to synthesize a complementary mutant strand (step 2 and 3). Then the uracil-labeled template strand is degraded by uracil DNA glycosylase (UDG) and Exonuclease III (ExoIII) (step 4). UDG recognizes uracils that are in DNA and ExoIII recognizes nicked duplexed DNA. This results in the final product having a codon change present on both strands of the plasmid. The ssDNA template is generated by transforming a backbone phagemid vector into an E. coli strain that is deficient in dUTPase and uracil deglycosidase. dUTPase prevents the buildup of dUTP and uracil deglycosidase removes uracil from newly synthesized DNA. Lack of both enzymes leads to a buildup of uracil and the insertion of uracil into newly synthesized DNA. This labeled ssDNA is packaged into phage and then extracted. Besides taking a couple days to generate the phage-derived uracil labeled template, this method requires further DNA shuffling to combine pairs of mutations together to test combinatory effects.
One-pot saturation mutagenesis
The one-pot saturation mutagenesis technique described in Wrenbeck et al is a PCR-based approach for generating a customizable comprehensive mutagenesis library that’s ready to be tested in a functional screen of your liking. This method is similar to site-directed mutagenesis (SDM) PCR, but with a twist since it relies on the sequential nicking, degradation, and PCR-generation of a mutant version of the top and bottom strands of the backbone plasmid. Unlike SDM, which uses a single mutagenic primer pair to generate an individual mutant, this technique uses mutagenic primers that tile across a region of interest, generating multiple mutants in one PCR reaction.
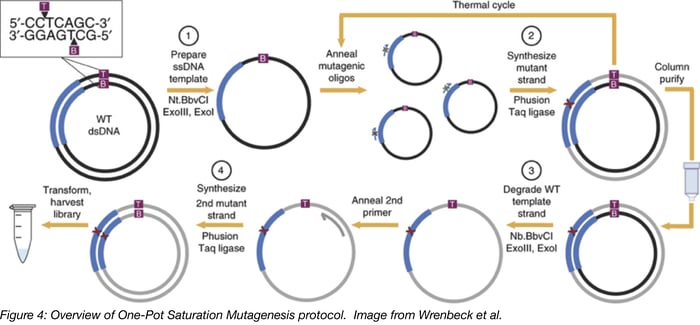
Below is a step-by-step overview of the protocol:
- Prepare ssDNA template: The wild-type plasmid backbone is nicked by one of a pair of restriction enzymes. These enzymes, Nt.BbvCI and Nb.BbvCI, recognize the same restriction site, but nick opposite strands of DNA. Treating the plasmid with ExoIII and ExoI then fully degrades the nicked strand.
- Synthesize mutant strand: A mix of degenerate primers and the high-fidelity Phusion polymerase are used to introduce point mutations into the newly synthesized DNA strand. Each degenerate primer set contains three consecutive randomized bases (NNN) at a given codon site and multiple primer sets tile across the protein or region of interest. A low primer-to-template ratio is used to promote annealing of one primer to each template. The PCR product is then column purified.
- Degrade wild-type template strand: Next, the opposite wild-type DNA strand is nicked by the BbvCI variant not used in step 1. Then this strand is degraded with ExoIII and ExoI.
- Synthesize 2nd mutant strand: The second mutant strand is synthesized in the same manner as the first mutant strand, but a universal primer is used for this round of PCR. The PCR product is digested with DpnI to remove residual starting template. After transformation and harvest, the library is ready for use.
One-pot saturation mutagenesis FAQ
- What’s the maximum length of codons that can be mutated? 88 codons, or 264 basepairs, was the maximum length tested by Wrenbeck et al but it’s likely that longer stretches of sequence could be used. However, a practical limitation is sequencing depth and cost. You need at least 100-200 reads per variant, so the more codons you test in one library, the more sequencing reads you will need. See Fowler et al for more details on how to determine read depth.
- Can I use my favorite plasmid with this protocol? Maybe. Not all plasmids will work for the one-pot mutagenesis method. There needs to be a BbvCI site present in the backbone.
- Does it matter what order I nick the top and bottom strands of the plasmid? The authors’ compared nicking the top strand first followed by the bottom strand versus nicking the bottom strand first followed by the top strand. Both produced about the same number of positive clones. See Supplementary Note 1 in Wrenbeck et al for details on how nicking was optimized.
- How should I design my mutagenic primers? The key is to design primers that are the same sense as the strand of DNA degraded in the first digest (step 1 in above diagram). Remember that the BbvCI enzymes nick the DNA strand that contains their respective recognition site. This means that if the BbvCI enzyme used for ssDNA preparation nicks the anti-sense strand, then the ssDNA template formed will be sense. Therefore, mutagenic oligos need to be anti-sense so they will anneal to the template. The opposite is true if the sense strand is nicked for template formation: template will be anti-sense, primers should be sense.
- Does the orientation of the BbcVI restrict site matter? Most of the time no, but there are 2 instances where it does. 1) When the backbone vector has multiple BbvCI sites. If these sites have opposite orientations, then both strands of the plasmid will be nicked during the first BbvCI digest and the whole plasmid will be degraded by ExoIII. See the below figure for an example like this. 2) When your gene of interest has a BbvCI site(s). If so, the nicking mutagenesis protocol will still work if the orientation of the BbvCI site(s) of the gene are in the same orientation as those in the plasmid. Again, if they are in the opposite direction, both strands of the plasmid will be nicked during the first BbvCI digest and the whole plasmid will be degraded. It’s easy to determine the orientation by looking at a map of your plasmid. If the sites are in opposite directions, you just need to use a plasmid with BbvCI restriction sites in the same orientation as the gene or use custom gene synthesis or site directed mutagenesis to remove the BbvCI site(s).

Overall, the key features of the one-pot saturation mutagenesis method are 1) ease of use, 2) time savings, and 3) ability to perform single site or multi-site saturation mutagenesis with the same protocol.
What do you think about one pot saturation mutagenesis? How would you use it in your research?
References
1. Natarajan, Chandrasekhar, et al. "Epistasis among adaptive mutations in deer mouse hemoglobin." Science 340.6138 (2013): 1324-1327. PubMed PMID: 23766324. PubMed Central PMCID: PMC4409680.
2. Mccullum, E. O., Williams, B. A., Zhang, J., & Chaput, J. C. (2010). “Random Mutagenesis by Error-Prone PCR”. Methods in Molecular Biology In Vitro Mutagenesis Protocols, pg. 103-109. PubMed PMID: 20676978.
3. Wrenbeck, Emily E., Justin R. Klesmith, James A. Stapleton, Adebola Adeniran, Keith E J Tyo, and Timothy A. Whitehead. "Plasmid-based one-pot saturation mutagenesis." Nature Methods 13.11 (2016): 928-30. PubMed PMID: 27723752.
4. Fowler, Douglas M., Jason J. Stephany, and Stanley Fields. “Measuring the Activity of Protein Variants on a Large Scale Using Deep Mutational Scanning.” Nature Protocols 9.9 (2014): 2267–2284. PubMed PMID: 25167058. PubMed Central PMCID: PMC4412028.
5. Araya, Carlos L., and Douglas M. Fowler. "Deep mutational scanning: assessing protein function on a massive scale." Trends in Biotechnology 29.9 (2011): 435-42. PubMed PMID: 21561674. PubMed Central PMCID: PMC3159719.
6. Firnberg, Elad, and Marc Ostermeier. “PFunkel: Efficient, Expansive, User-Defined Mutagenesis.” Ed. D. Dafydd Jones. PLoS ONE 7.12 (2012): e52031. PubMed PMID: 23284860. PubMed Central PMCID: PMC3524131.
Additional Resources on the Addgene Blog
- Use Site Directed Mutagenesis to Generate Specific Mutations in Your Plasmids
- Learn How You Can Use CRISPR Pooled Libraries to Generate Mutant Populations
- Use REPLACER Mutagenesis to Mutate Your Plasmids
Resources on Addgene.org
- Find Plasmids from the Whitehead Lab
- Use CRISPR Pooled Libraries to Generate Mutants

Topics: Molecular Biology Protocols and Tips, Other Plasmid Tools, Plasmids


Leave a Comment