We all know that in the lab there are often little tricks that are essential for experiments but that nobody talks about. After months of troubleshooting, those people who did not tell you that essential thing ask incredulously, “You seriously didn’t add 3 microliters of 5 mM star anise?” This is something I was expecting when I set out to make my first CRISPR/Cas9 gene edit. I wanted to inactivate the gene BRAF (a kinase implicated in several human cancers) in A549 cells (a human lung cancer cell line), armed only with viruses obtained through Addgene’s viral service and the methods sections of scientific articles (gasp). To my delight, not only was I able to make the edits without any reagent-grade endangered Martian chicory root, but considering this is a needle in a haystack type of objective, it was surprisingly easy. It’s true, I CRISPRed. In this post, I’ll summarize the basic steps and analyses, and give what I think are the main tips for each step of performing and analyzing a gene edit using Addgene’s lentiviral CRISPR tools.
Cas9 delivery
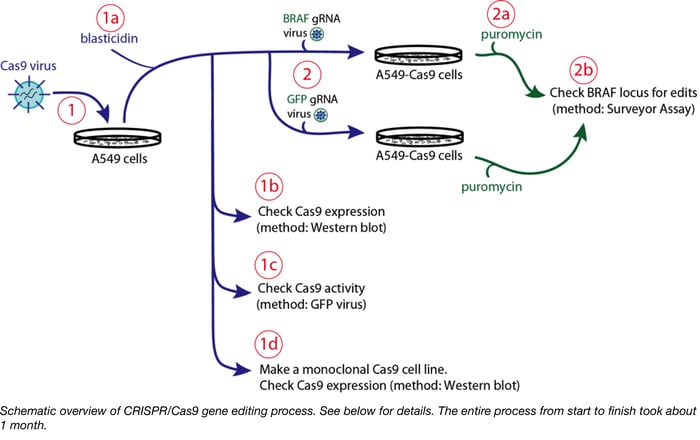
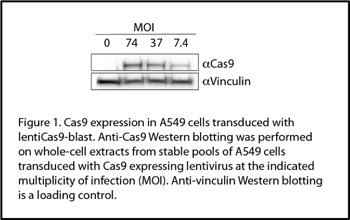 Overview: Before any editing can begin we need our A549 cells to express Cas9. In these particular experiments, we generated A549 cells stably expressing Cas9 via transduction with Cas9 lentiviral vector, lentiCas9-Blast (52962-LV, Figure 1). Some cells were then used to generate a monoclonal cell lines by limiting dilution. The rest of the cells were frozen down.
Pro-Tips:
 1. It’s all about the MOI. In retrospect I used a way too high Cas9 MOI considering that A549 cells are relatively easy to transduce. I ended up with too many Cas9 integrations per cell, and my stable cell pool had wildly variable Cas9 expression (Figure 1). This is a problem because Cas9 expression affects growth rate, so my cell pool is going to evolve over time, which is bad news for repeatability and bad news for a screen. Because Addgene viruses are provided at a specific titer, you can better plan your transductions and use a range of reasonable MOIs.
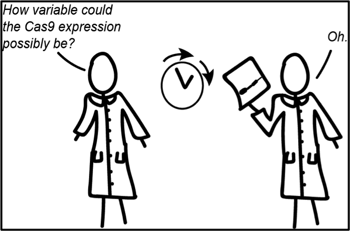
2. Create a monoclonal Cas9-expression cell line. Especially if you’re doing a screen. I made a few monoclonal lines (Figure 2) and I was surprised at how variable Cas9-expression was across the different cells (Figure 3).
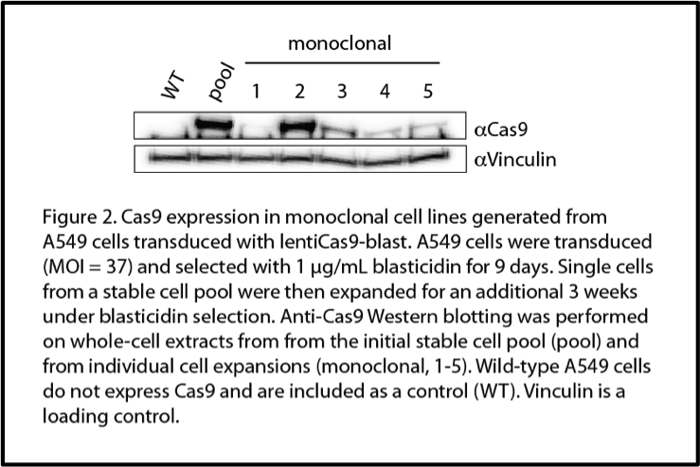
3. In terms of making the monoclonal line: I had never done it before and it worked the first time probably because I used a robust cell line. If your cells are sensitive, it might be more difficult to get them to grow out. The only downside is that it takes a few weeks for single cells to grow out. However, because the cells are growing so slowly, there isn’t much maintenance involved. Also it was really fun to find individual colonies growing out in the 96-well dish. My protocol with many additional tips can be found here.
Checking Cas9 expression
Overview: By Western blotting (Figure 2, pool), I knew the cells expressed Cas9, but I didn’t know what level of expression was the most efficient for gene editing. A virus encoding GFP plus a gRNA targeting GFP (pXPR_011, 59702-LV) was used to assay Cas9 activity in my stable A549 cell pools. Using this virus, it’s expected that Cas9 activity, guided by the virally-delivered GFP gRNA, will edit out the virally-delivered GFP gene. So, cells with no Cas9 should appear green and cells with functional Cas9 should appear less green. Note that there won’t be uniform editing across all the cells in the population, so some of the cells will still appear green despite having active Cas9 (see tip 2).
Pro-Tips
 1. To quantify Cas9 activity using this assay, you really need to use FACS (like they did in the original publication). I thought I could see GFP expression with a fluorescence microscope, but the GFP expression was so low (even in the transduced wild-type A549 cells that lack Cas9 and thus should have expressed GFP) that I couldn’t get a good image. You could probably also do Western blotting against GFP expression, but I didn’t.
2. In the original publication they see GFP expression in about 20% of their Cas9-expressing cells. So, even when Cas9 is efficiently editing, don’t expect a 100% knockout population.
BRAF gRNA delivery
Overview: In practice you would select the Cas9 line that’s “most efficient at editing” to introduce the gRNA, but I just randomly chose one of my stable pools. Viruses containing BRAF gRNA (BRDN0000561167 and BRDN0001146266) ( 76479-LV and 76480-LV) or control GFP gRNA (BRDN0000561167) (80034-LV) were individually used to transduced stable pools of Cas9-A549 cells at an MOI of 0.3, as recommended by the original publication.
Pro-Tip:
 1. Use multiple gRNAs to target different regions of your gene. I used existing BRAF gRNA viruses, but you can find a list of validated gRNA plasmids on our website. There are a few reasons to target different regions of the gene with multiple gRNAs, but the most important is that you could avoid potential off target artifacts by comparing the phenotypes of multiple gRNAs. Targeting different regions of the gene is also useful in case the gene has a weird mutation that you didn’t know about (which could affect the ability of the gRNA to bind).
Verifying genomic edits with the surveyor assay
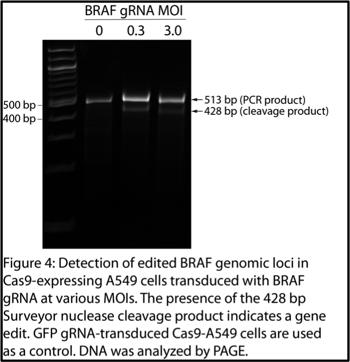 Overview: I used the Surveyor assay to look for genomic edits at the BRAF sites targeted by my specific gRNAs (Figure 4). The most difficult part of the assay was designing primers flanking my edits in genomic DNA and doing PCR on genomic DNA. The surveyor assay itself was relatively easy.
The basis of the Surveyor assay is that Surveyor nuclease cleaves double stranded DNA (dsDNA) at basepair mismatches. To use this tool to detect a BRAF gene edit, simply PCR-amplify the BRAF locus from the edited cells (the PCR product should contain the edited BRAF sequence), and PCR-amplify the BRAF locus from control cells (the PCR product should contain the wild-type BRAF sequence). Then, mix the PCR products and use temperature to denature and renature the dsDNA. Upon renaturation, you will generate DNA duplexes with one strand from the edited cells and one strand from the control cells, which should contain basepair mismatches at the site of the edit. Using Surveyor nuclease followed by gel electrophoresis, these mismatches are indicated by the presence of DNA cleavage products.
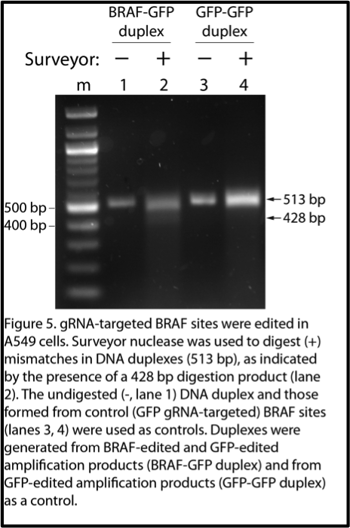
The appearance of the 428 bp band indicates edits in the BRAF gene in the BRAF-gRNA transduced cells, and no such edits in the cells transduced by the control GFP-gRNA (Figure 4, 5). When the gel was overexposed, I could even also see the 85 bp product at the bottom of the gel in the BRAF gRNA-transduced samples (data not shown).
Pro-Tips:
 1.Designing primers against genomic DNA to amplify the gRNA targets was challenging because you’re limited by the sequence of the human genome. I used the UCSC genome browser and Primer3 to design primers that amplified a 500-600 bp product. The primers I designed (listed above) worked well and I got clear bands using the conditions above.
 2. Design your primers so that the digestion site isn’t in the middle of the PCR product. If the mismatch is in the middle of the PCR product, you would expect two equally sized digestion products (that would co-migrate on a gel) instead of two different sized digestion products (which could be easier to visualize and identify). If you need/want to put the digestion site in the middle of the PCR product, you would still be able to identify the cleavage product.
3. The Surveyor kit had a lot of good tips for first time users, all of which I followed. If you have never used this assay before, consider following their tips, including:
- Before digesting the DNA duplexes with Surveyor nuclease, save some of the duplex and run it as an undigested control. Sometimes the PCR products can look smeared, so having an undigested control can help distinguish between a smear and a faint digestion product. Also, depending on the extent of gene editing in your cells and the efficiency of the surveyor digestion reaction, the digested product may be limited and faint, so it’s useful to have as many controls as possible to confirm your results. (Figure 5). The digestion product (Figure 4, lanes 0.3 % 3.0, Figure 5, lane 2) is faint, so comparing it to the undigested control (Figure 4, lane 0, Figure 5, lane 1) is what confirms it’s a real digestion product and not another PCR product.
4. After optimizing the reaction and confirming the presence of the band, you could run another gel that highlights the important results (for example, if you needed to make a figure with the data). Using acrylamide instead of agarose gives much sharper bands. I compared two MOIs of gRNA transduction to see if that had any effect on the editing efficiency, and it did not (Figure 4).
5. In theory you could use densitometric analysis to quantitate the intensity of the bands on your gel and get an idea of the percentage of cells in the population that have an edit. I didn’t do this, but to do it you would need a pretty good gel image. If you are analyzing short DNA fragments, run PAGE instead of agarose to get sharper bands.

Conclusion
Overall, making a human cell line with a gene knockout was straightforward, and is a testament to how far genome engineering has come. For comparison, in 2007 it took about 3 months to knockout a single allele in a human line, using methods based on homologous recombination (Rago et al., 2007). Using CRISPR, I was able to knockout BRAF in a human cancer cell line in about 1 month, which I’d say is pretty amazing. Despite the shifting landscape of research opportunities, it’s an exciting time to be in the lab. Based on the power of available techniques and how quick and easy it is to share information and regents, it’s exciting to think that no matter who you are, you could quickly be on your way to making new scientific observations.
References
1. Rago C, Vogelstein B, Bunz F. Genetic knockouts and knockins in human somatic cells. Nature Protocols 2007; 2(11): 2734-46. PubMed PMID: 18007609.
Addgene Materials Used
1. lentiCas9-Blast (Plasmid #52962) was a gift from Feng Zhang and is described in Improved vectors and genome-wide libraries for CRISPR screening. Sanjana NE, Shalem O, Zhang F. Nat Methods. 2014 Aug;11(8):783-4. doi: 10.1038/nmeth.3047. 10.1038/nmeth.3047. PubMed PMID: 25075903. PubMed Central PMCID: PMC4486245.
2. pXPR_011 (Plasmid #59702) was a gift from John Doench & David Root and is described in Rational design of highly active sgRNAs for CRISPR-Cas9-mediated gene inactivation. Doench JG, Hartenian E, Graham DB, Tothova Z, Hegde M, Smith I, Sullender M, Ebert BL, Xavier RJ, Root DE. Nat Biotechnol. 2014 Sep 3. doi: 10.1038/nbt.3026. 10.1038/nbt.3026 PubMed PMID: 25184501. PubMed Central PMCID: PMC4262738.
3. EGFP gRNA (BRDN0000561167) (Plasmid #80034) and BRAF gRNAs (BRDN0001145345 and BRDN0001146266) (Plasmid #76479 and #76480) were gifts from John Doench & David Root and are described in Optimized sgRNA design to maximize activity and minimize off-target effects of CRISPR-Cas9. Doench JG, Fusi N, Sullender M, Hegde M, Vaimberg EW, Donovan KF, Smith I, Tothova Z, Wilen C, Orchard R, Virgin HW, Listgarten J, Root DE. Nat Biotechnol. 2016 Jan 18. doi: 10.1038/nbt.3437. PubMed PMID: 26780180. PubMed Central PMCID: PMC4744125.
Additional Resources on the Addgene Blog
- Genome-wide Screening Using CRISPR/Cas9
- Deliver Multiple gRNAs at Once - Multiplex Expression of gRNAs
- Generating Mouse Models Using CRISPR/Cas9
Resources at Addgene.org
- Generating Stable Cell Lines with Lentivirus
- Isolating a Monoclonal Cell Population by Limiting Dilution
- Lentivirus Production
Websites
- Primer3: for Designing Primers
- UCSC Genome Browser: For eploring genomic DNA
- ImageJ: Free Software for Analyzing Gels
Topics: CRISPR, CRISPR Protocols and Tips


Leave a Comment